Migrate from Vercel to Coherence
This guide shows you how to easily migrate your application from Vercel to Coherence.
By running your app in your own cloud account on Amazon Web Services (AWS) or Google Cloud Platform (GCP), you get the compliance, cost, and customization benefits that only the large public cloud providers can offer. Read more about Coherence vs. platform-as-a-service (PaaS) provider hosting here.
Coherence offers the features you love on Vercel, like built-in CI/CD and preview environments, while also delivering a great developer experience with a user-friendly developer portal and CLI. When you use Coherence, you don't need to be a DevOps expert to manage a world-class deployment platform - leave that part to us. Additionally, you can use your cloud credits with Coherence, making it the perfect choice for startups.
What You'll Learn
This guide will show you how to:
- Prepare an application deployed on Vercel for deployment on Coherence
- Deploy the application on Coherence
- Migrate the data from your Vercel database to Coherence
- Transfer your domain from Vercel to Coherence
Prerequisites
To follow along, you'll need:
- A Coherence account
- A GitHub account
- Administrator access to a Google Cloud Platform (GCP) or Amazon Web Services (AWS) account
- An app on Vercel that you want to migrate. If you don't have one, you can fork our example application.
1. Prepare your Vercel application for migration
Coherence gives you flexible options for building and deploying your application.
Option A: Use Nixpacks (recommended)
If you don't have a Dockerfile, Coherence will automatically use Nixpacks to build your container. This means you don't need to make any changes to your application structure.
Option B: Use an existing Dockerfile
If you've been using a Dockerfile with Vercel, Coherence will use that Dockerfile to deploy your application. No additional preparation is needed.
Option C: Write a Dockerfile (if necessary)
If your application doesn't have a Dockerfile and you prefer not to use Nixpacks, you'll need to write a Dockerfile for your application. Here's an example for a Next.js application:
FROM node:18
WORKDIR /app
COPY package*.json ./
RUN npm install --legacy-peer-deps
COPY . .
RUN npm run build
CMD ["npm", "start"]
Update database connection
You need to update your database connection to use a standard PostgreSQL client instead of Vercel-specific solutions. This ensures compatibility with various PostgreSQL providers and allows you to use the DATABASE_URL environment variable on Coherence.
For example, if you're using Vercel Postgres with the Neon serverless driver, you'll need to switch to node-postgres. Here's how you might update your database connection code:
import { Pool } from 'pg';
import { drizzle } from 'drizzle-orm/node-postgres';

const pool = new Pool({
  connectionString: process.env.DATABASE_URL,
});

export const db = drizzle(pool);
Remove Vercel-specific components
Remove any Vercel-specific imports, configurations, or services from your code. This may include:
- Vercel Analytics
- Vercel-specific environment variables
- Vercel deployment configurations
Update application settings
If your application uses frameworks like Next.js or Express, you may need to update settings to ensure compatibility with Coherence and proper handling of health checks.
For Next.js applications, you might need to update your next.config.js:
module.exports = {
  // ... other configurations
  poweredByHeader: false,
  generateEtags: false,
}
For Express applications, consider adding a health check endpoint:
app.get('/health', (req, res) => {
  res.status(200).send('OK');
});
2. Deploy your application on Coherence
Now that your code is prepared, let's set up your application on Coherence.
Create a new application
- In the Coherence dashboard, click New application
- Give the application a name
- Select Google Cloud as the provider and Cloud Run as the architecture
- Click Continue
Create a collection
- On the application's landing page, click Create collection
- Give the collection a name
- Click Create Collection
Configure an environment
- In the collection, click New Environment
- Give the environment a name
- Select the appropriate environment type (Staging is recommended for initial testing)
- Click Create
Add Coherence services
Create a backend service
- Click the environment name to enter the environment homepage
- Go to the Services tab
- Click New service and select the framework for your project under Container
- Configure the service:
- Name: Give the service a name (e.g., "backend")
- Start Command:
npm run start(or your specific start command) - Enter "/" under URL path
- Container source: Choose Repository
- Click Add one under Repo
- Paste in the link to your GitHub code repository
- Enter "/" under Context
- If you're using a Dockerfile, enter "Dockerfile" under Dockerfile. Otherwise, leave it blank to use Nixpacks
- Select your track branch (e.g.,
main) - Click Create service
After creating the service, add the necessary environment variables in the Variables tab. You can bulk import variables using the Coherence UI. The Coherence CLI offers environment variable management capability for scripting.
Create a database service
- In the Services tab, click New service and select Postgres
- Configure the database:
- Name: Give the service a name (e.g., "products")
- Engine: Enter "postgres"
- Version: Choose the appropriate version
- Click Create service
Connect to your cloud provider
Follow the steps in our Google Cloud guide or AWS guide to connect Coherence to your cloud account.
Start a provisioning task
- Select the Provision Taks tab for the collection
- Click Submit new task to submit a provisioning task
Wait for this step to complete before moving on. It should take several minutes to complete.
Start a build and deploy pipeline
- Go to the Deployments tab for the environment
- Click New deployment
- Select the branch and commit to submit from
- Click Submit deployment to submit the pipeline
View your deployed application
Once the build is complete:
- In your Coherence dashboard, navigate to your environment
- Look for the Domains section and find the provided URL
- Click the URL to open your deployed application in a new browser tab
3. Migrate the data
This is a crucial step in the migration process. Don't hesitate to contact the Coherence team if you need assistance.
Export data from Vercel
- In your Vercel dashboard, go to the Storage tab and enter your project database
- Copy the
psqldatabase connection string provided in the UI - Use
pg_dumpto export your data:
pg_dump "your-vercel-connection-string" > vercel_db_dump.sql
Choose a migration method
You can migrate data to Coherence in two ways:
- Using the Coherence CLI (
cocli) - Migrating directly to your cloud database
Set up a CNC toolbox
Set up a CNC toolbox to interact with your Coherence environment from your local machine:
- Install
cocncby following the instructions in the CNC documentation - Install
cocliby following the instructions in the cocli GitHub repository - Install the Google Cloud CLI by following the instructions in the Google Cloud documentation
- Authenticate the Google Cloud CLI with these commands:
gcloud auth application-default login
gcloud auth login
Start a toolbox
First, set up authentication.
- In the Coherence dashboard, navigate to your profile
- Click Create token
- Give the token a name and select an expiration period
- Click Create token
- Copy the token value
- Run the following command on your local machine with your access token:
export COHERENCE_ACCESS_TOKEN="your-access-token-here"
Next, set your app ID and collection ID to variables.
In your terminal, add your app name and collection name to the command below:
app_id=$(cocli apps list | jq '.[] | select(.title=="Your App Name") | .id')

collection_id=$(cocli collections list -a $app_id | jq '.data[] | select(.name=="your-collection-name") | .id')
To start a toolbox, replace main with your environment name in the following command:
cocli cnc -c $collection_id -- toolbox start main --proxy-only
Keep the toolbox running while you migrate the data in a new terminal.
Migrate the data to the Coherence project
To import your data to your new Coherence-managed database:
- Open a new terminal in the folder containing
vercel_db_dump.sqlfile - Get the
psqldatabase connection string from Coherence by copying the value of theDATABASE_URLvariable found in the Variables tab on your environment homepage - Run the following command, replacing
<database-connection-string>with your database connection string andpath/to/vercel_db_dump.sqlwith the path to your migration file:
psql -d <database-connection-string> < path/to/vercel_db_dump.sql
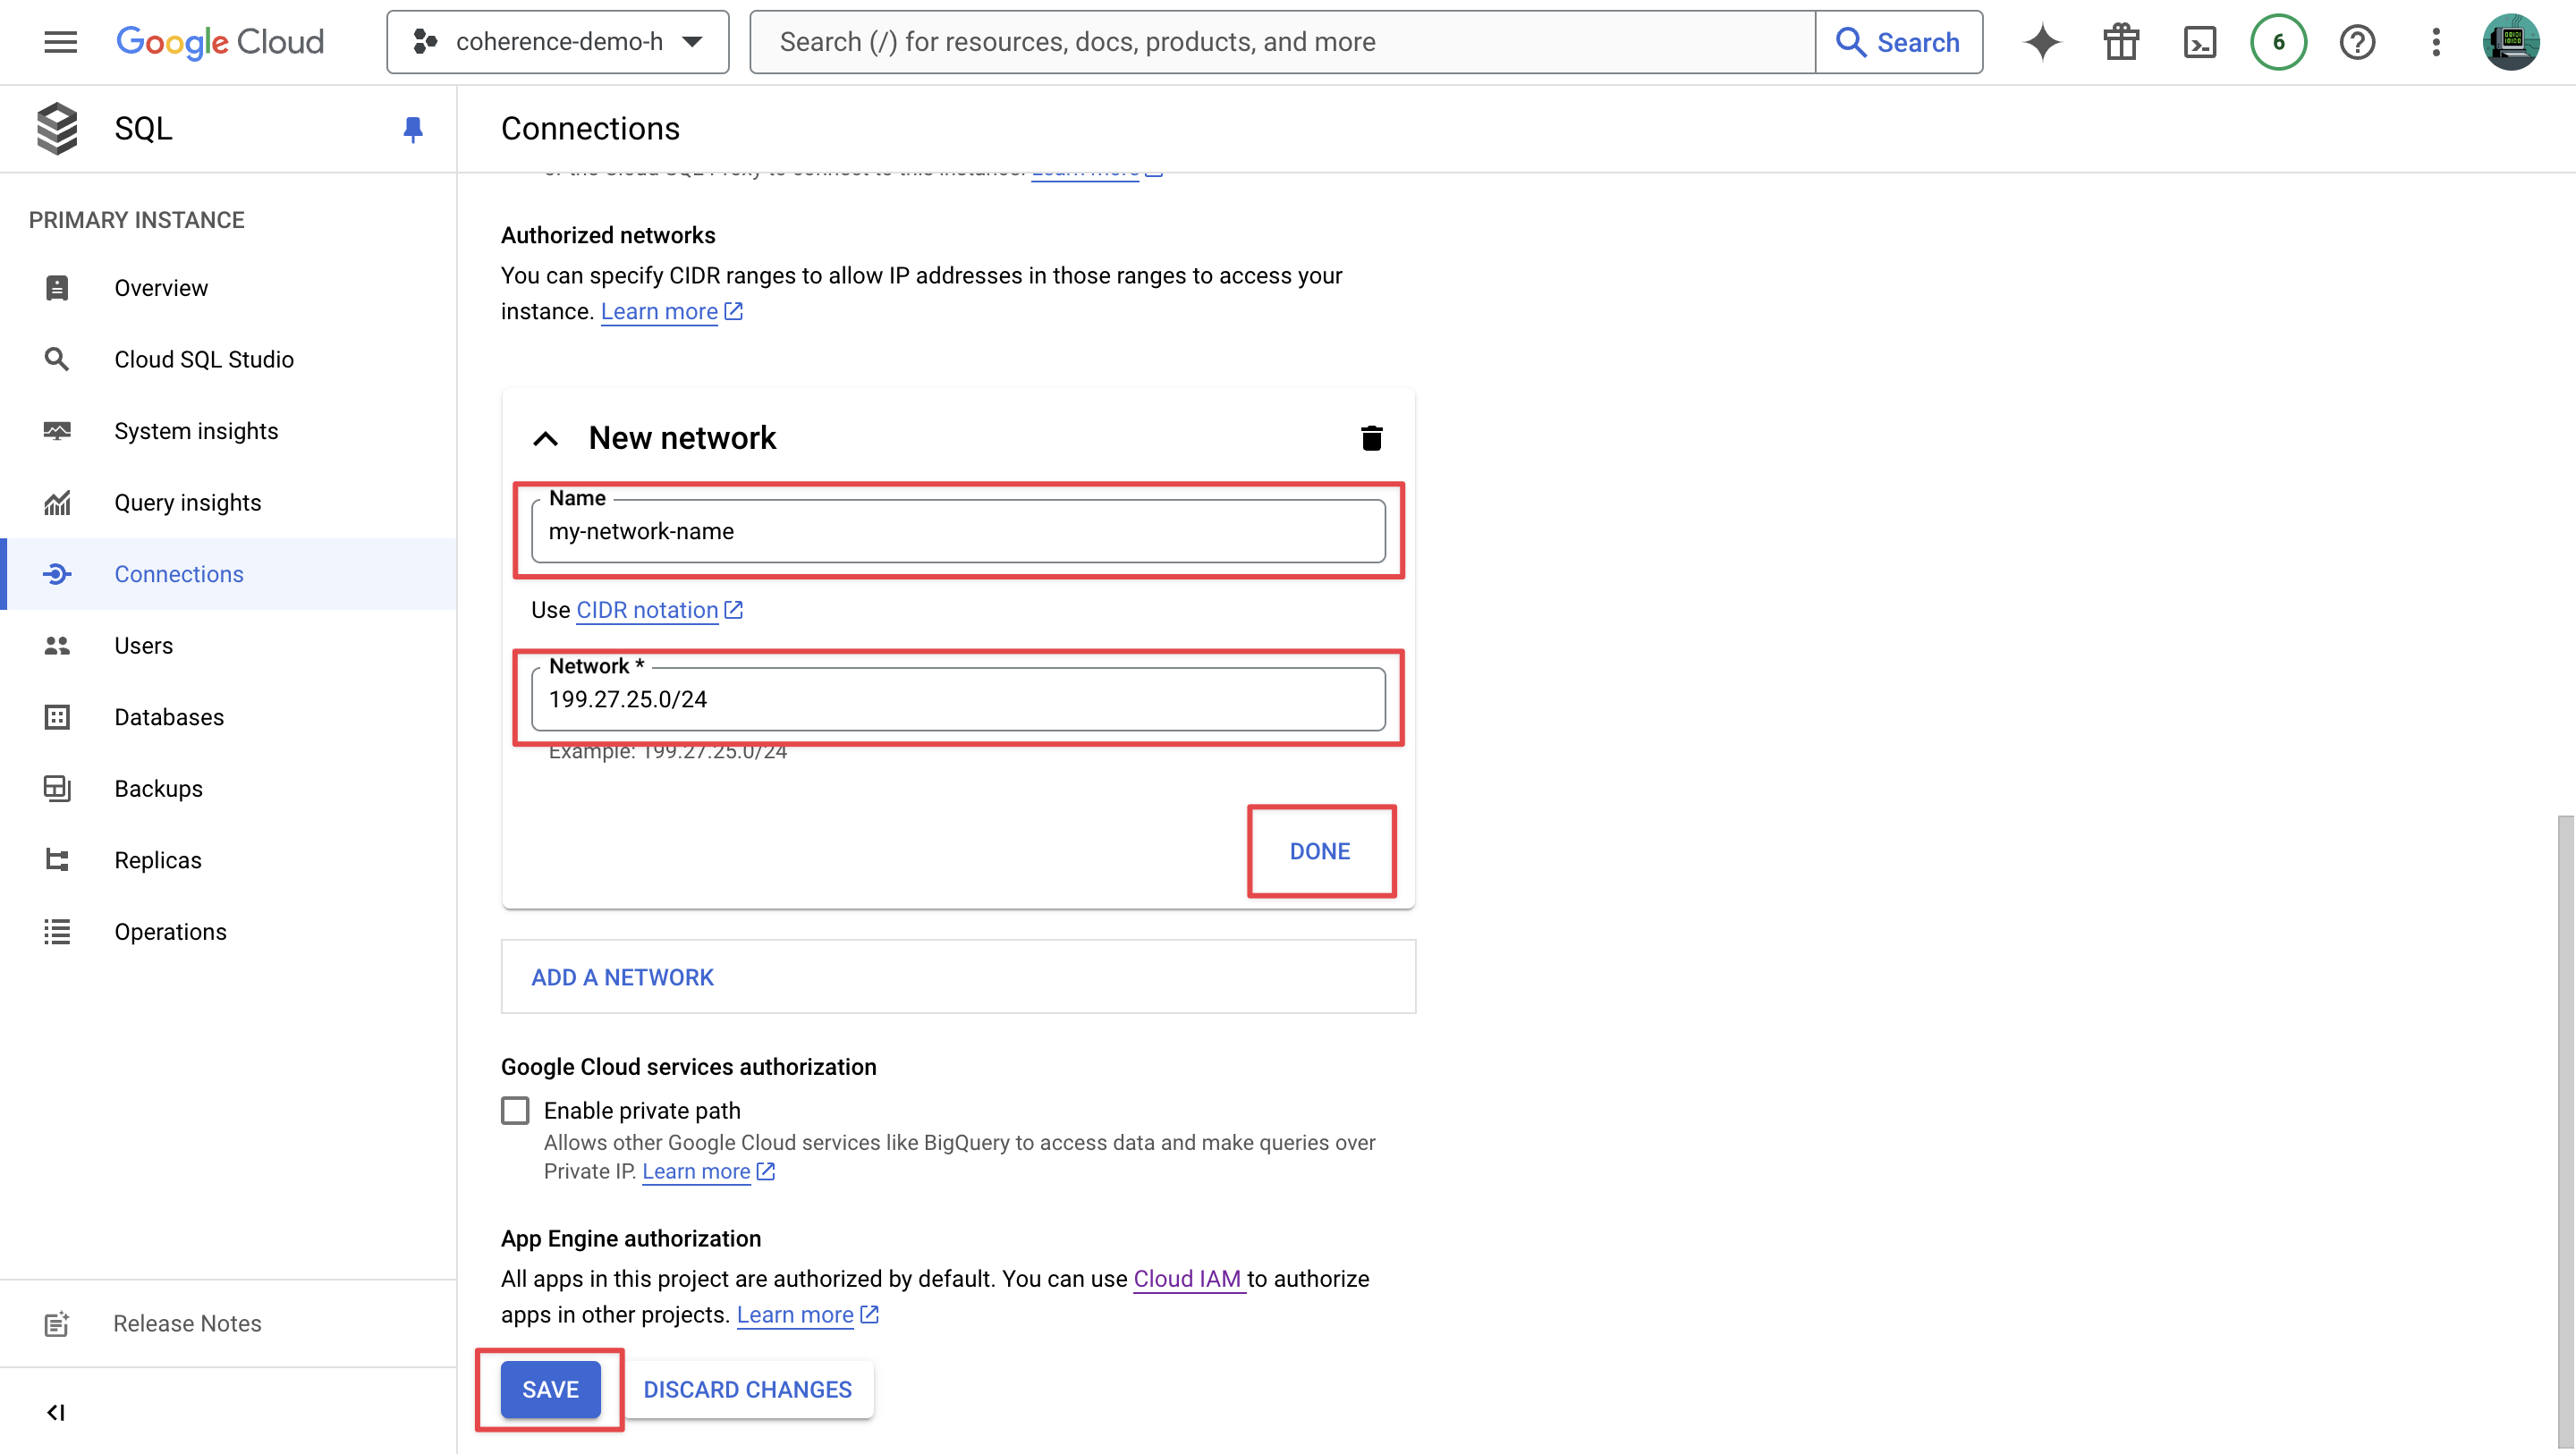
To migrate your data directly to GCP, first authorize your public IP.
- Get your public IP. Find your public IP here.
- Navigate to your GCP console
- Navigate to SQL in the left menu
- Navigate to Connections and open the Networking tab
- Scroll down to Authorized networks
- In New network, give your network a name and add your public IP address in the Network field
- Click Add network, then click Save at the bottom of the page
Connect to your Cloud SQL database on your local machine with the following command:
psql -d <database-connection-string> < path/to/vercel_db_dump.sql
Verify the data migration
Check your application to ensure your data has been successfully migrated.
4. Migrate the domain
The final step is to update your domain settings to point to your Coherence-hosted application.
Remove the domain from Vercel
- In your Vercel project settings, navigate to the Domains section
- Remove the custom domain from your Vercel project
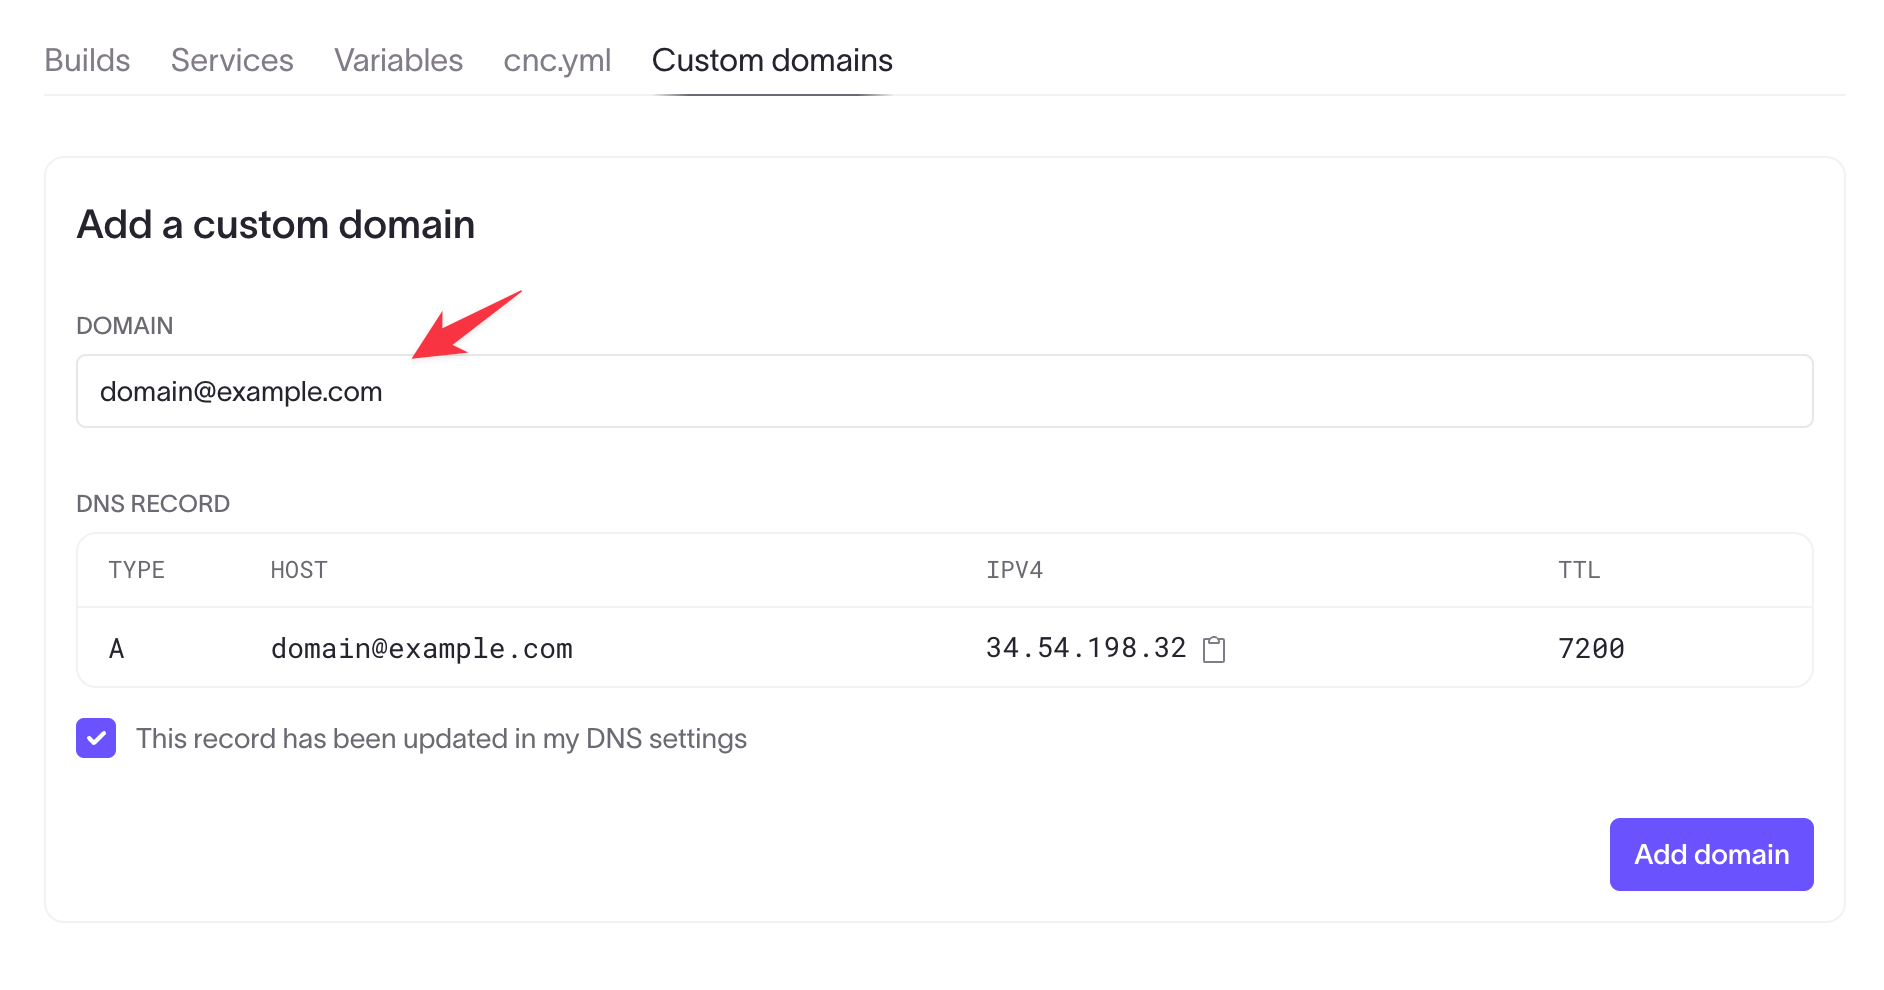
Change DNS settings for the domain
- Log in to your domain registrar's dashboard
- In the Coherence dashboard, navigate to your environment homepage and select the Custom domains tab
- Add your custom domain to the Domain field
- Copy the provided DNS record and add it to your domain registrar's settings
- Click Add domain to save the configuration
Wait for DNS propagation (up to 48 hours).
Once DNS propagation is complete, visit your domain to verify that your website is accessible and your migrated data is functioning correctly.
Conclusion
Congratulations! You've successfully migrated your application from Vercel to Coherence. Enjoy the benefits of running your application on your own cloud infrastructure while maintaining the ease of use you're accustomed to with PaaS providers.
If you encounter any issues or have questions during the migration process, don't hesitate to reach out to the Coherence support team. We're here to ensure your migration is smooth and successful.