Heroku (Coherence with Neon)
When migrating from Heroku to Coherence, you can use Neon as a database. Neon is a managed database service that is compatible with Heroku's Postgres. You can migrate your application from Heroku to Coherence and migrate your database from Heroku to Neon to use Neon as your database service.
Why Neon?
When using AWS or GCP, you may incur additional costs for managed databases. Neon is a cost-effective alternative that provides the same features as Heroku's Postgres and AWS RDS or GCP Cloud SQL. Neon is fully managed, so you don't have to worry about maintenance or backups. Neon also has a generous free tier, so you can get started without any additional costs.
For more information on Neon, see the Neon documentation.
Prerequisites
To follow along, you'll need:
- A Coherence account. Sign up here.
- A GitHub account.
- Administrator access to your Heroku account.
- Administrator access to your AWS or GCP account.
- An app on Heroku that you want to migrate. If you don't have one, you can fork our example application here. Make sure to fork the entire repository, including the
neon-dbbranch.
Prepare the Heroku application for migration
The example application we provide uses Heroku's container registry to deploy an Express application. This approach enables us to use the same Dockerfile to deploy the application on Coherence.
If your application uses Heroku's Procfile to specify the commands to run your application, you'll need to convert this into a Dockerfile that Coherence can use to build your application. For more information on how to write a Dockerfile, see the Dockerfile reference documentation.
The commands used in the Procfile to start your application will be needed when setting up your services in Coherence.
For example, if your Procfile contains the following command:
web: npm run start --PORT
In Coherence, you'll need to use npm run start --PORT as the startup command for your service.
Save your Procfile commands for use with Coherence
On the Deploy tab in Heroku, you'll find the command that Heroku uses to start your application. Save this command for use with Coherence.

Your command will look something like this:
web: npm run start
Edit your application to use Neon
If you're following along with your own application, you'll need to update your application to use Neon as the database.
In your application, update the connection string to use a NEON_DB_URL environment variable. Coherence will provide this environment variable when you deploy the application.
DATABASE_URL = os.environ.get('NEON_DB_URL')
Deploy the application on Coherence
Now that your code is prepared, set up Coherence by creating an application, setting up a collection and environment, and configuring services.
Create a new application
To create a new application, navigate to the Coherence dashboard and click on the New application button. Fill in the application name. Choose Google Cloud as the provider and Cloud Run as the architecture and click Continue.
Create a collection
Collections are a way to group your environments. You can create a new collection by clicking the Create collection button on the homepage of your application. Give your collection a name and click Create collection.
Add an environment
Create an environment from the collection home screen by clicking the New environment button. Add your environment name, choose the environment type, and click Create.
Add Coherence services to the environment
In Coherence, services are loosely equivalent to web dynos in Heroku.
Add services from the environment details Services tab, and Coherence will automatically generate the required cnc.yml configuration file for them. Coherence uses the cnc.yml file to deploy the application.
Create a backend service
To set up the backend service for the application:
- In your environment, navigate to the Services tab.
- Click the New service button.
- Select the framework for your project under Container. In the example repo we are using Next.js.
- Configure the service:
- Name:
backend - Start Command:
npm run start(or the command from your Procfile) - Enter "/" under URL path
- Container source: choose Repository.
- Click Add one under Repo.
- Paste in the link to your GitHub code repository.
- Enter "/" under Context.
- Enter "Dockerfile" under Dockerfile.
- Select your track branch. If you're using the example repo, select
neon-db.
- Name:
- Click Create service.
Create a Neon database
Next, we'll create a Neon database for your application:
- Go to the Neon dashboard.
- Create a new project for your application.
- Within the project, click Create database.
- Give your database the same name as your Heroku database. If you're using the example repo, the database name is
employees. - Create a user for your database.
- Click Create database.

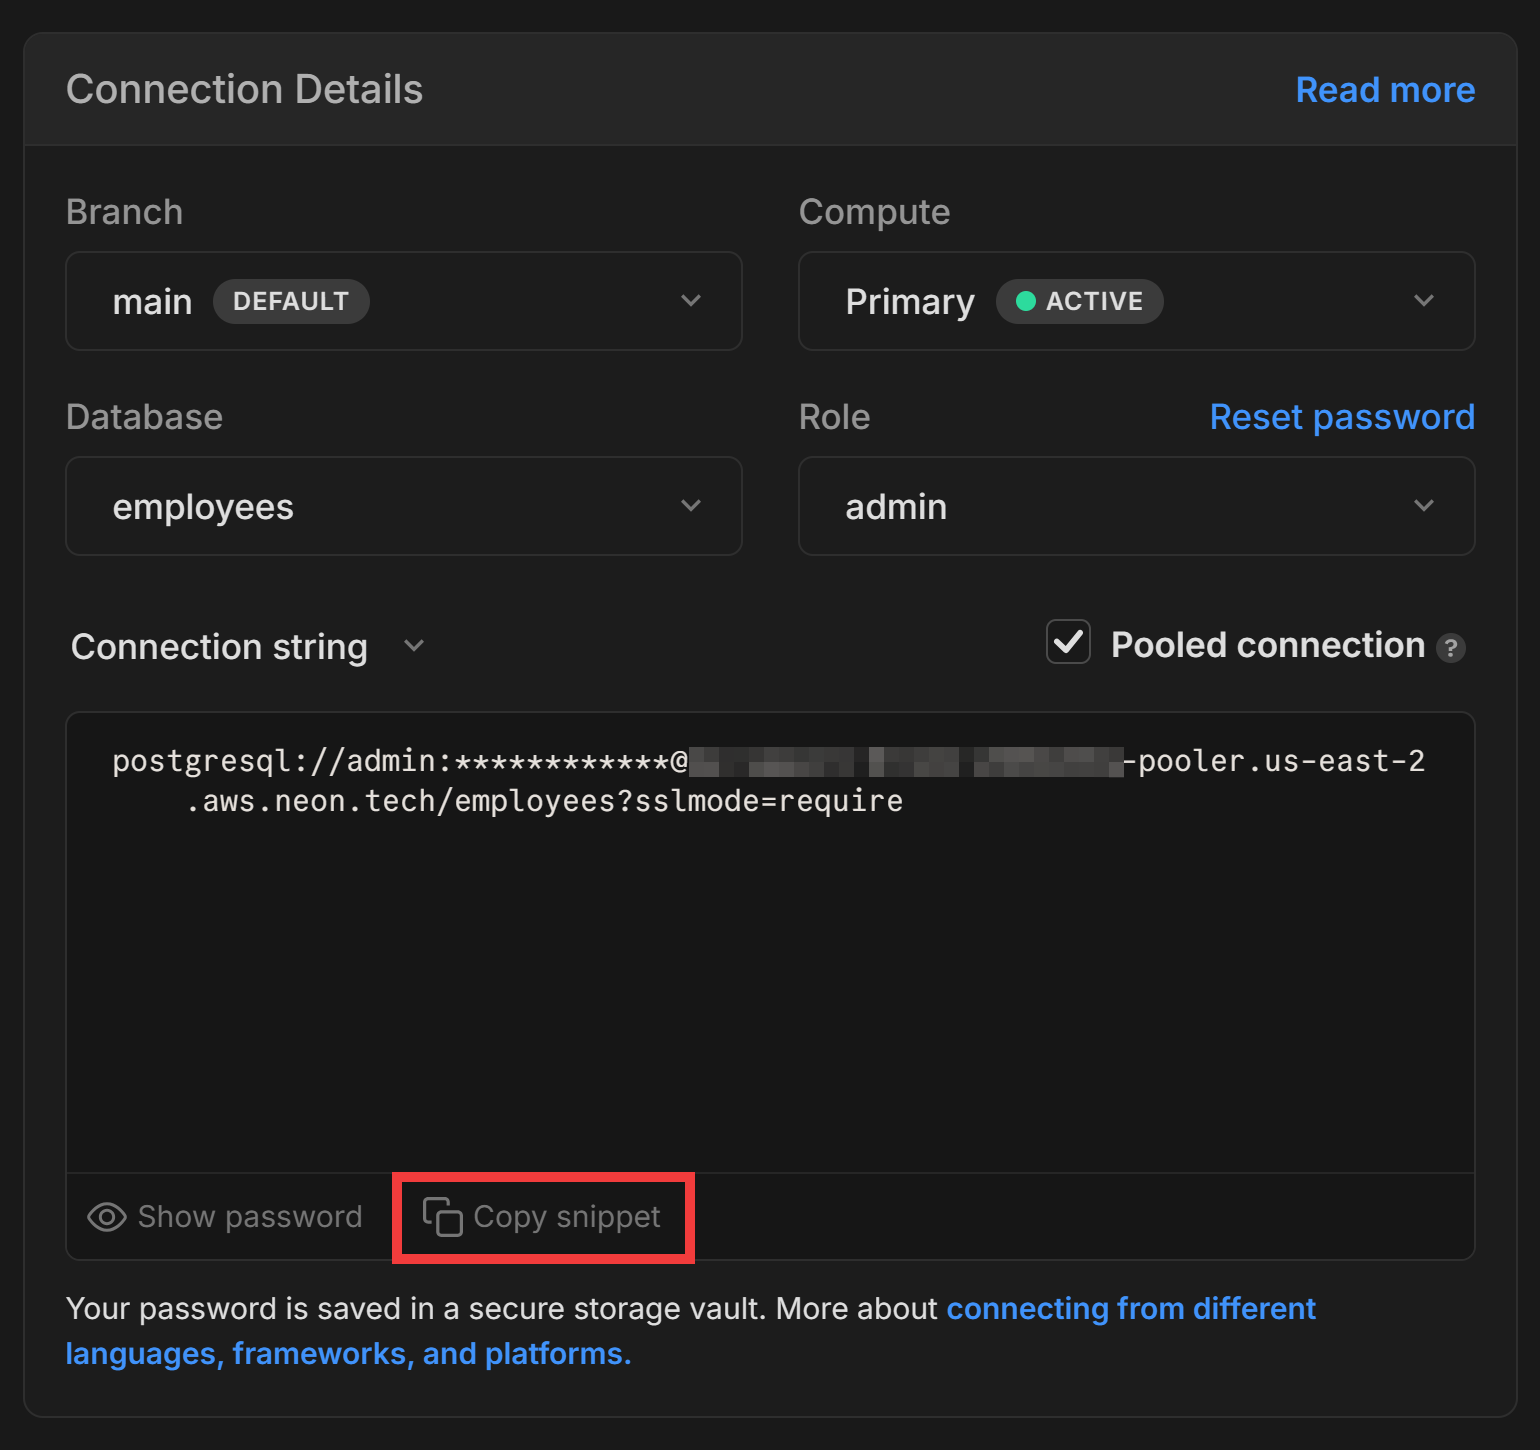
Save the connection string for your database. You'll need this to connect your application to the database.
Add your database connection string
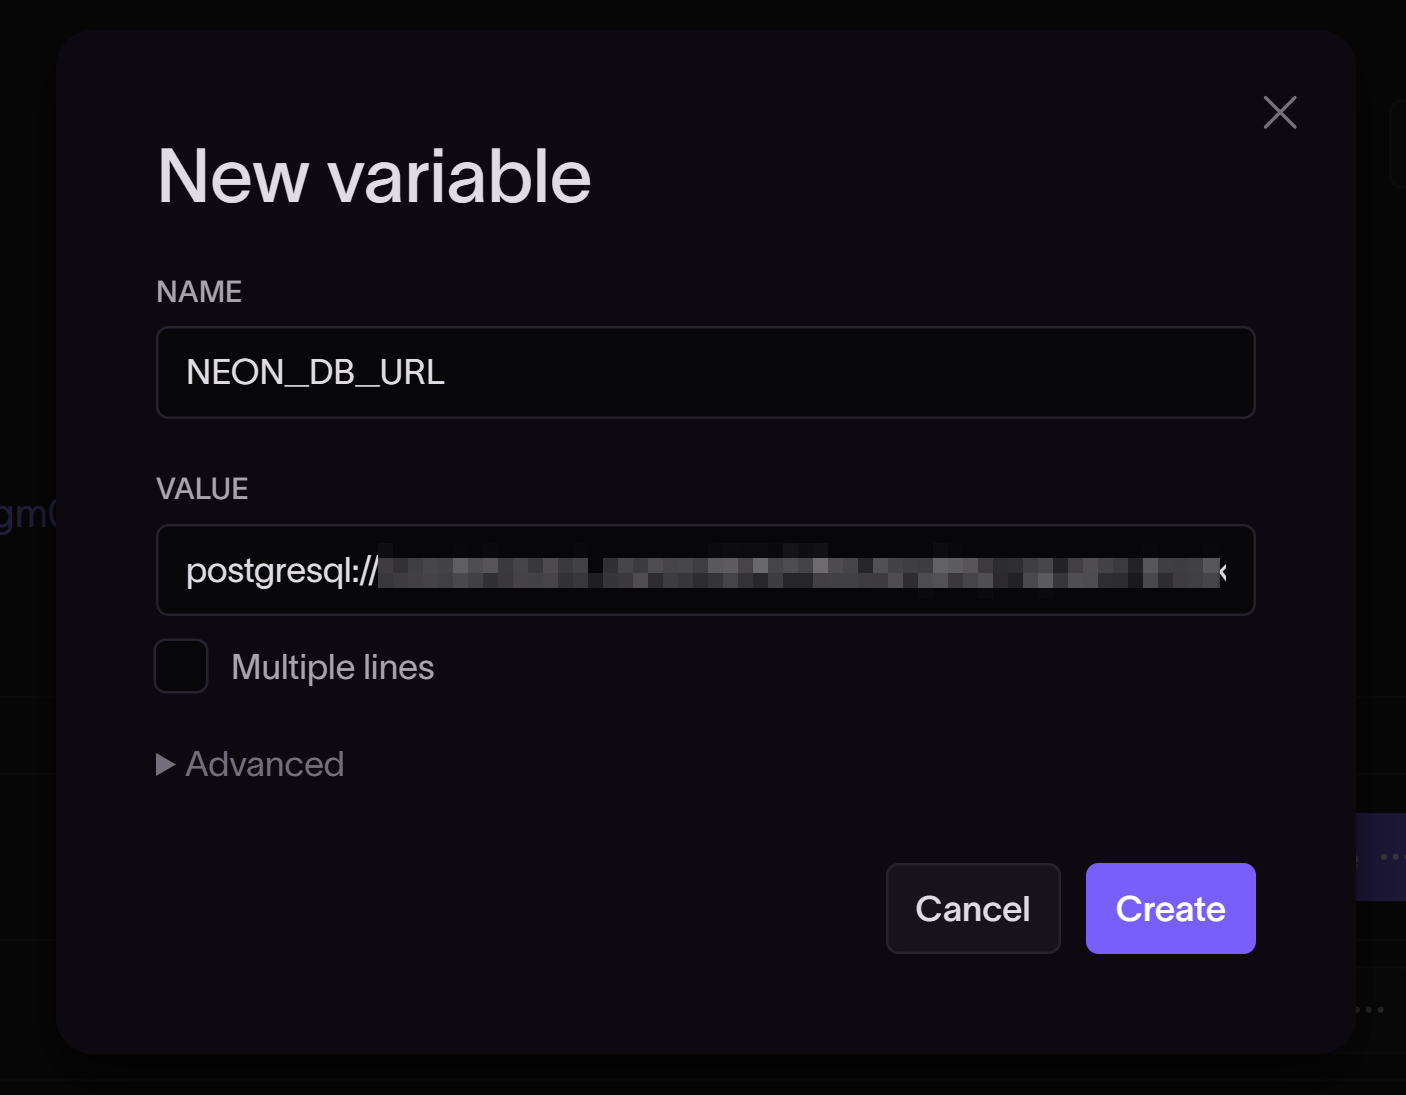
To add your database connection string, navigate to the Variables tab in your environment. Add a new variable with the key NEON_DB_URL and the value of your Neon database connection string.

Connect to your cloud provider
To connect your Coherence application to Google Cloud, follow the steps in our Google Cloud guide.
To connect your Coherence application to AWS, follow the steps in our AWS guide.
Start a provisioning task
Once Coherence has been granted access to your cloud account, submit a provisioning task so that Coherence can automatically set up and manage the necessary cloud resources for the collection.
- Select the Builds tab for the environment.
- Click the Submit button to submit a provisioning task.
- Click the Submit new task button.
Coherence will automatically provision infrastructure for the project based on your service requirements.
Wait for this step to complete before moving on. It could take several minutes.
Start a build task
Finally, to build and deploy the application:
- Go to the Builds tab in the environment.
- Click New build and select the branch and commit to build from. We're using
main. - Click Submit build to start the build process.
Migrate production configurations, including any data and DNS settings
This is the most complex and important part of the migration. Please get in touch with the Coherence team if you've got any questions - we're happy to help!
With your application deployed, the next step is to migrate your data from Heroku to your new Coherence-managed database. The following steps export data from Heroku and import it into the new database.
Get the data from Heroku
First, we need to export the data from Heroku:
- In your Heroku dashboard, go to the Settings tab.
-
Go to the Config Vars section and copy the
DATABASE_URLvalue.
-
On your local machine, install PostgreSQL.
- Use
pg_dumpto export your data:
pg_dump "YOUR-HEROKU-CONNECTION-STRING" > heroku_db_dump.sql
Import your data into Neon using pg_restore
Using the pg_restore command, you can import the data into Neon:
pg_restore -v -d <neon_database_connection_string> <dump_file_name>
Find your database connection string on the Neon dashboard.
For more information on importing data into Neon, see the Neon documentation.
Verify the data migration
Check the Neon dashboard to verify that the data has been imported successfully.
View the deployed application
When the migration is complete, you can view the deployed application to verify that everything is working as expected.
- In your Coherence dashboard, navigate to the environment.
- Click on the provided URL to open the deployed application in a new browser tab.
Migrate the domain
The final step in the migration process is to update your domain settings to point to the new Coherence-hosted application.
Remove the domain from Heroku
First, remove the domain from your Heroku project:
- In your Heroku project settings, navigate to the Domains section.
- Remove the custom domain from your Heroku project.
Change DNS settings for the domain
Next, update your DNS settings to point to Coherence:
- Log in to your domain registrar's dashboard.
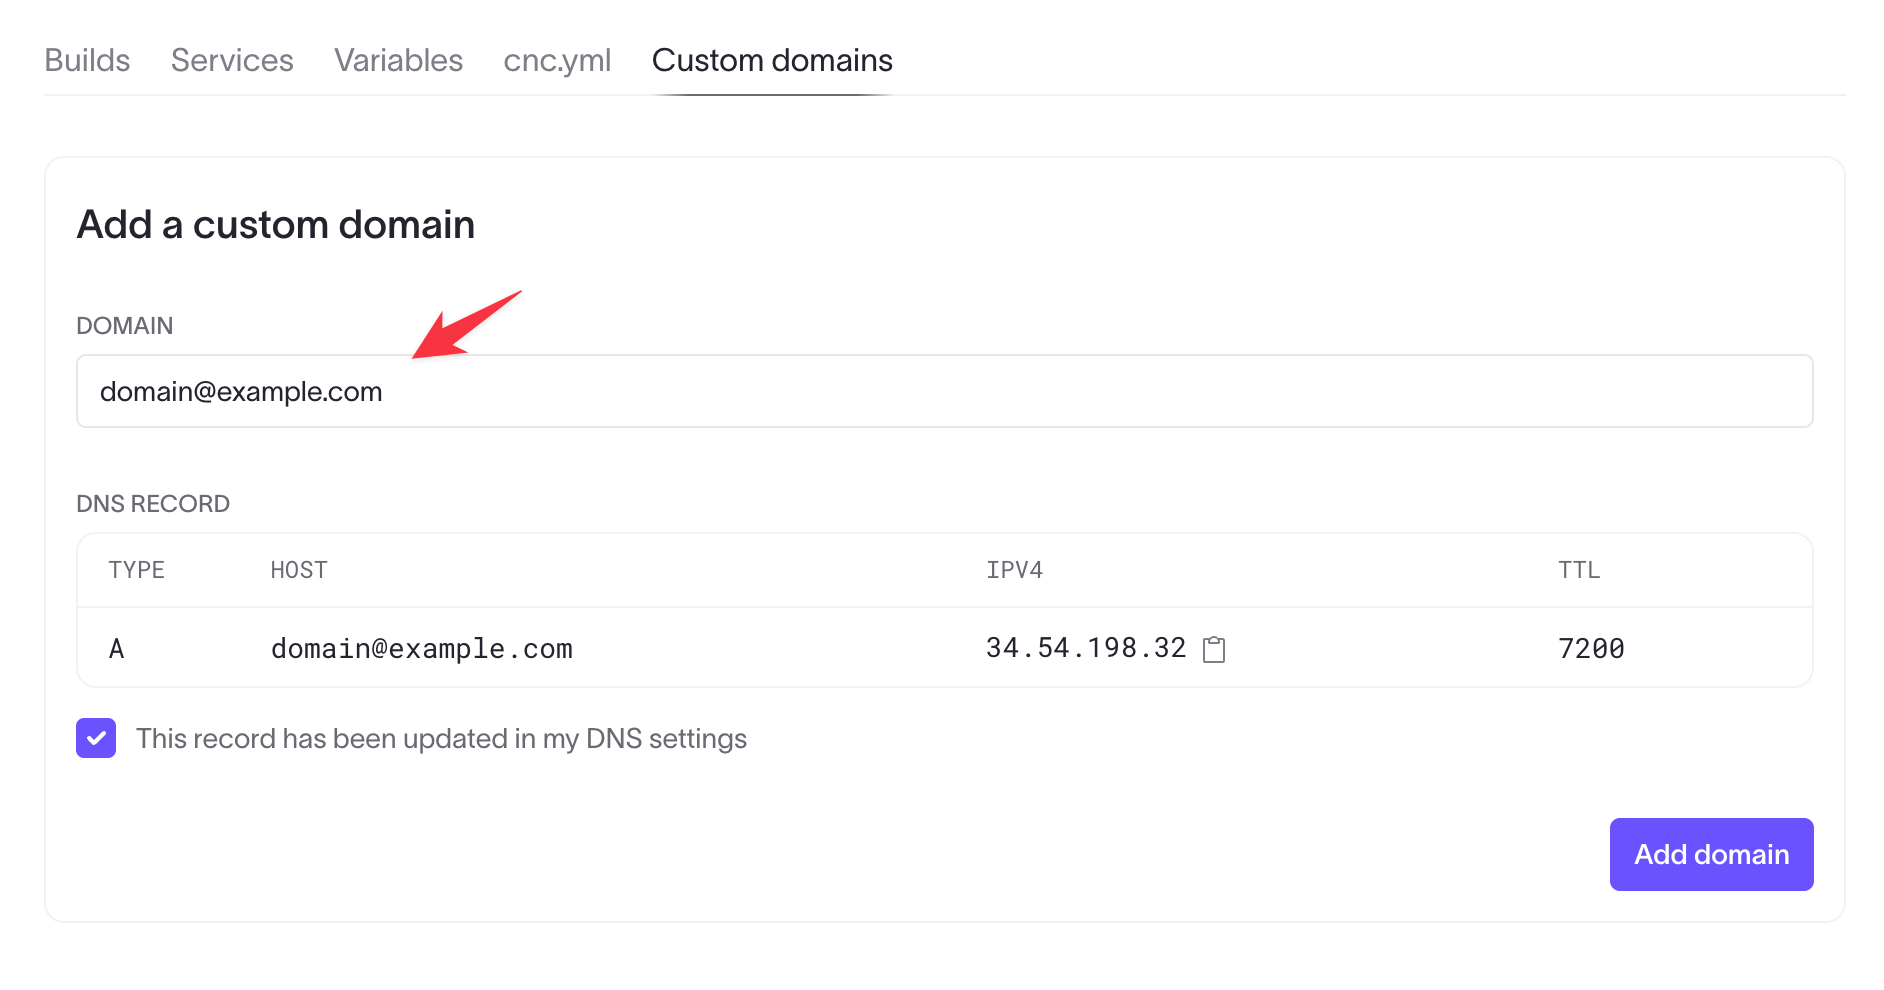
- In the environment in Coherence, under the Custom domains tab, add your custom domain to the Domain field.
- Copy the DNS Record provided and add it to your domain registrar's domain settings dashboard.
- Click Add domain to save the configuration.

Wait for DNS propagation (up to 48 hours).
Once DNS propagation is complete, visit your domain to verify that your website is accessible and functioning correctly with the migrated data.