Framework Examples
We provide templated applications in popular frameworks running on the various reference architectures available on Coherence. Use one of these templates as a starting point for your own application or as a reference for deploying an existing application on Coherence.
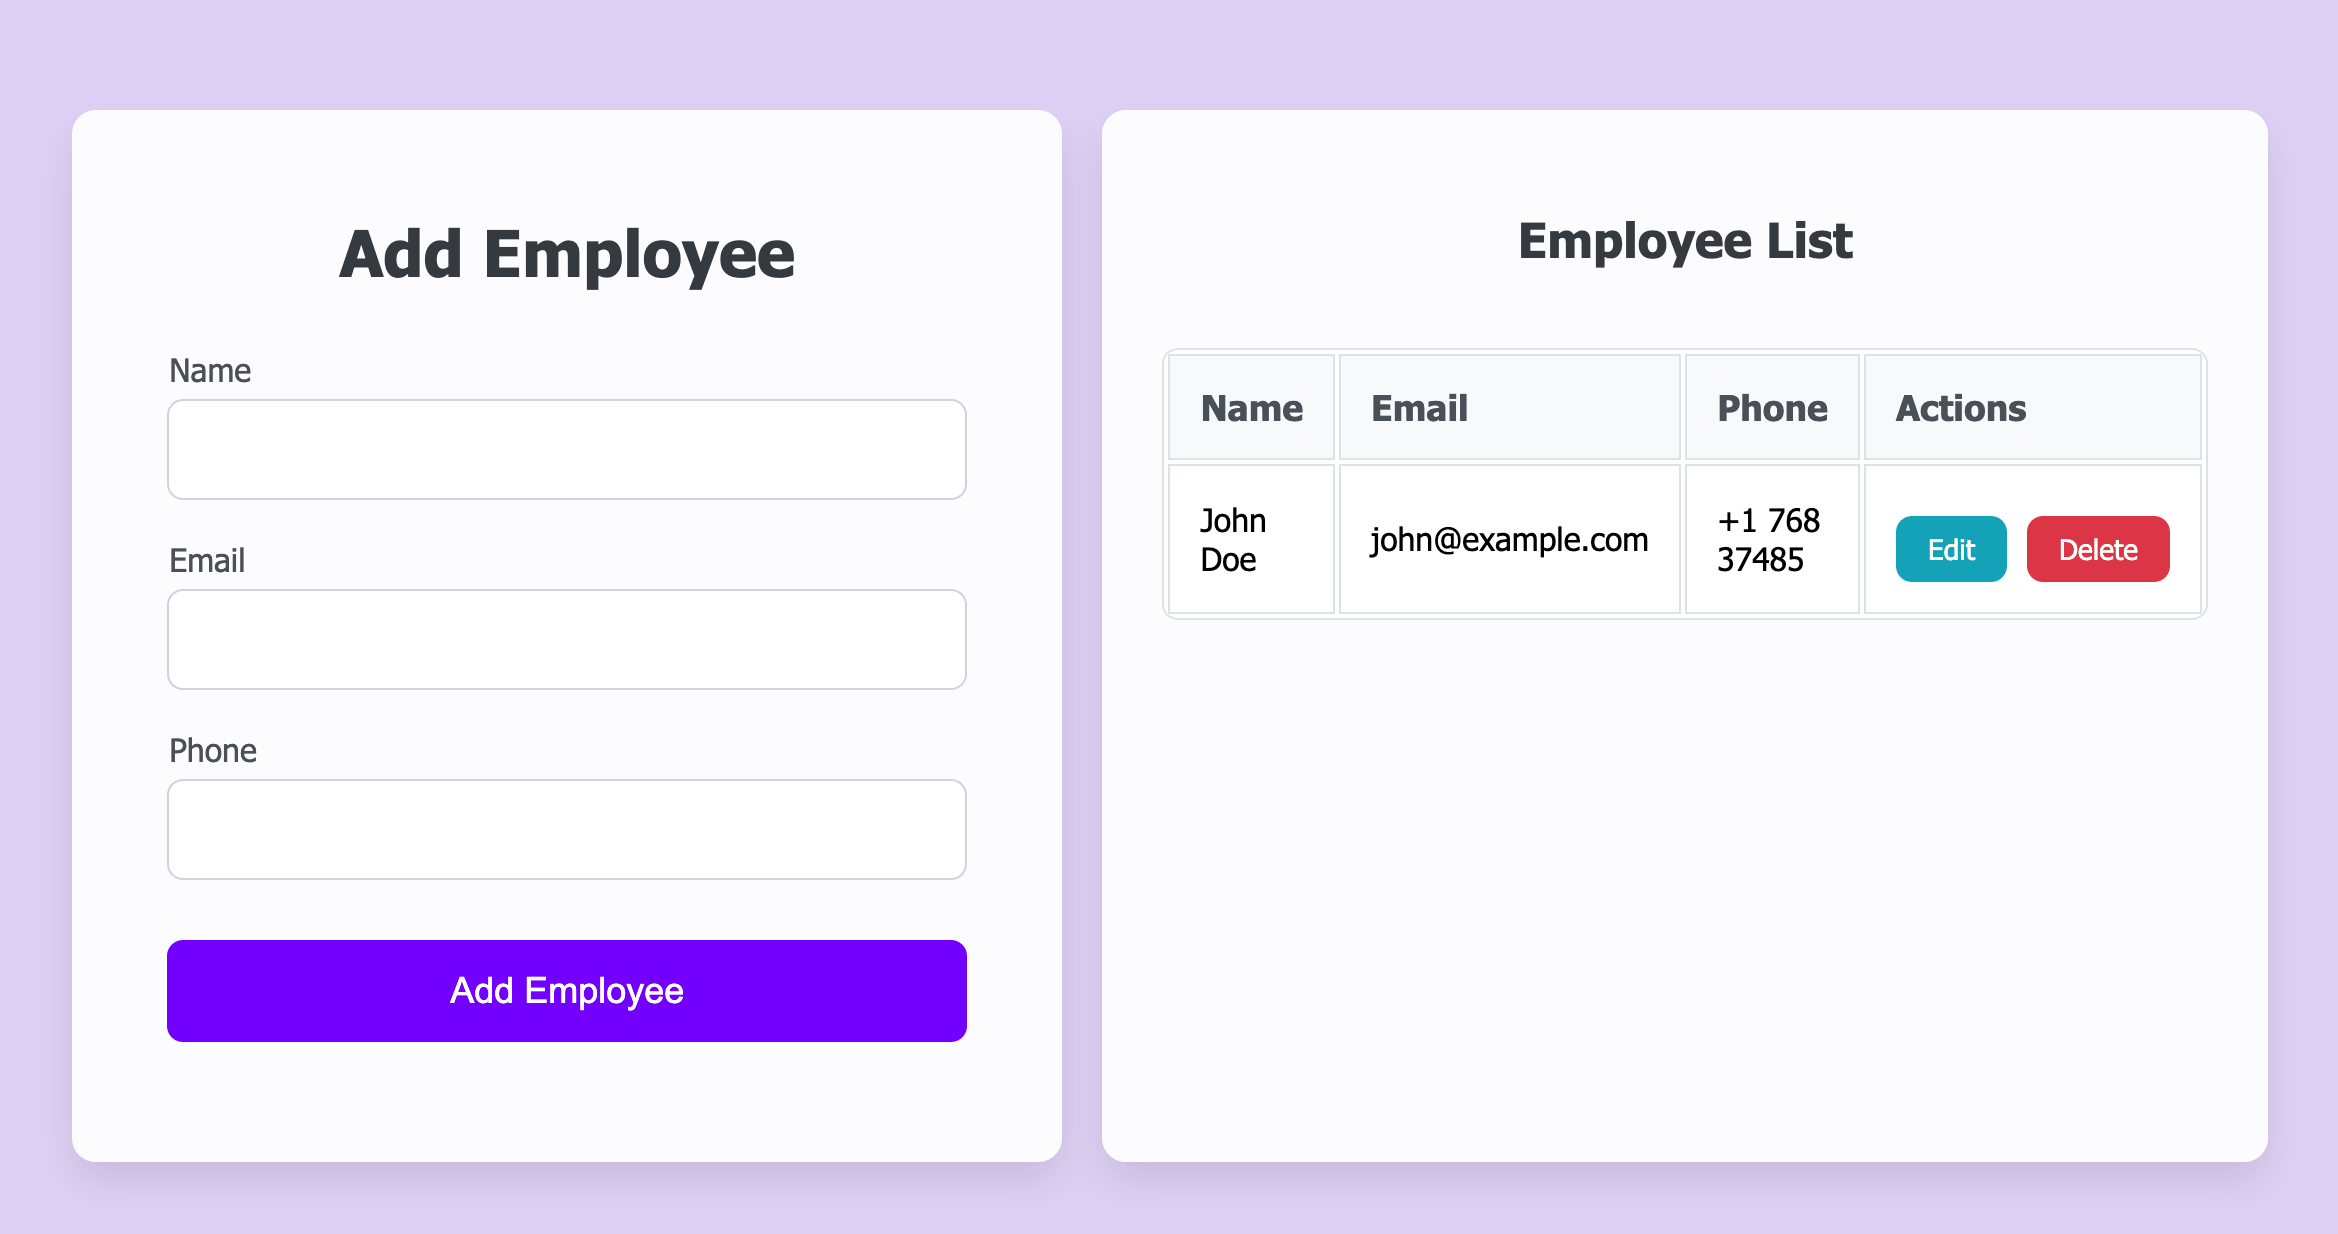
For each stack and reference architecture, we'll show you how to deploy an example employee-management application: A basic full-stack application with CRUD functionality.
To deploy the application to your cloud environment, choose your stack and reference architecture and follow the steps below. You'll be able to edit or extend the app by pushing changes to your GitHub repository.
Prerequisites
To follow along, you'll need
- A Coherence account.
- An account on Google Cloud Platform (GCP) or Amazon Web Services (AWS).
- A GitHub account.
Overview
This guide will take you through the following steps:
- Forking the example application to your GitHub account.
- Creating an application on Coherence.
- Creating a collection on Coherence.
- Creating an environment on Coherence.
- Adding Coherence services for the backend and database.
- Connecting your cloud account.
- Provisioning your infrastructure.
- Building and deploying your application.
1. Fork the example application to your GitHub account
Select the tab for your stack below and fork the given repository to your GitHub account.
The Next.js example application is a full-stack application that uses Next.js for the frontend, Express for the backend, and a PostgreSQL database.
The Django example application is a full-stack application that uses Django for the backend and PostgreSQL as a database.
The Flask example application is a full-stack application that uses Flask for the backend and PostgreSQL as a database.
The FastAPI example application is a full-stack application that uses FastAPI for the backend and PostgreSQL as a database.
The Ruby on Rails example application is a full-stack application that uses Ruby on Rails for the backend and PostgreSQL as a database.
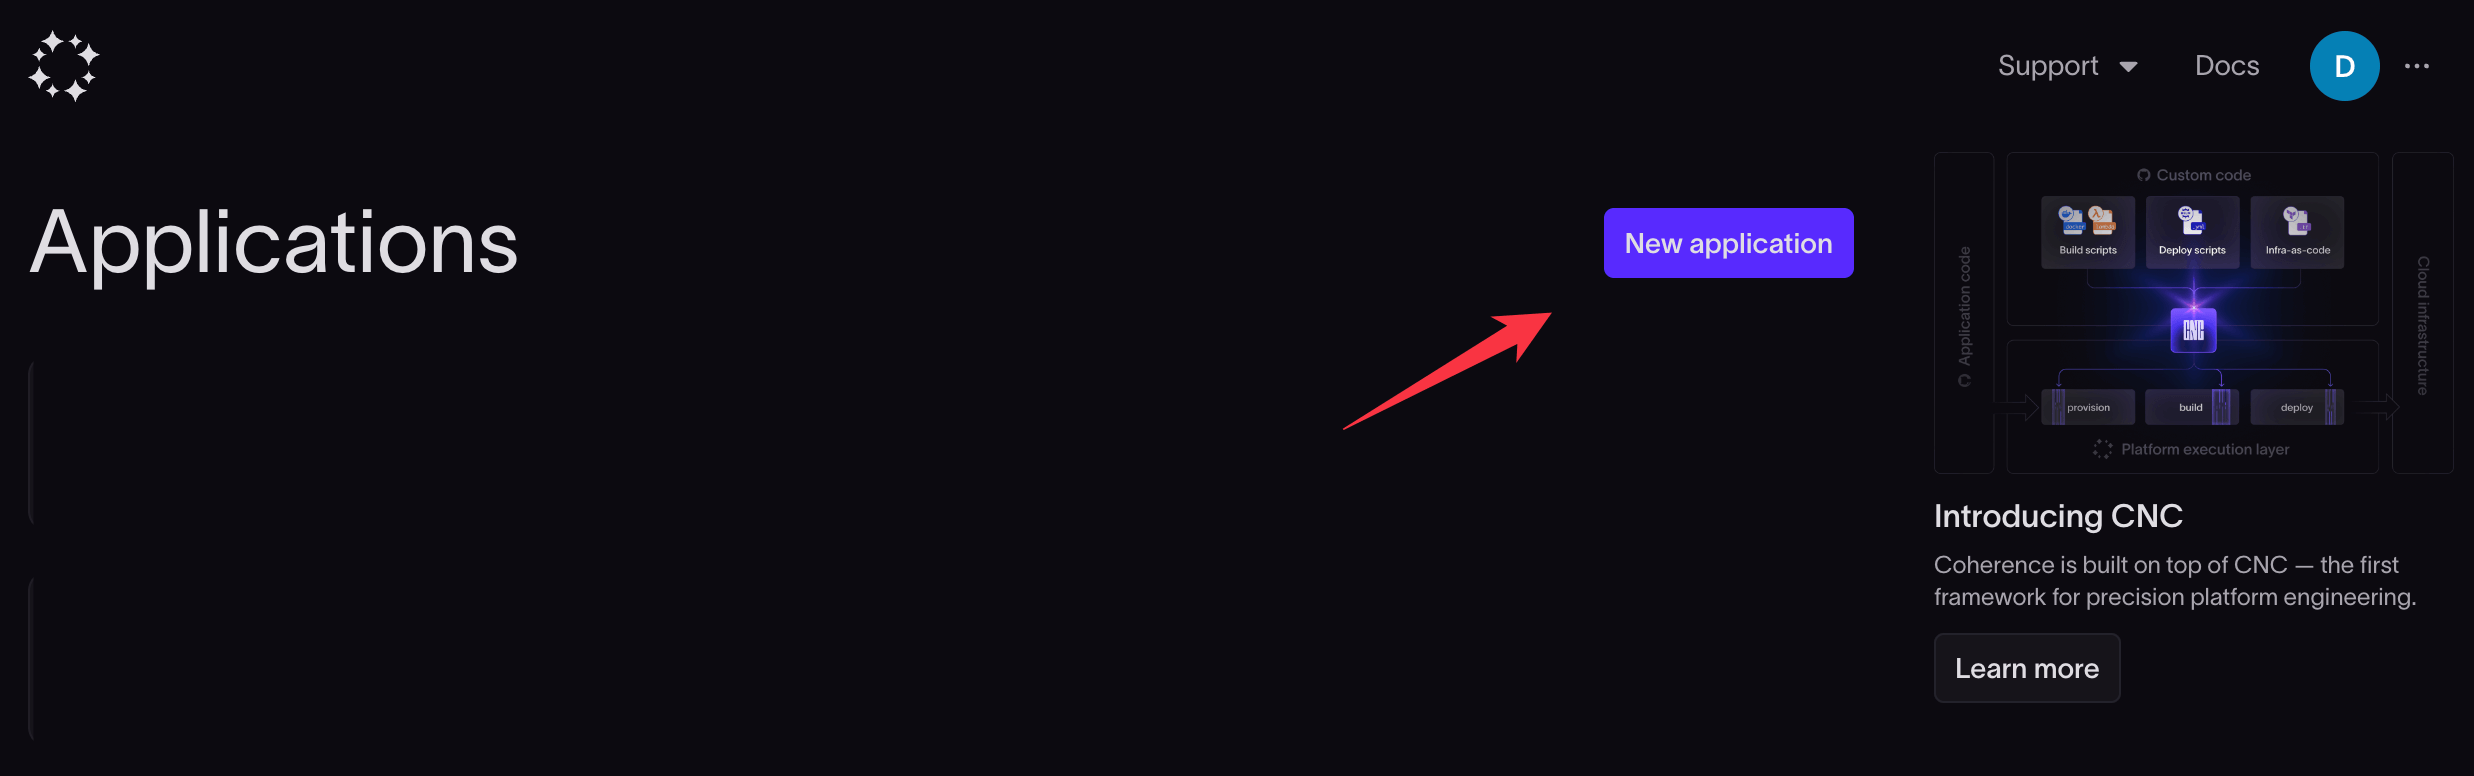
2. Create an application
Log in to your Coherence account and select New application.
Follow the instructions below based on your cloud provider.
- Give your application a name, like "Employee Management Application".
- Choose Google Cloud as the Provider.
-
Choose Cloud Run for the Architecture.
- You can instead select one of the following reference architectures:
- GKE if you have a more complex application and want to use Kubernetes as your underlying infrastructure. We recommend this only for advanced users.
- Cloud Run Lite if you want to use the most affordable option. Cloud Run Lite will often run on the Cloud Run free tier but offers less than the standard Cloud Run option.
- You can instead select one of the following reference architectures:
-
Click Continue to proceed to creating a collection.
- Give your application a name, like "Employee Management Application".
- Choose Amazon AWS as the Provider.
- Choose ECS for the Architecture.
- Click Continue to proceed to creating a collection.
3. Create a collection
In Coherence, a collection is broadly analogous to a cloud account. If you have multiple AWS or GCP accounts, you would likely create one collection for each.
- Click the Create collection button.
- Enter a name for your collection and click Create collection.
4. Create an environment
Each collection can have multiple environments. For example, you might run development and staging within the same cloud account (collection), and have a separate environment for production in a different collection.
To create an environment, click the New environment button.
- In the environment-creation modal, give your environment a name.
- Choose Staging from the dropdown. Read about environment types in the documentation.
- Click Create.
5. Add Services
Each application can consist of one or more services. For our example application, we need two services: a backend and a database.
In the new environment's dashboard, navigate to the Services tab.
Add a backend service
Click the New service button.
- Select Next.js under Container.
- Enter "backend" under Name.
- Enter the start command
npm run start. - Enter "/" under URL path.
- Choose Repository under Container source.
- Click Add one under Repo.
- Paste in the link to the GitHub repository you forked at the start of this guide.
- Click Add repository.
- Enter "/" under Context.
- Enter "Dockerfile" under Dockerfile.
- Select main under Track branch.
- Click Create service.
- Select Django under Container.
- Enter "backend" under Name.
- Enter the start command
python manage.py runserver 0.0.0.0:8080. - Enter "/" under URL path.
- Choose Repository under Container source.
- Click Add one under Repo.
- Paste in the link to the GitHub repository you forked at the start of this guide.
- Click Add repository.
- Enter "/" under Context.
- Enter "Dockerfile" under Dockerfile.
- Select main under Track branch.
- Click Create service.
- Select Flask under Container.
- Enter "backend" under Name.
- Enter the start command
python app.py 0.0.0.0:8080. - Enter "/" under URL path.
- Choose Repository under Container source.
- Click Add one under Repo.
- Paste in the link to the GitHub repository you forked at the start of this guide.
- Click Add repository.
- Enter "/" under Context.
- Enter "Dockerfile" under Dockerfile.
- Select main under Track branch.
- Click Create service.
- Select FastAPI under Container.
- Enter "backend" under Name.
- Enter the start command
uvicorn app.main:app --port 8080 --host 0.0.0.0 --reload. - Enter "/" under URL path.
- Choose Repository under Container source.
- Click Add one under Repo.
- Paste in the link to the GitHub repository you forked at the start of this guide.
- Click Add repository.
- Enter "/" under Context.
- Enter "Dockerfile" under Dockerfile.
- Select main under Track branch.
- Click Create service.
- Select Ruby on Rails under Container.
- Enter "backend" under Name.
- Enter the start command
bundle exec rails server -e production -b 0.0.0.0. - Enter "/" under URL path.
- Choose Repository under Container source.
- Click Add one under Repo.
- Paste in the link to the GitHub repository you forked at the start of this guide.
- Click Add repository.
- Enter "/" under Context.
- Enter "Dockerfile" under Dockerfile.
- Select main under Track branch.
- Click Create service.
If you see Not connected while adding the repository, give Coherence access by clicking Connect and following the prompts on GitHub to install the Coherence GitHub application in the repository.
Important Note for Nixpacks Users
If you're using Nixpacks as your builder (which is the Coherence default if you don't define a Dockerfile), you'll need to make some adjustments to your commands:
- For Python-based frameworks (Django, Flask, FastAPI). Prefix your commands with
. /opt/venv/bin/activate &&.- For example:
/opt/venv/bin/activate && python manage.py runserver 0.0.0.0:8080
- For example:
This activates the virtual environment before running your command.
- For Ruby on Rails. Prefix your commands with
. /root/.profile &&.- For example:
/root/.profile && bundle exec rails server -e production -b 0.0.0.0
- For example:
This ensures that Ruby gems are available on the PATH.
If you're using your own Dockerfile, you can omit these prefixes as long as your Python packages or Ruby gems are available on the PATH by default.
Add a database service
Click New service and select Postgres under Database.
- Enter "employees" under Name.
- Click Create service.
6. Edit the cnc.yml file to handle database migrations
The example application requires an initial database migration step to be run to create an "employees" database table.
In the environment dashboard, navigate to the cnc.yml tab. Update the x-cnc configuration for the backend service to include a migrate command as shown below:
services:
  backend:
    ...
    x-cnc:
      type: backend
      system:
        health_check: ''
      migrate: npm run migrate up
      url_path: /
    ...
services:
  backend:
    ...
    x-cnc:
      type: backend
      system:
        health_check: ''
      migrate: python manage.py migrate
      url_path: /
    ...
services:
  backend:
    ...
    x-cnc:
      type: backend
      system:
        health_check: ''
      migrate: flask db migrate -m "Initial migration."
      url_path: /
    ...
services:
  backend:
    ...
    x-cnc:
      type: backend
      system:
        health_check: ''
        migrate: python -m alembic upgrade heads
      url_path: /
    ...
services:
  backend:
    ...
    x-cnc:
      type: backend
      system:
        health_check: ''
      migrate: bundle exec rails db:migrate
      url_path: /
    ...
Click the Save changes button.
6. Connect your cloud account
Now connect your cloud account to allow Coherence to provision the infrastructure and deploy your application.
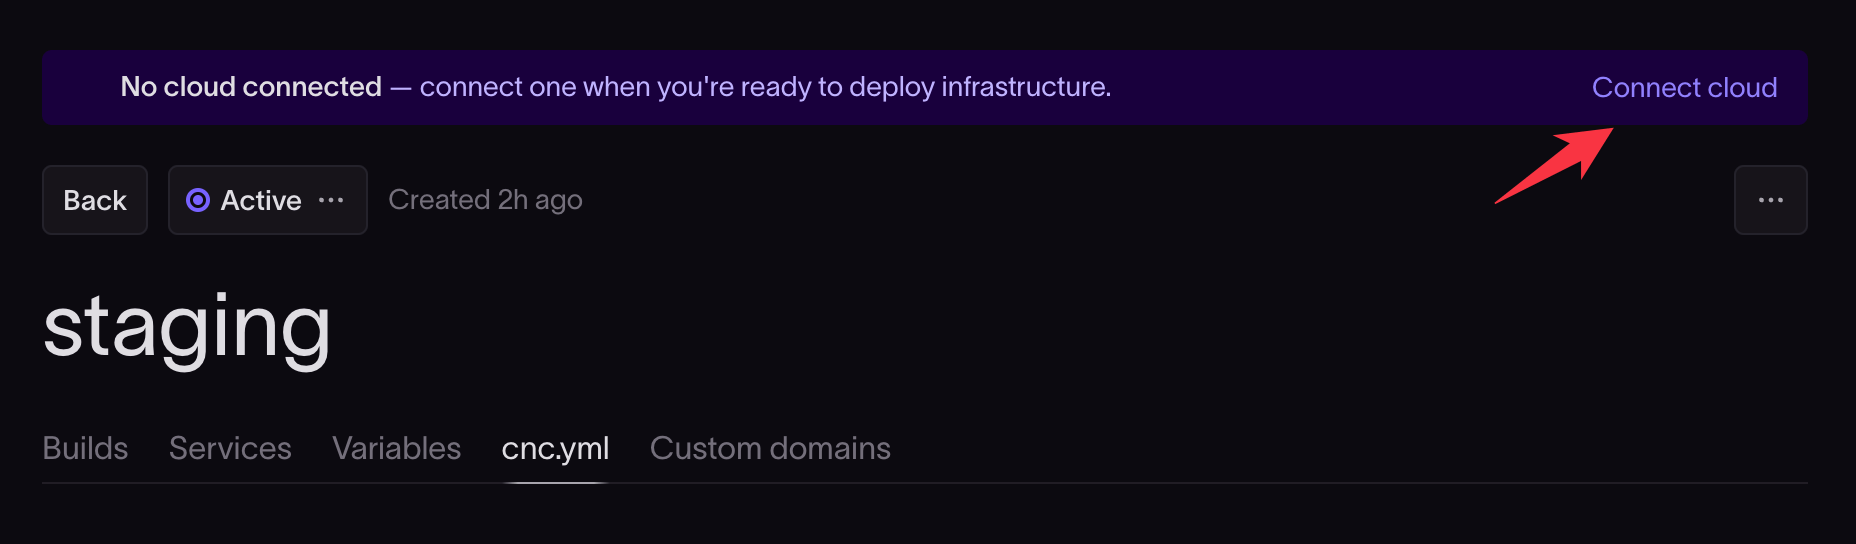
- Click Connect cloud.
- Enter your Google Cloud project ID. Find your project ID on the project's main page in the Google Cloud console.
- Select the region to use for your cloud instance.
- Check the boxes to confirm you have admin privileges and sufficient quota.
- Click Next to proceed to the instructions to add an IAM role in your cloud provider that will allow Coherence to create the resources it needs in your cloud account.
Read our connect to GCP guide if you need more help with this step.
- Click Connect cloud.
- Enter your AWS account ID. Find your account ID on the main page of the AWS console.
- Select the region to use for your cloud instance.
- Check the boxes to confirm you have admin privileges and sufficient quota.
- Click Next to proceed to the instructions to add an IAM role in your cloud provider that will allow Coherence to create the resources it needs in your cloud account.
Read our connect to AWS guide if you need more help with this step.
When prompted, you can skip the Import variables modal if you do not have extra variables to define. Variables like DATABASE_URL will be automatically configured.
7. Provision infrastructure
Once Coherence has been granted access to your cloud account, you need to submit a provisioning task so that Coherence can automatically set up and manage the necessary cloud resources for your collection.
- Select the Builds tab for the environment.
- Click the Submit button to submit a provisioning task.
- Click the Submit new task button.
Coherence will automatically provision infrastructure for your project based on your service requirements.
Wait for this step to complete before moving on. It should take several minutes.
8. Build and deploy the application
Once the provisioning task is complete, you can build and deploy your application.
- Click on the Builds tab in your environment dashboard.
- Click New build.
- Choose main from the dropdown under Branch / Image.
- Click Submit build.
Coherence will run the build and deploy scripts on your cloud resources.

Once your environment has successfully built and deployed, you can click the link under Domains to see your deployed application.
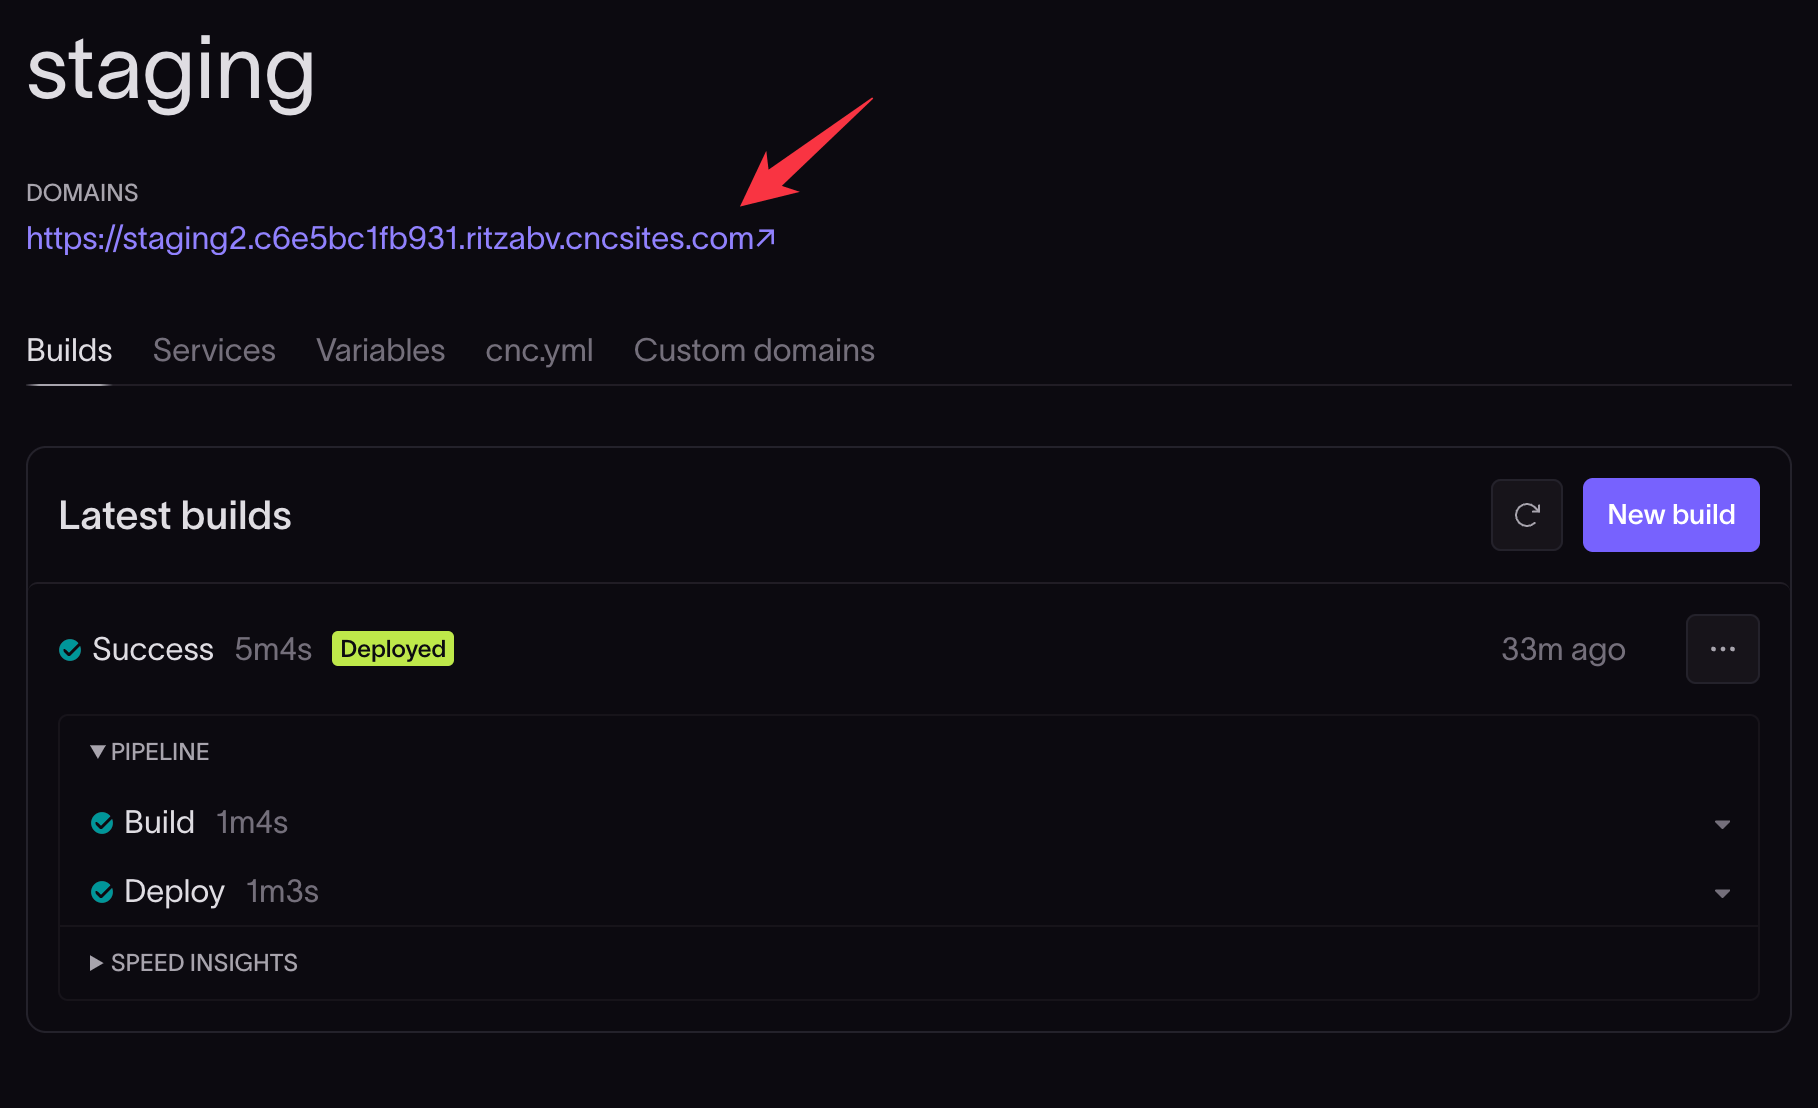
The deployed application will now be accessible at the given domain.

Troubleshooting
Note that even after seeing the build and deployment complete, you may need to wait a few minutes before your site is accessible. Usually, SSL certificates take a few minutes to half an hour to deploy.
If either the build or deploy steps fail, you can view build logs, run logs, and event logs to help you debug the issue.
Please feel free to contact us if you need more help getting your application running. Press the Contact button in the header of this page or select an option from the Support dropdown in your Coherence dashboard. Include as much information as possible in your support request, such as screenshots of the error you're seeing.