Create a NextJS Full Stack Example
This guide will show you how to create a full-stack app with Next.js and PostgreSQL on the Coherence platform.
Using Express, we'll build a small Next.js CRUD application to manage and display employee contact details stored in a PostgreSQL database and deploy and manage the app in a cloud environment from Coherence.
Prerequisites
To follow this guide, you'll need:
- A Coherence account.
- Some familiarity with creating an app on the Coherence platform and authorizing Coherence to access your GitHub repository. Follow our guide to creating an app on Coherence for more details.
- A Google Cloud Platform (GCP) account.
- Docker installed on your machine. We'll use Docker and Docker Compose to test the application locally. If you prefer to run the application directly on your machine, you'll need Node.js and PostgreSQL installed.
Getting started
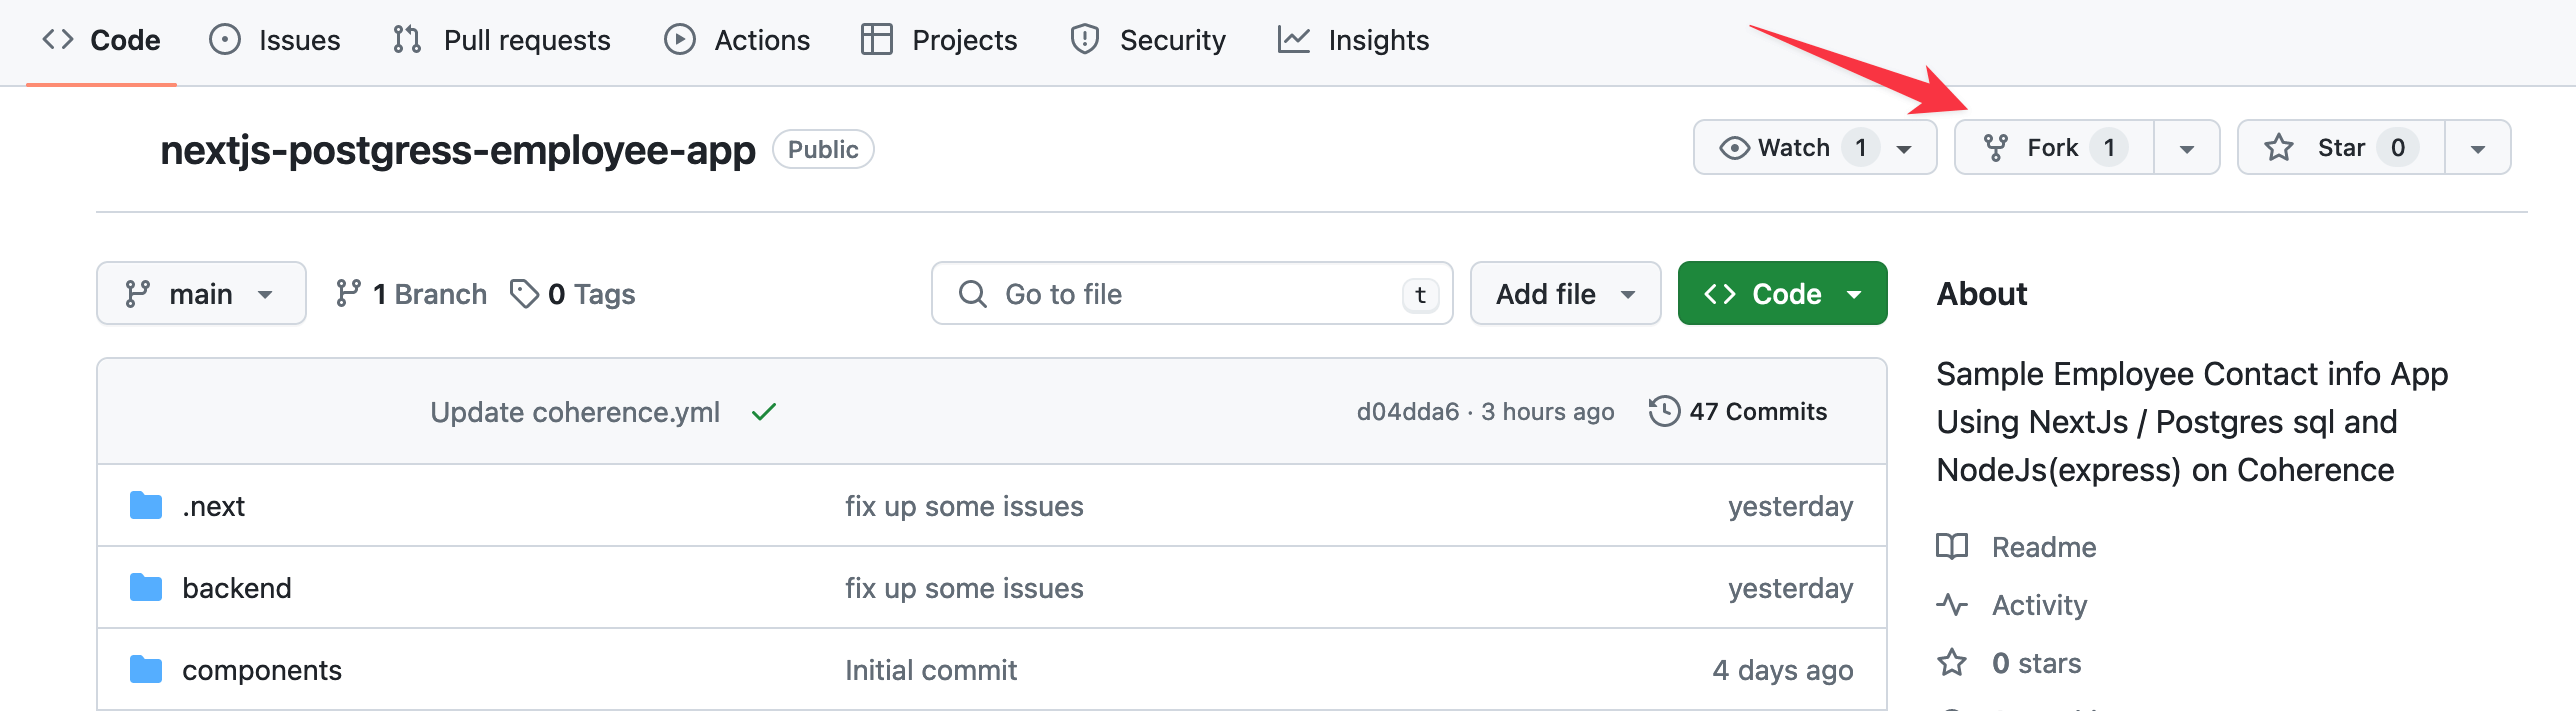
Start by forking the example app repository on GitHub. Select the Fork button on the top right of the GitHub repository page and then select Create Fork on the screen that follows.
In your working directory, clone and start the application with the following commands, replacing <your_github_username> with your actual GitHub username.
git clone https://github.com/<your_github_username>/nextjs-postgress-employee-app.git
cd nextjs-postgress-employee-app
docker-compose up
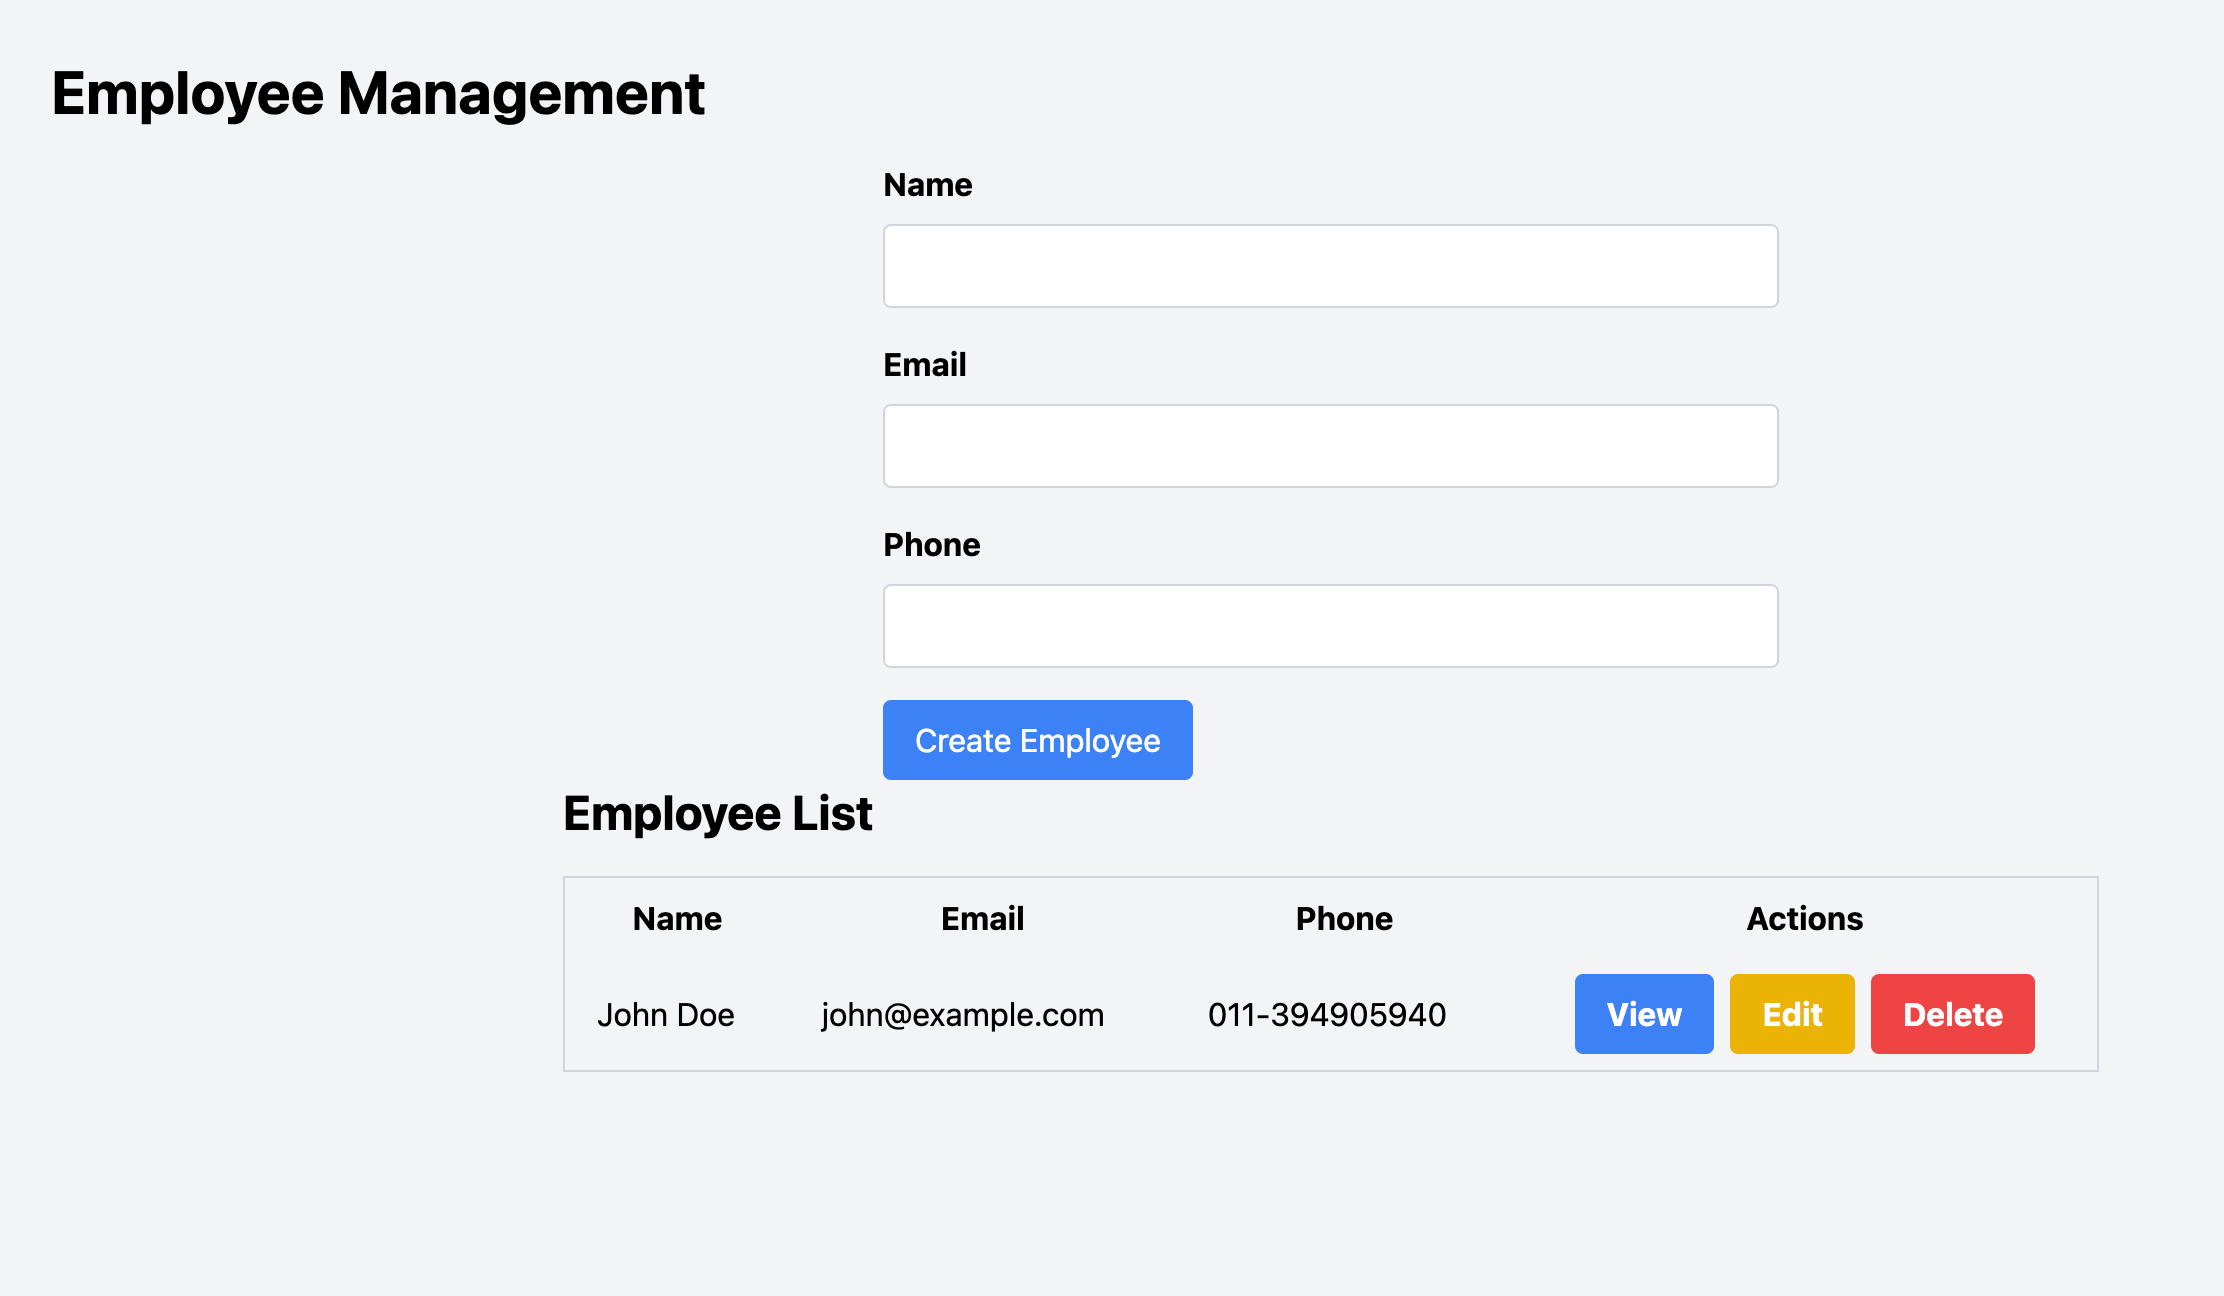
The application should now be accessible at http://localhost:3000.
The application consists of the following parts:
- A Next.js frontend.
- An Express backend that connects to a PostgreSQL database.
- Database model migration scripts.
- A Dockerfile and
docker-compose.ymlconfiguration file.
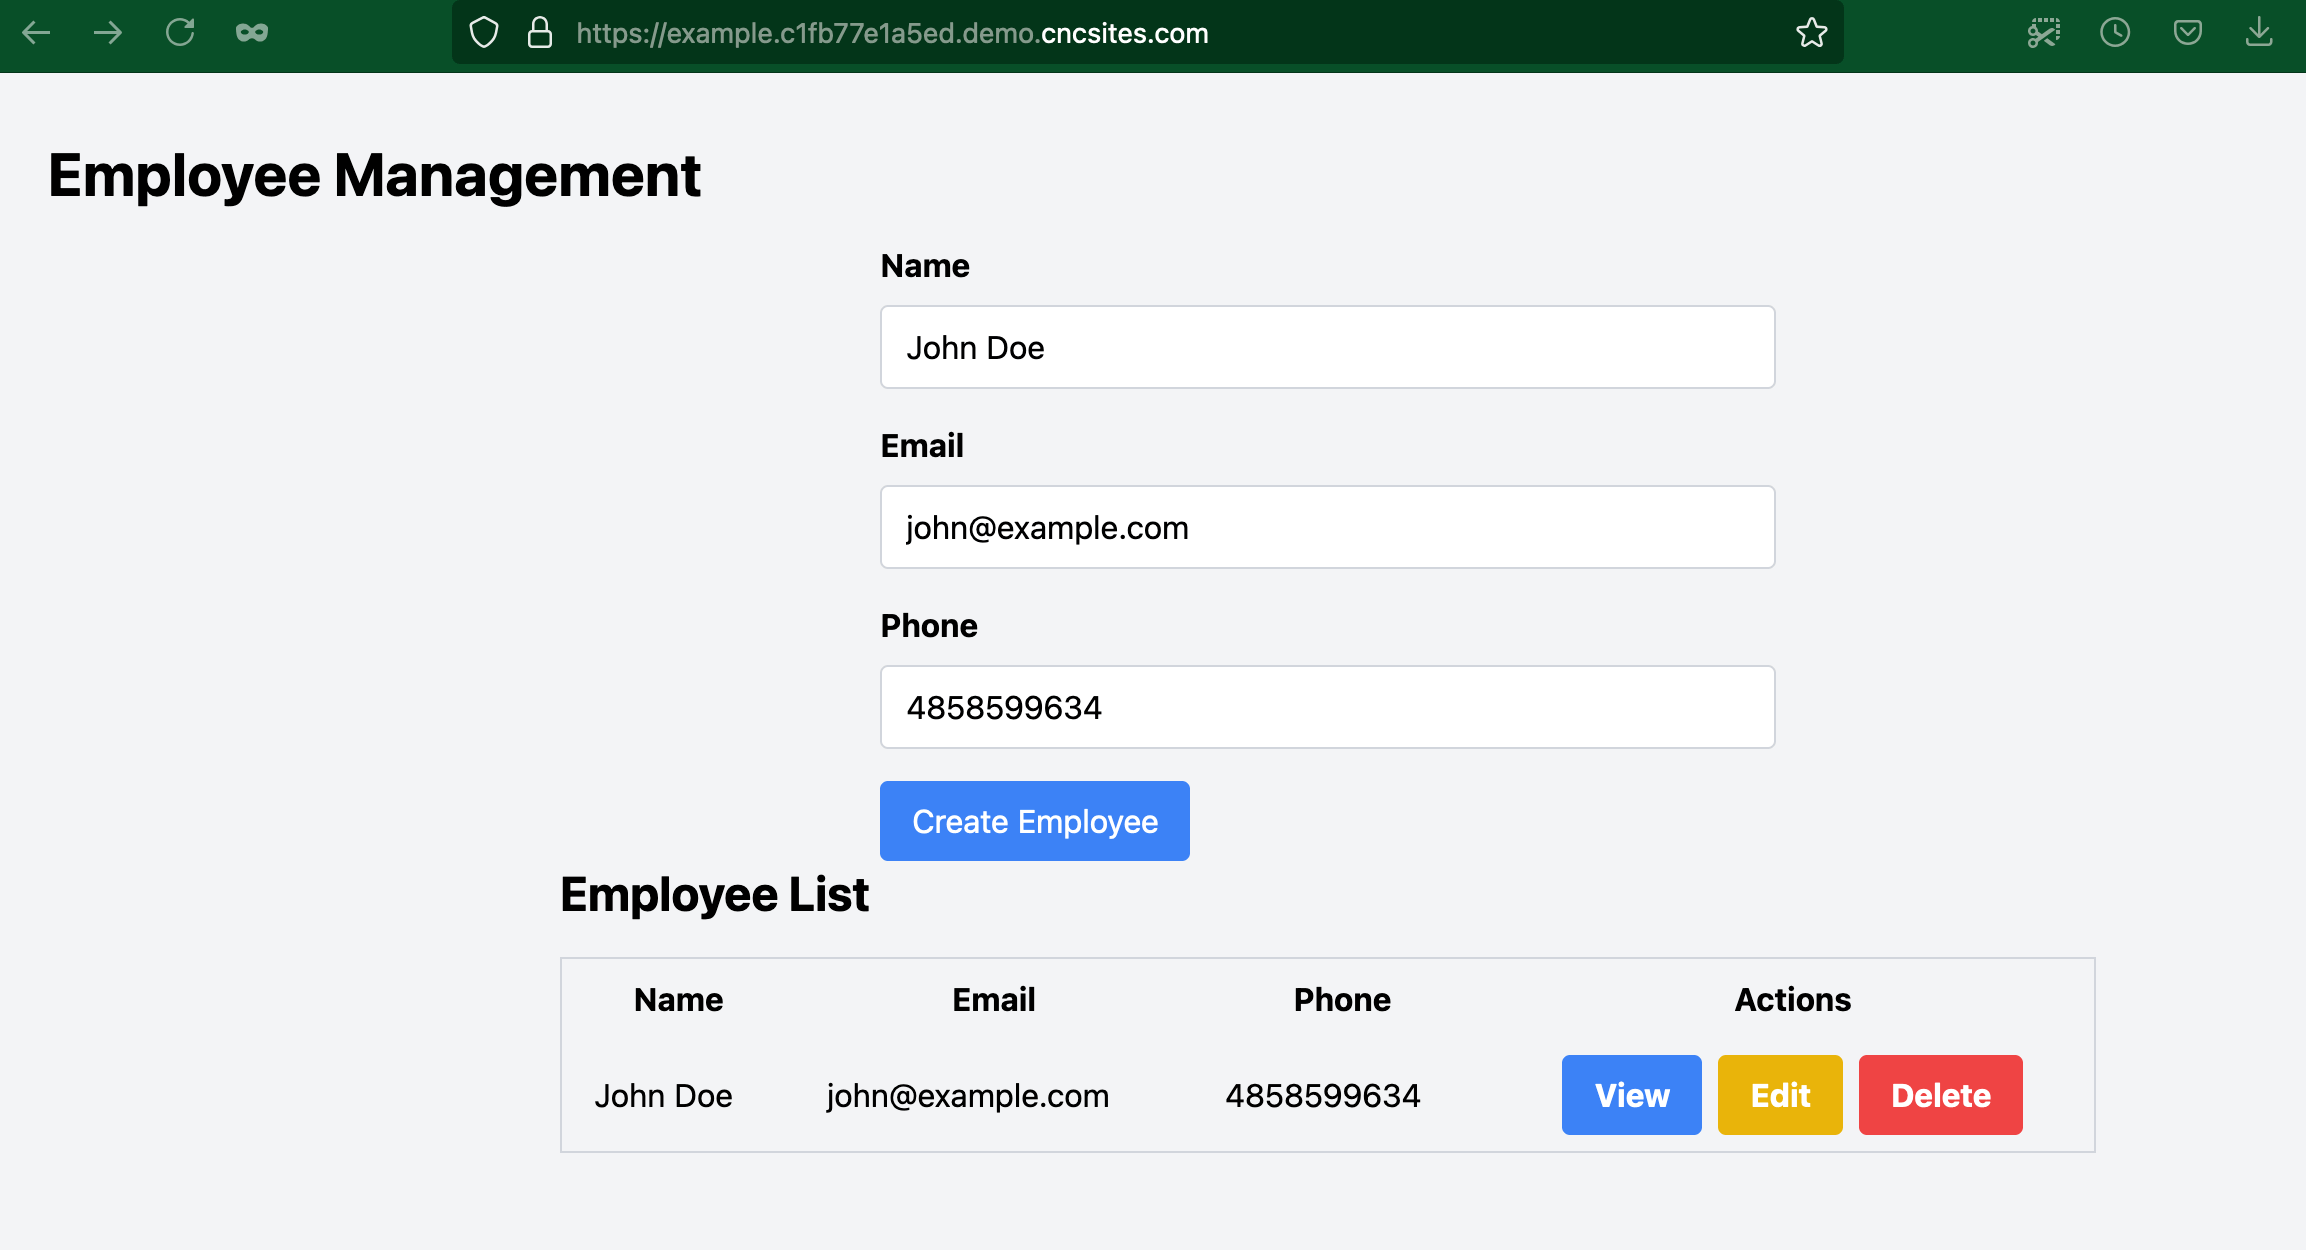
The frontend
The frontend is a Next.js web app you can use to enter employee information to be stored in the database. The web app communicates with the database using API endpoints in the backend.
The backend
The backend is an Express API that communicates with the PostgreSQL database to store information.
The database
The database is a PostgreSQL database to store employee information.
The Dockerfile
The frontend uses the Dockerfile below to copy the project configurations to the required locations and install packages.
FROM node:18
WORKDIR /app
COPY package*.json ./
RUN npm install
COPY . .
RUN npm run build
EXPOSE 3000
CMD ["npm", "start"]
After the project builds, port 3000 is exposed and the start command is executed.
The docker-compose.yml file
The Docker Compose configuration file defines the app and database services for the project Docker containers.
version: '3'
services:
  app:
    build:
      context: .
      dockerfile: Dockerfile
    ports:
      - '3000:3000'
    depends_on:
      - db
    environment:
      - DATABASE_URL=postgres://postgres:password@db:5432/employees
    command: >
      sh -c "npm install wait-on && npx wait-on tcp:db:5432 && npm run migrate up && npm run build && npm start"
  db:
    image: postgres:14
    environment:
      - POSTGRES_PASSWORD=password
      - POSTGRES_DB=employees
      - POSTGRES_HOST_AUTH_METHOD=md5
    ports:
      - '5432:5432'
    volumes:
      - ./psql_data:/var/lib/postgresql/data
The docker-compose up command builds the app image and starts up the app and database containers. Here, we use the wait-on library to set the app container to wait for the database to start accepting connections on port 5432.
Deploying the app to production
Here are the steps to follow to deploy an app to production:
- Create a new application.
- Create a collection.
- Create an environment.
- Add a backend service and connect the repository.
- Add a database service.
- Connect a cloud account.
- Edit the
cnc.ymlfile. - Configure collections variables.
- Build and deploy the application.
Create a new application
Log in to your Coherence account and select New application to go to the application creation form.
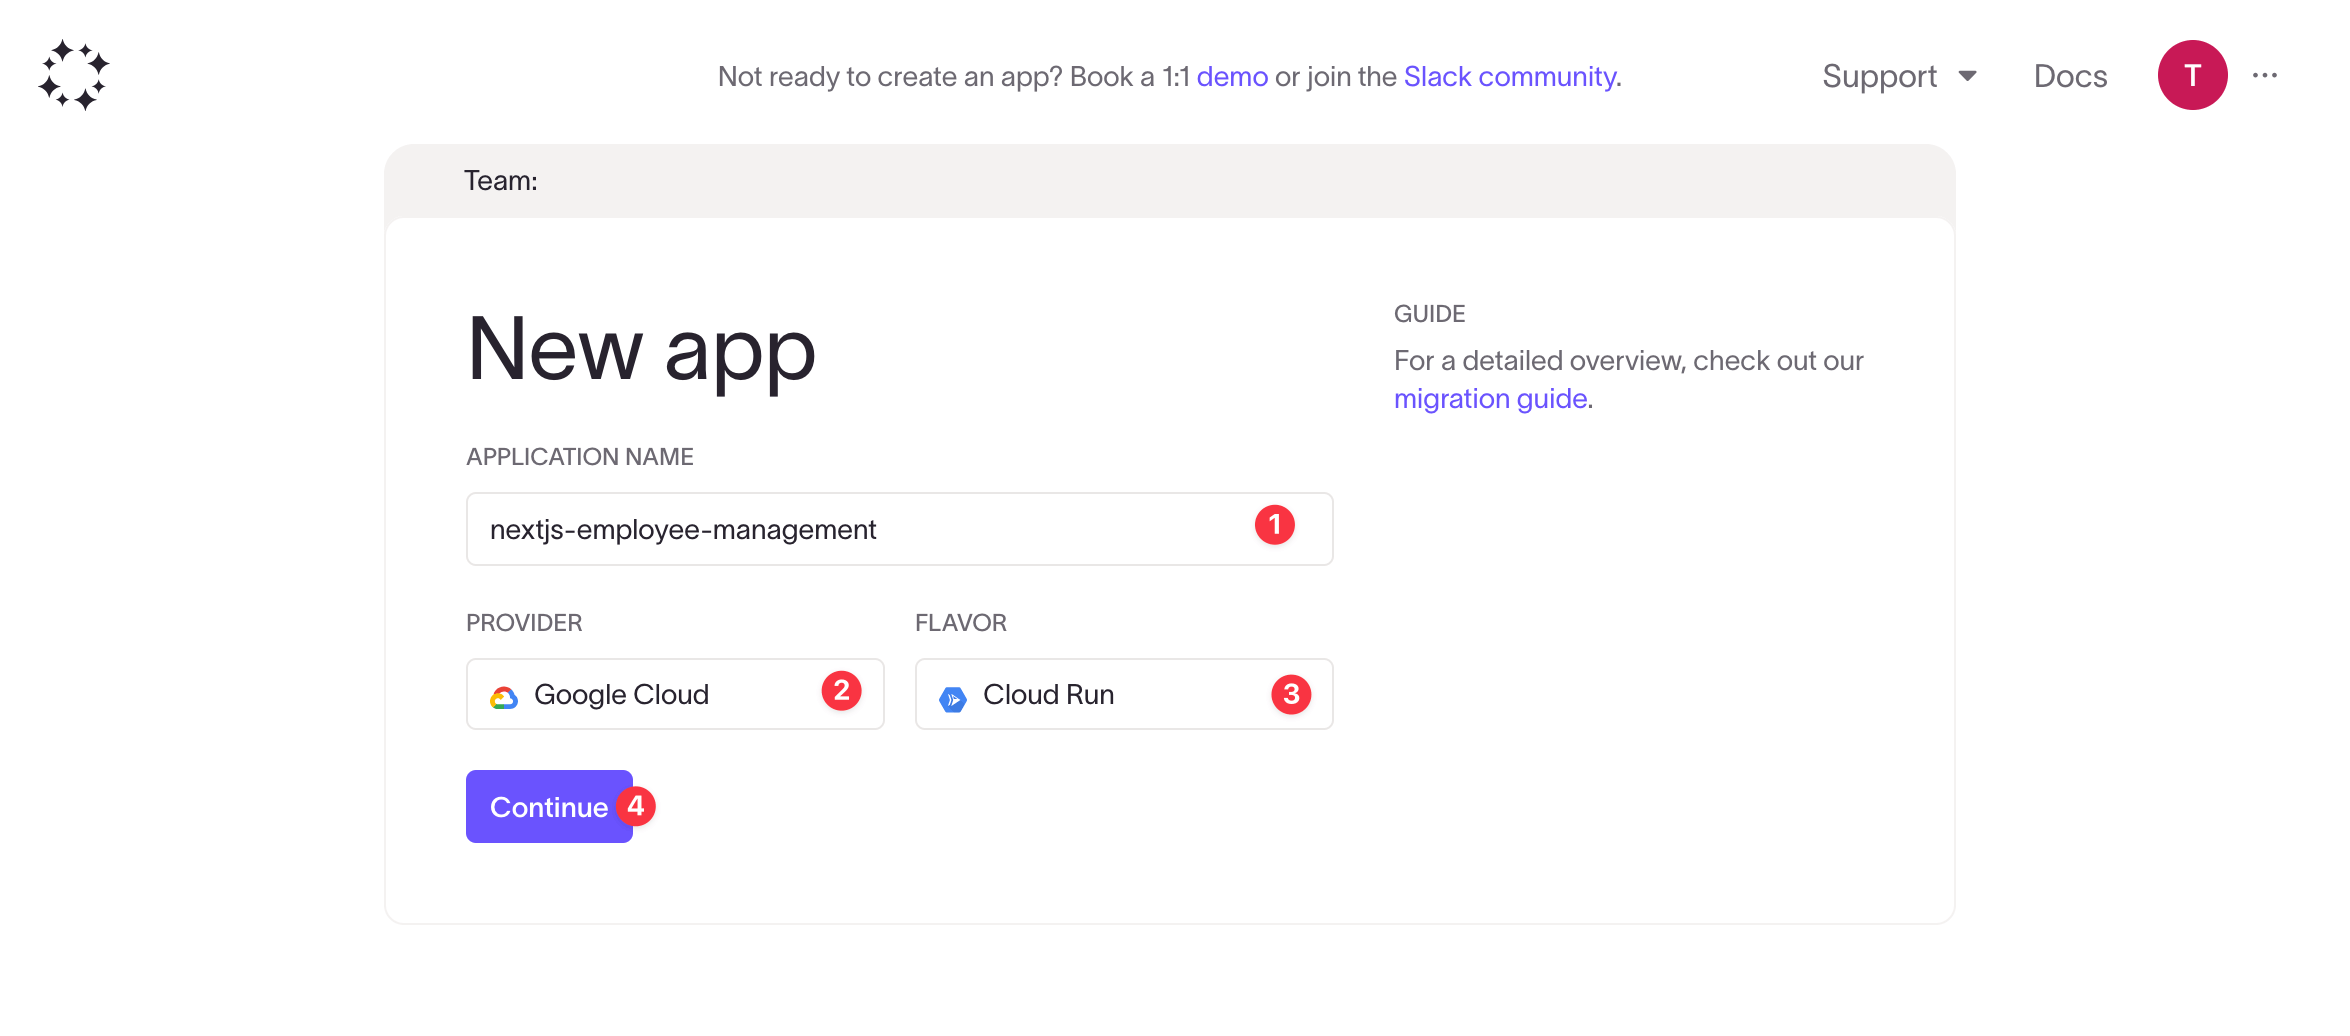
- Enter your application's name.
- Choose the cloud provider you'd like to use. For this guide, we use Google Cloud Platform.
- Choose the flavor you'd like to use. For this guide, we use Google Cloud Run.
- Click Continue to go to your application dashboard.
Create a collection
In Coherence, collections allow you to separate environments. For example, you may have a development collection with environments for testing and building new features for your app, and a demo collection with environments for demonstrating features that are almost ready for production.
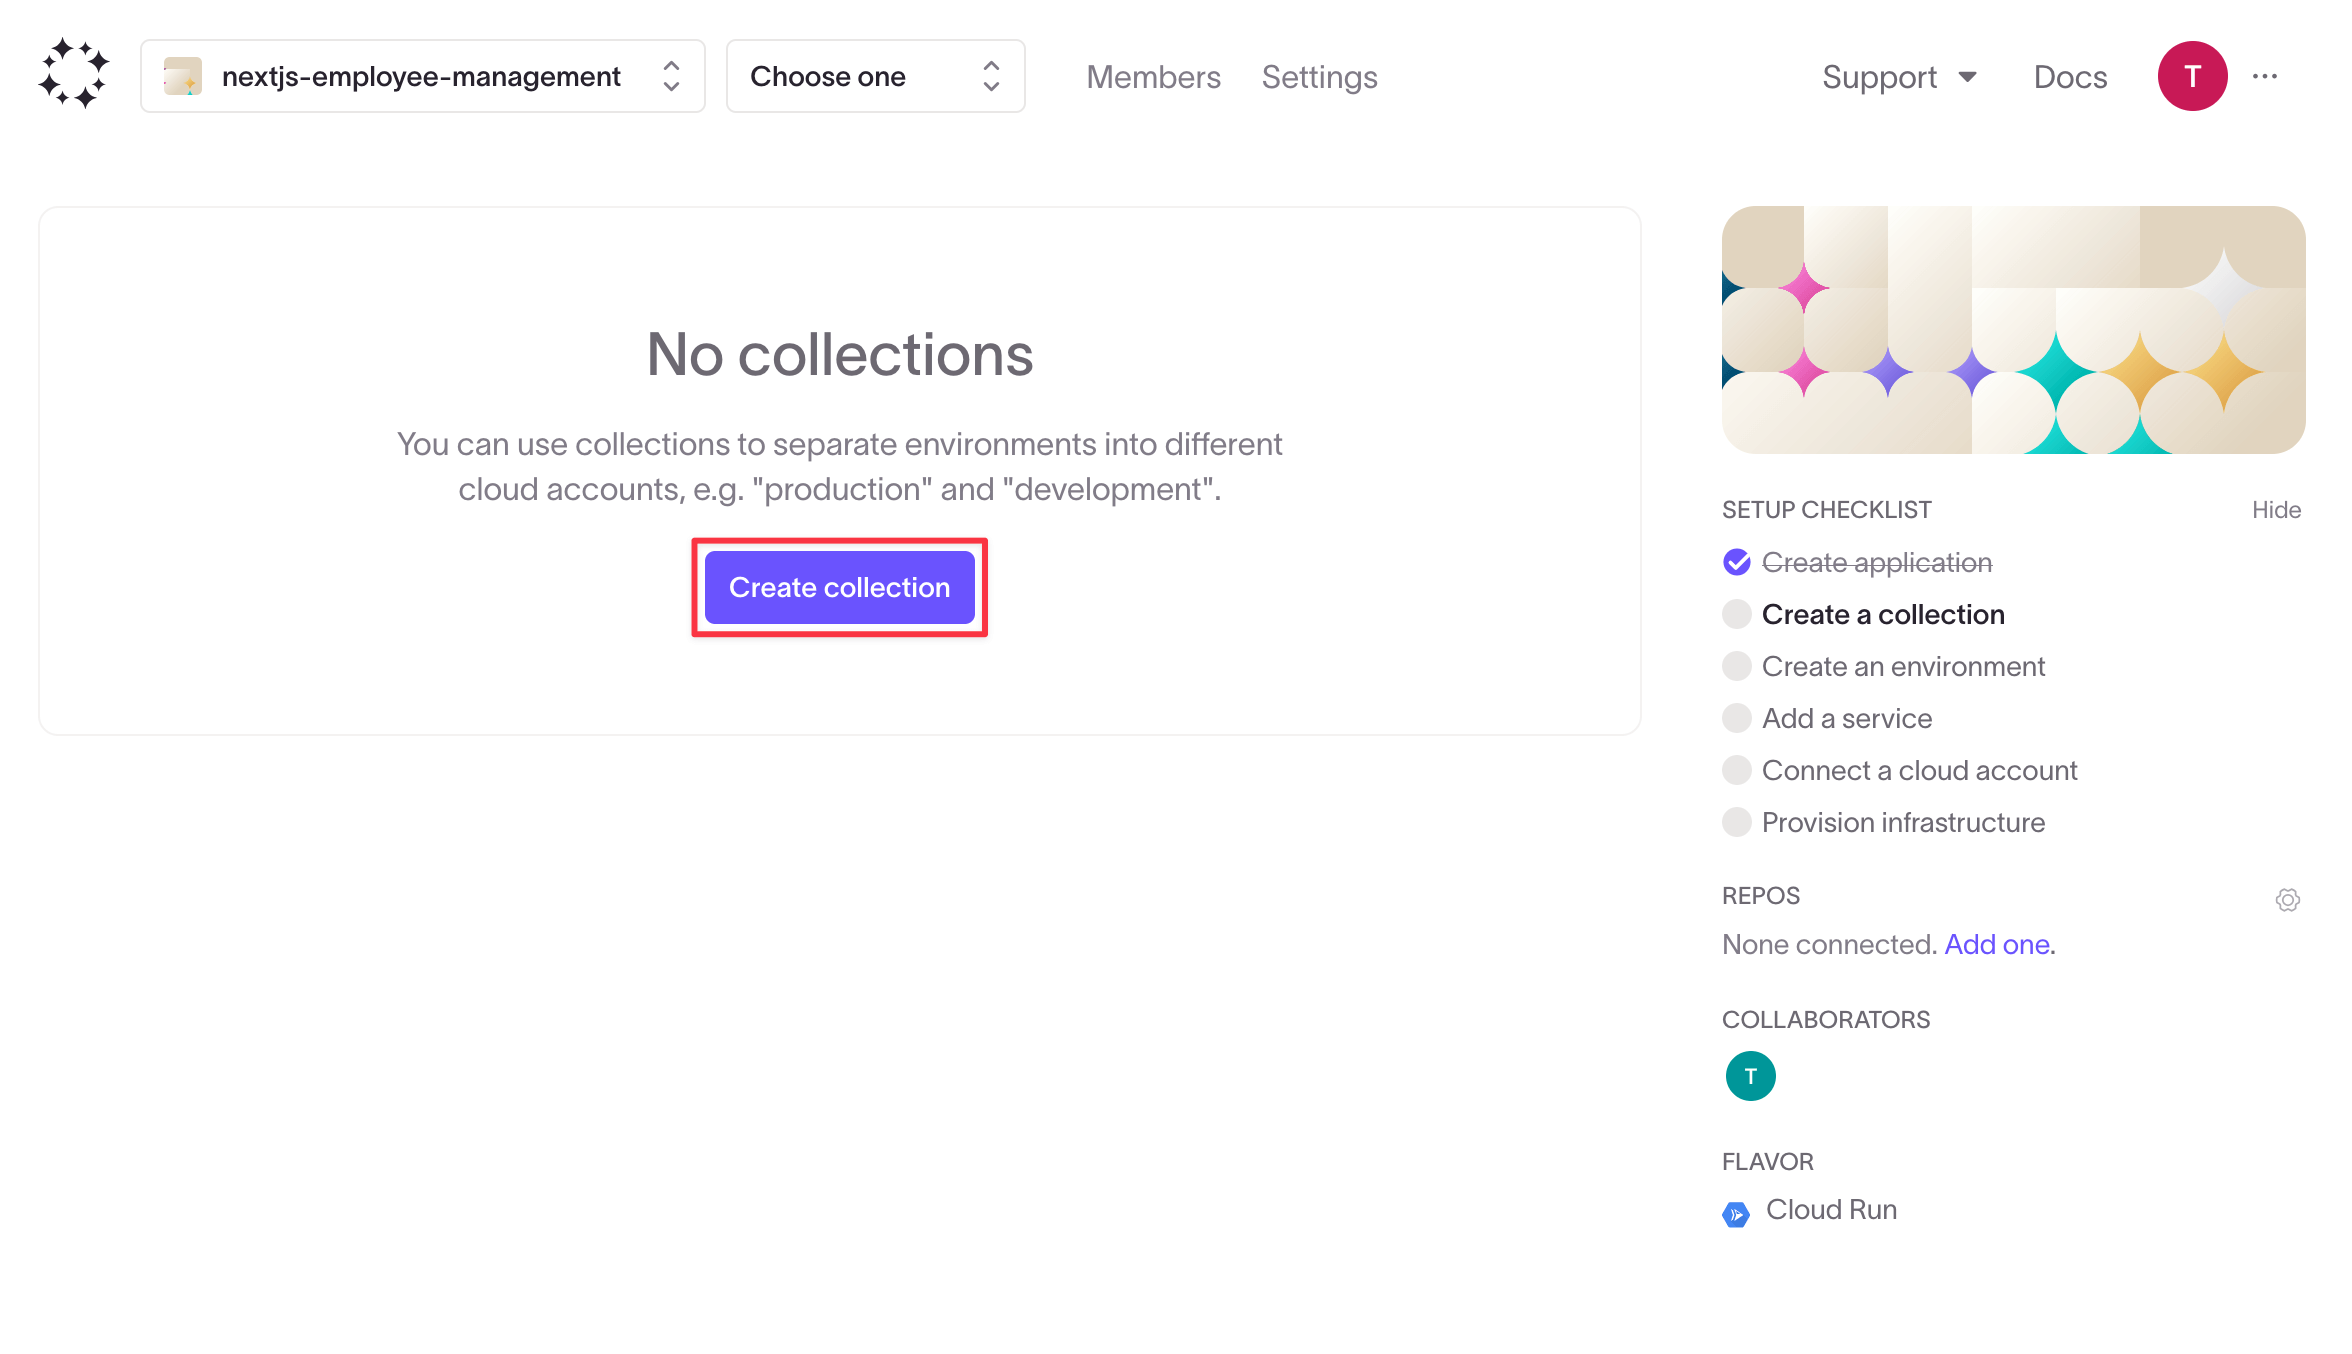
Create collections on the application's landing page.
Click the Create collection button.
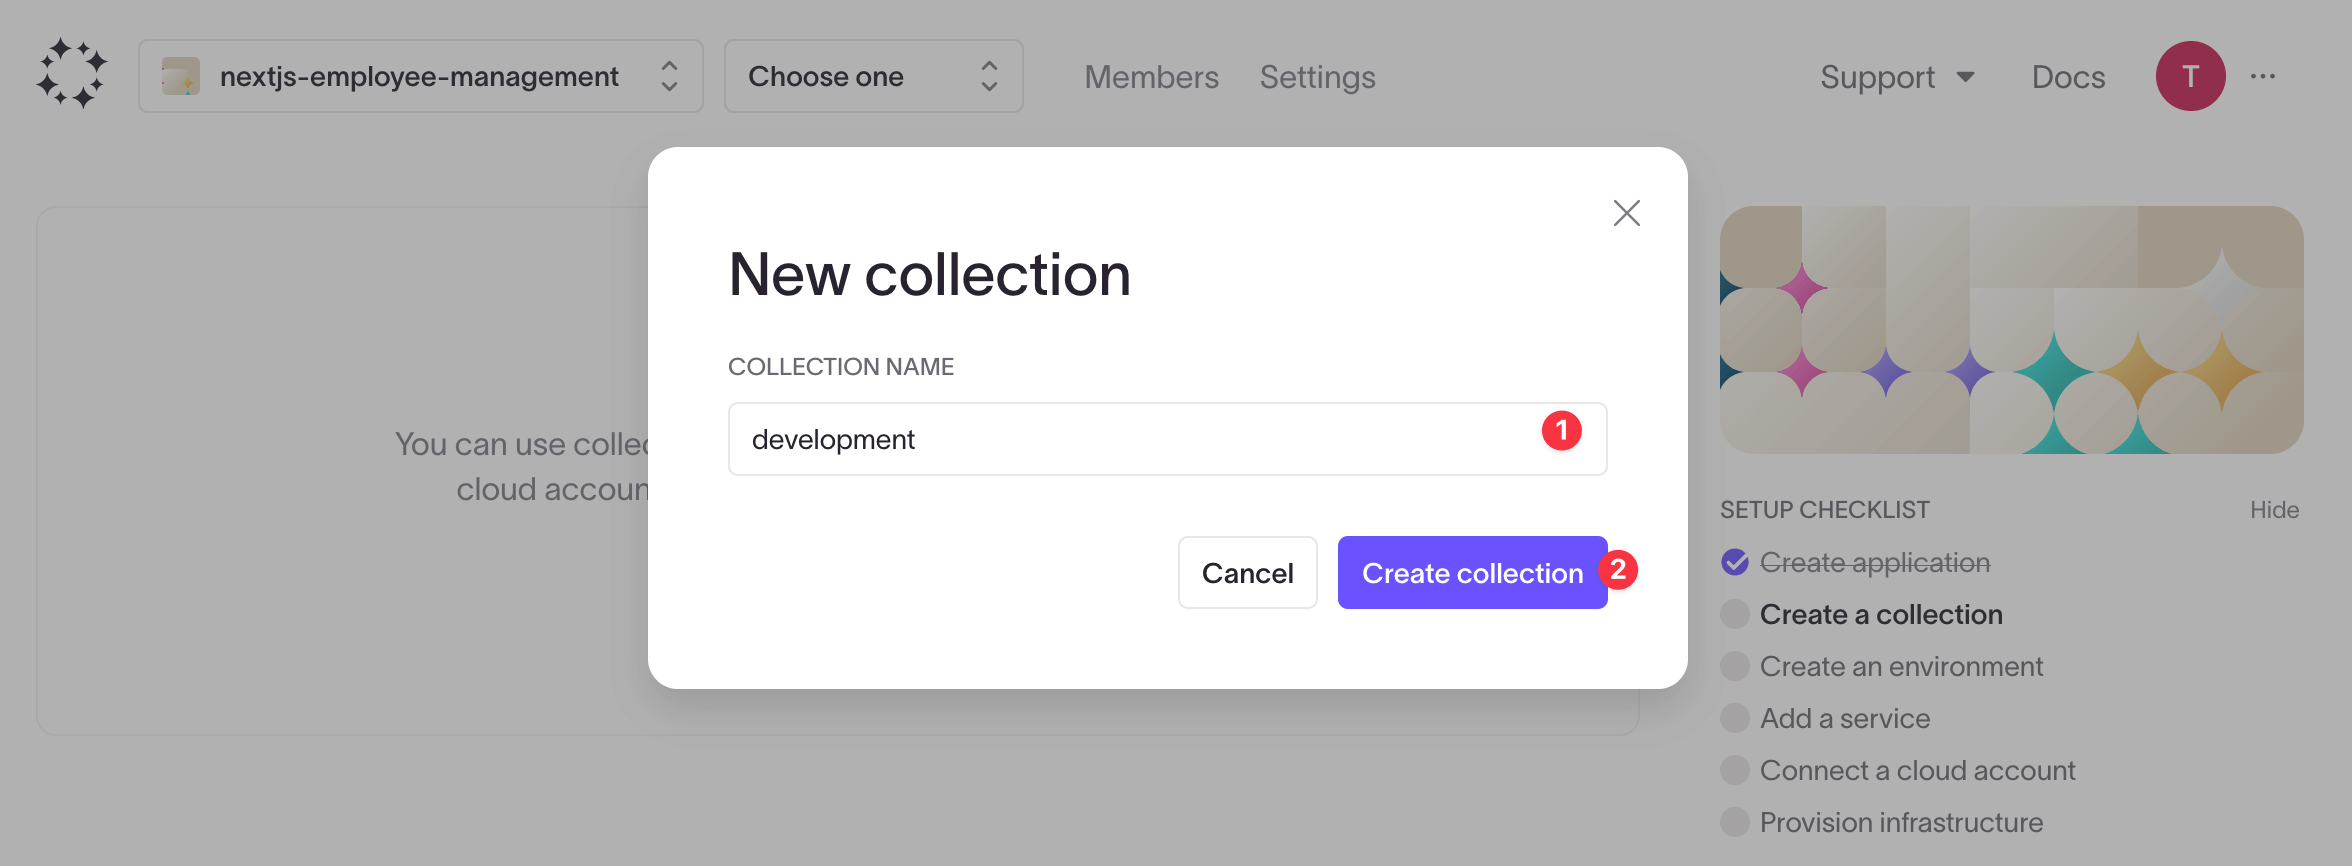
Give your collection a name and click Create Collection.
Create an environment
Environments allow you to test your app in isolated setups. This means you can have multiple environments for different branches of your repo, or for testing different environment variables.
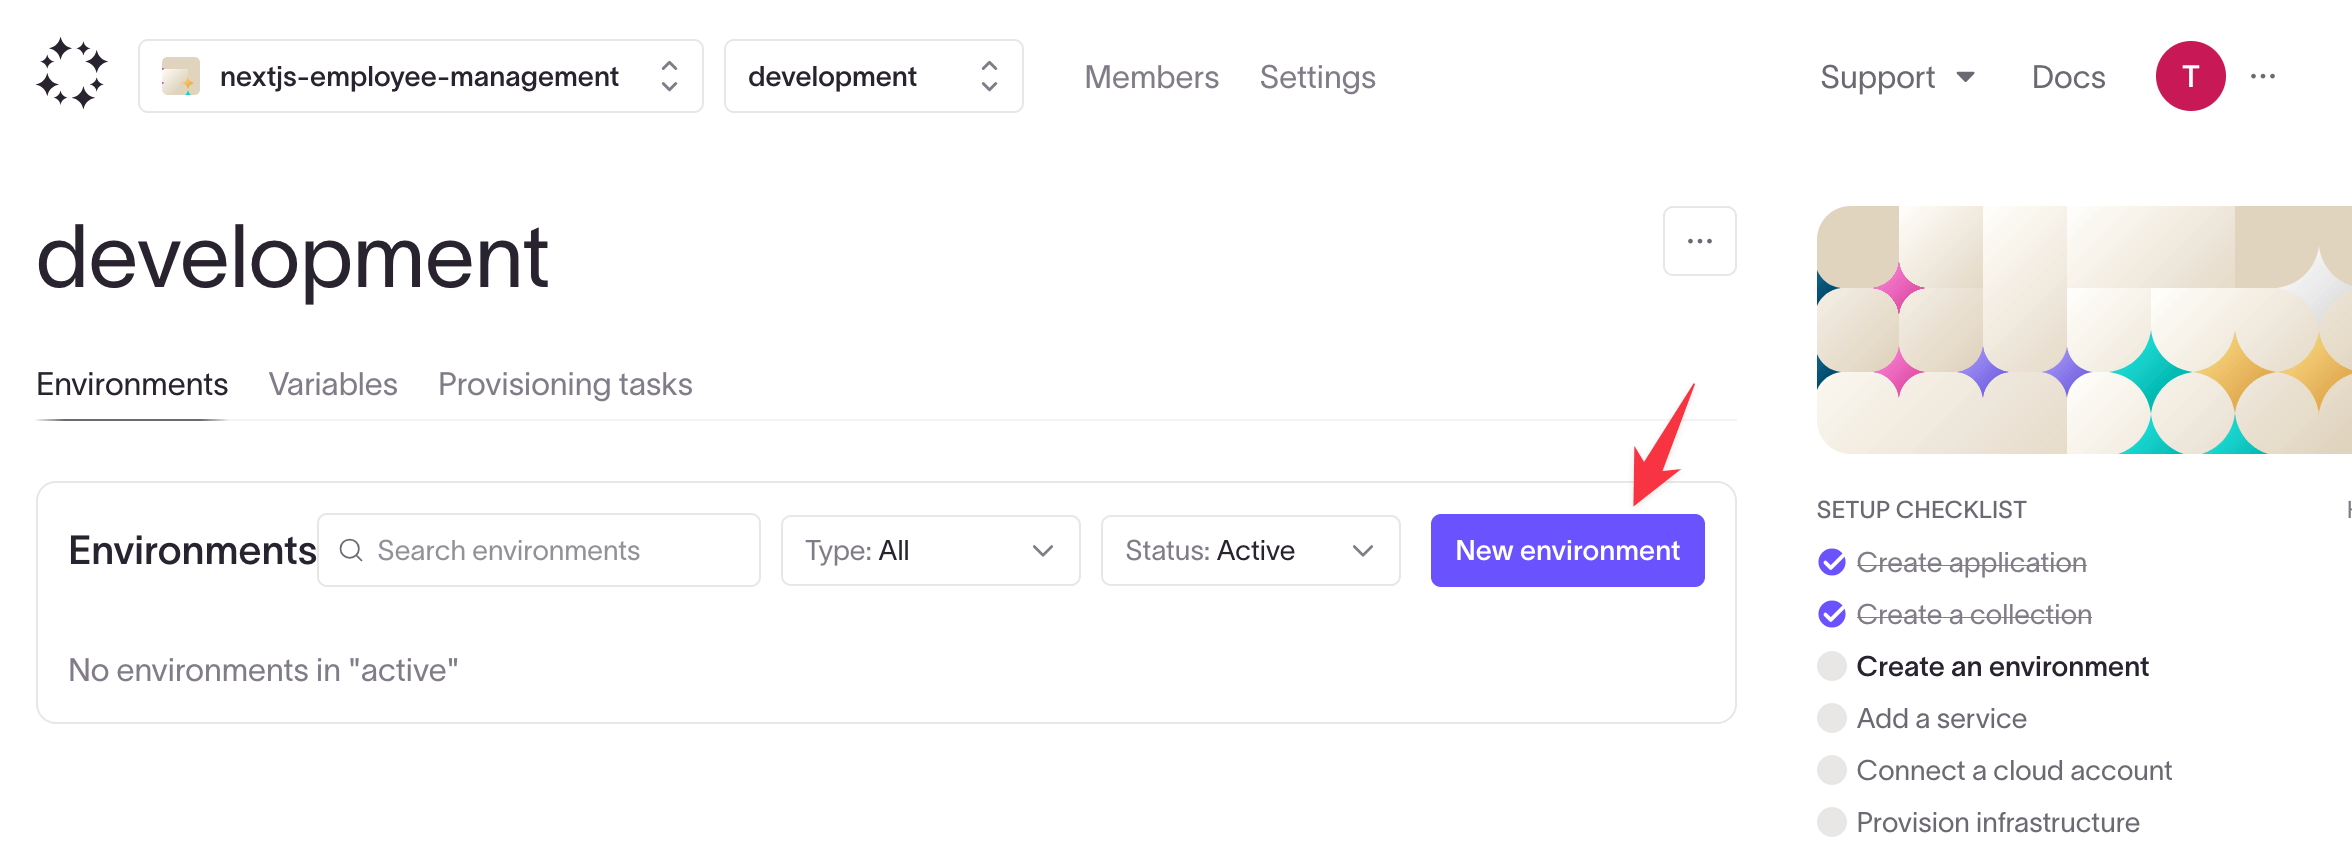
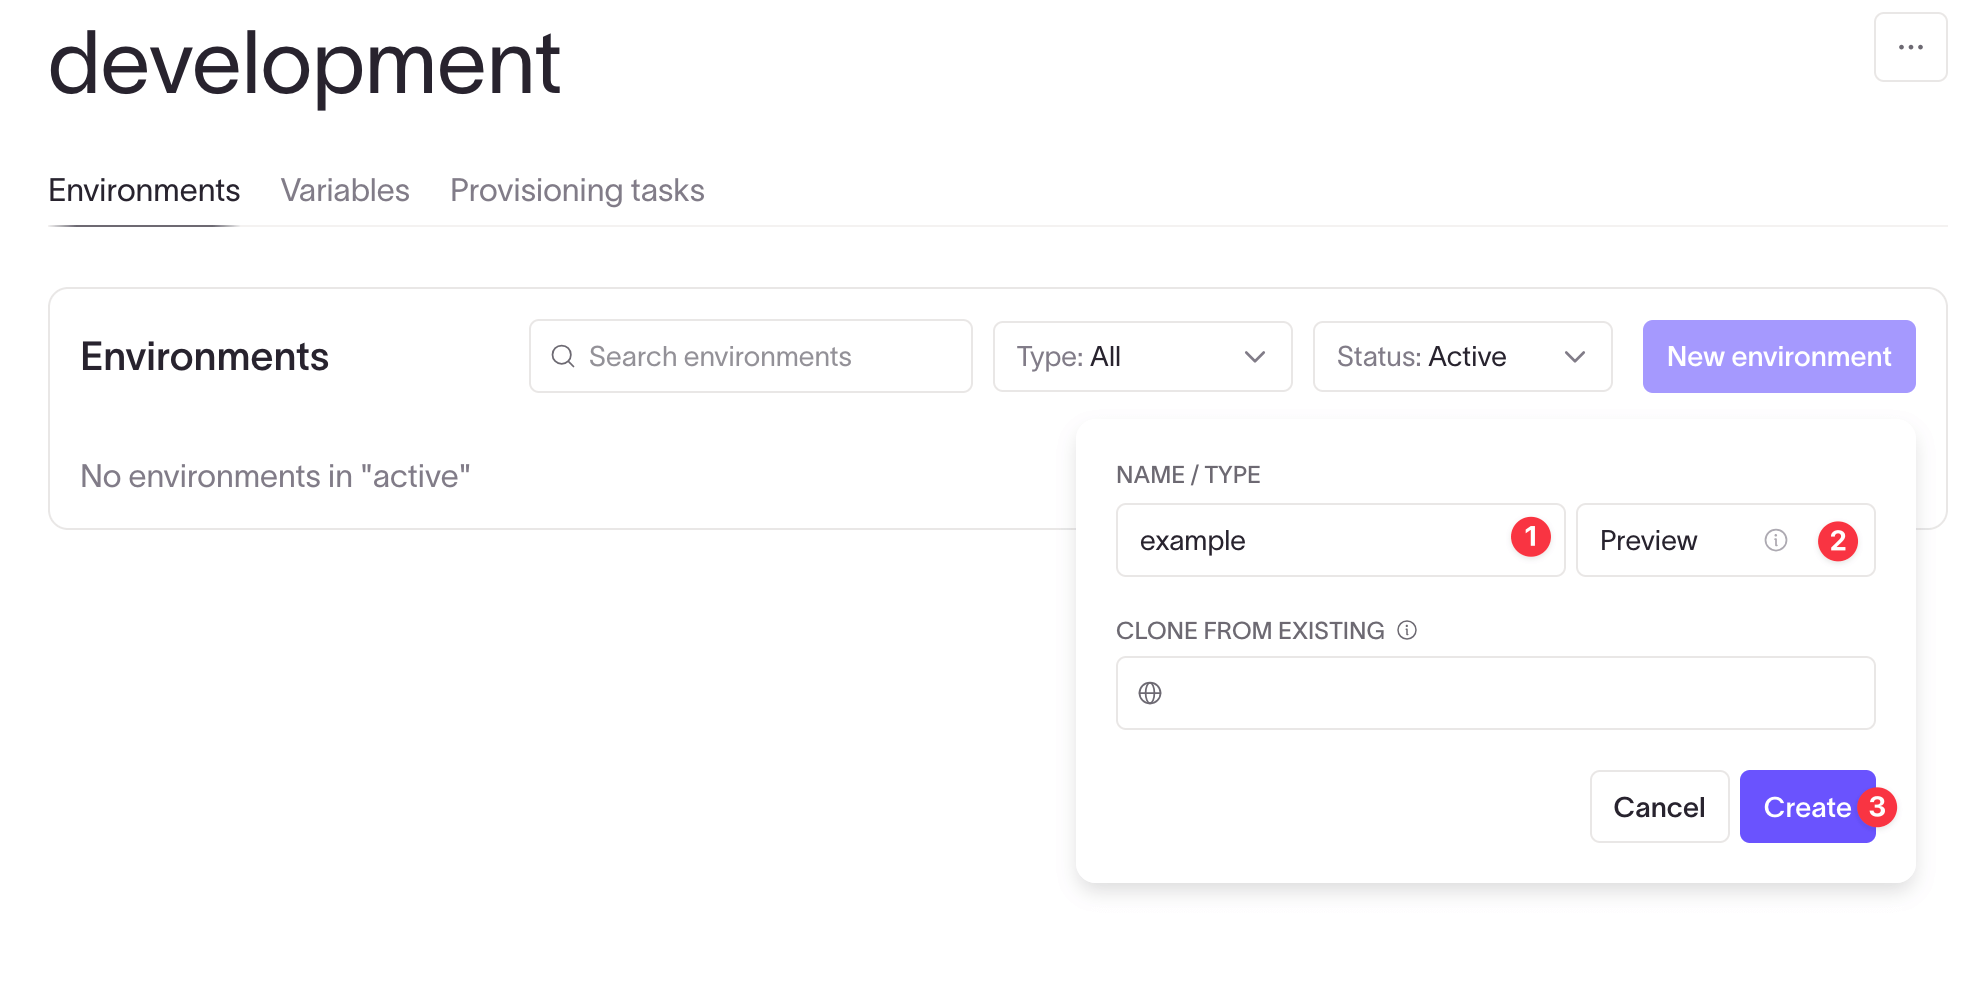
To create an environment, click New environment.
In the environment creation modal, give your environment a name and choose its type. This guide uses a Preview environment for demonstration purposes. Look at the documentation on the benefits of preview environments for more information on environments.
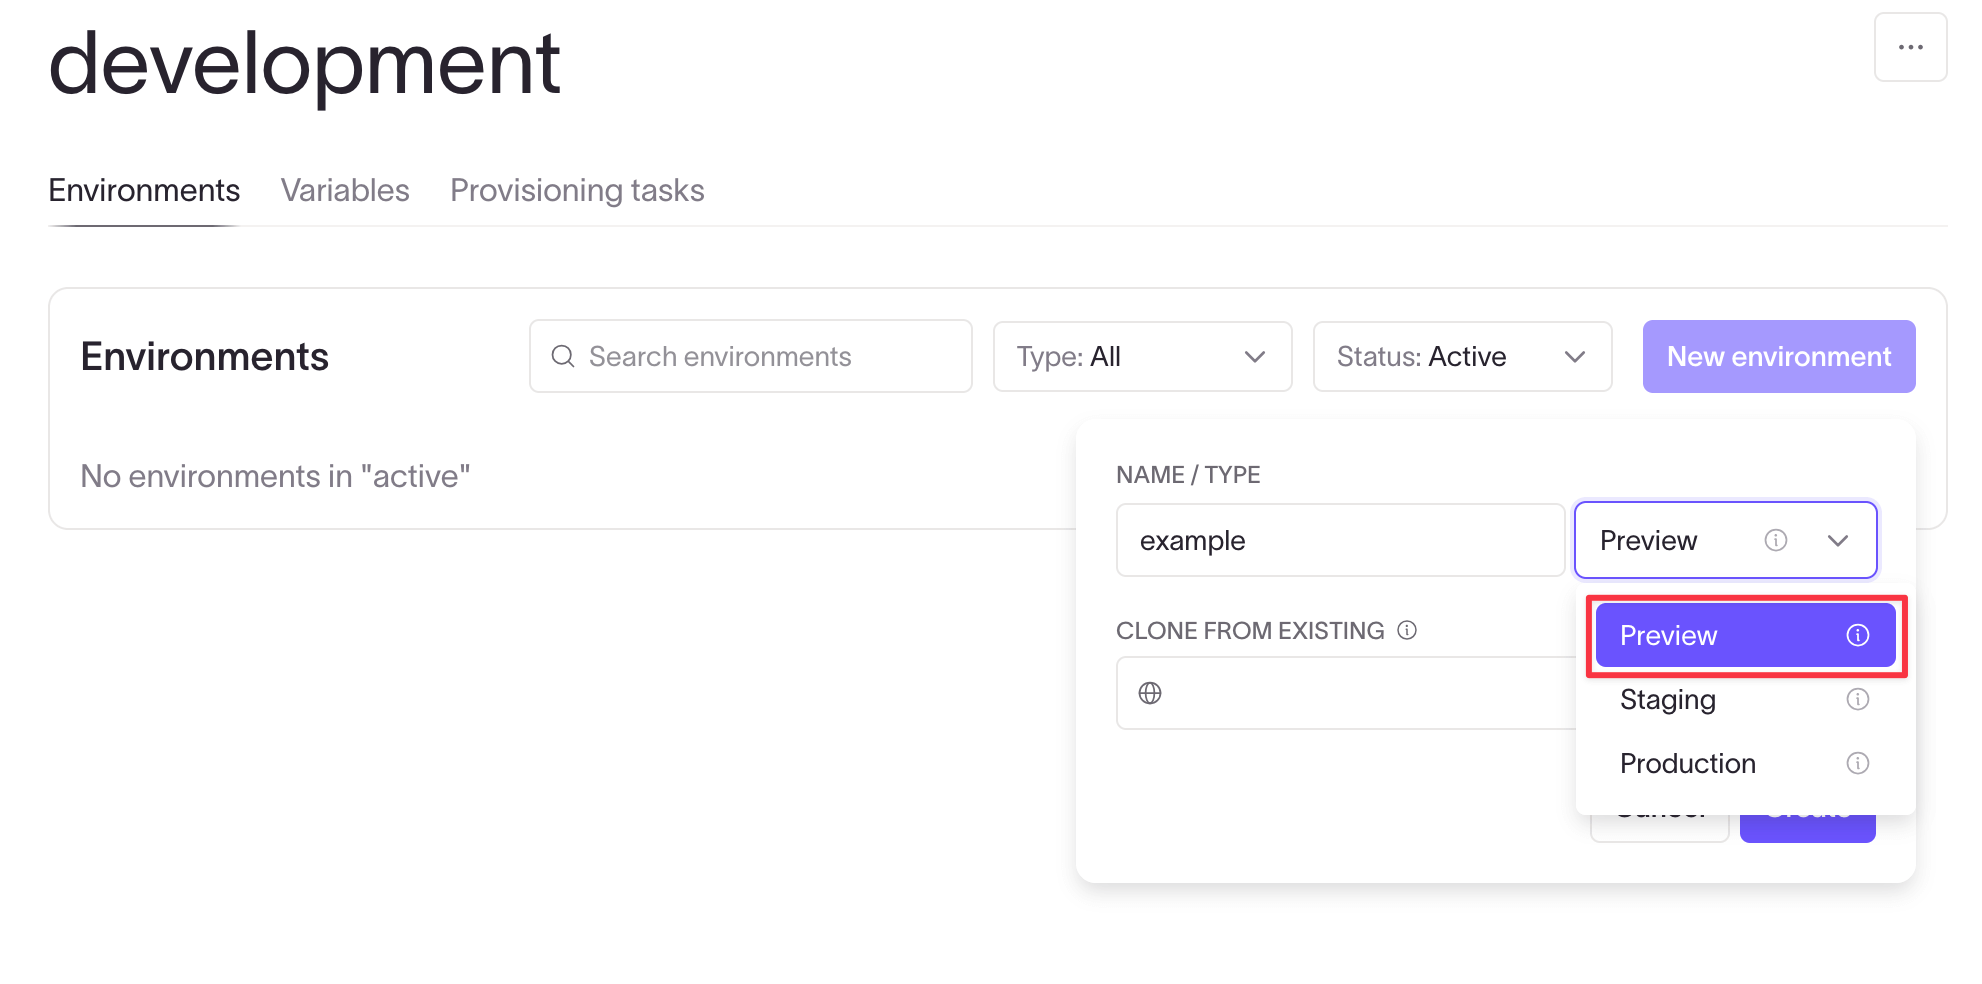
Click Create to create your environment.
Add services
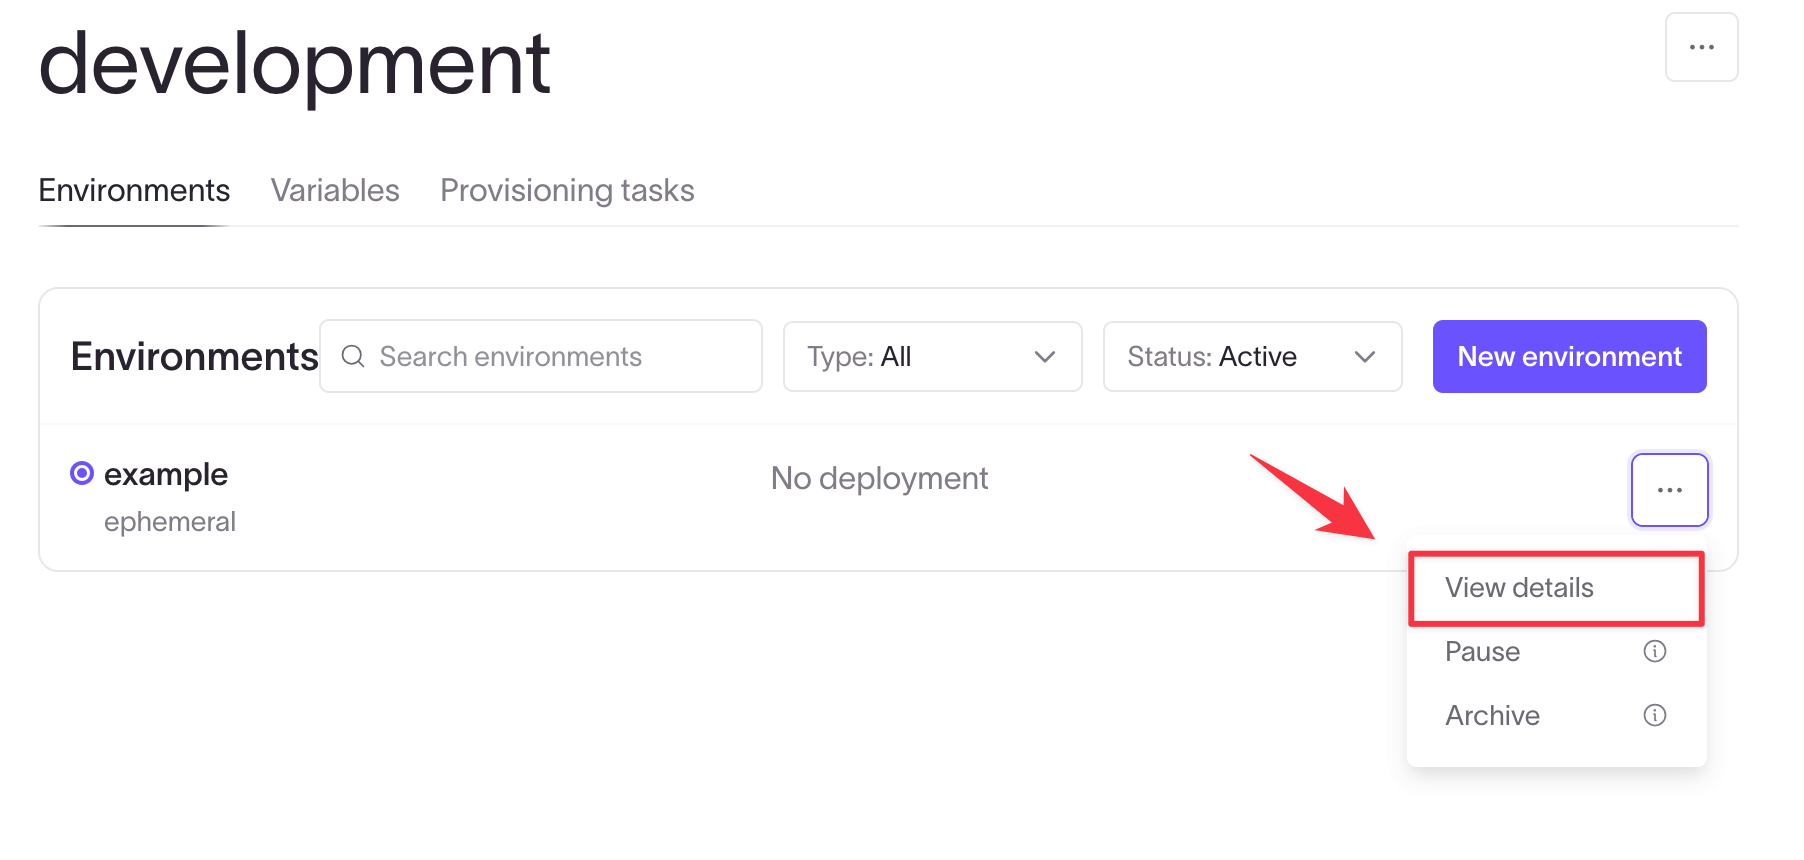
Open the three-dot menu next to the new environment and click View details.
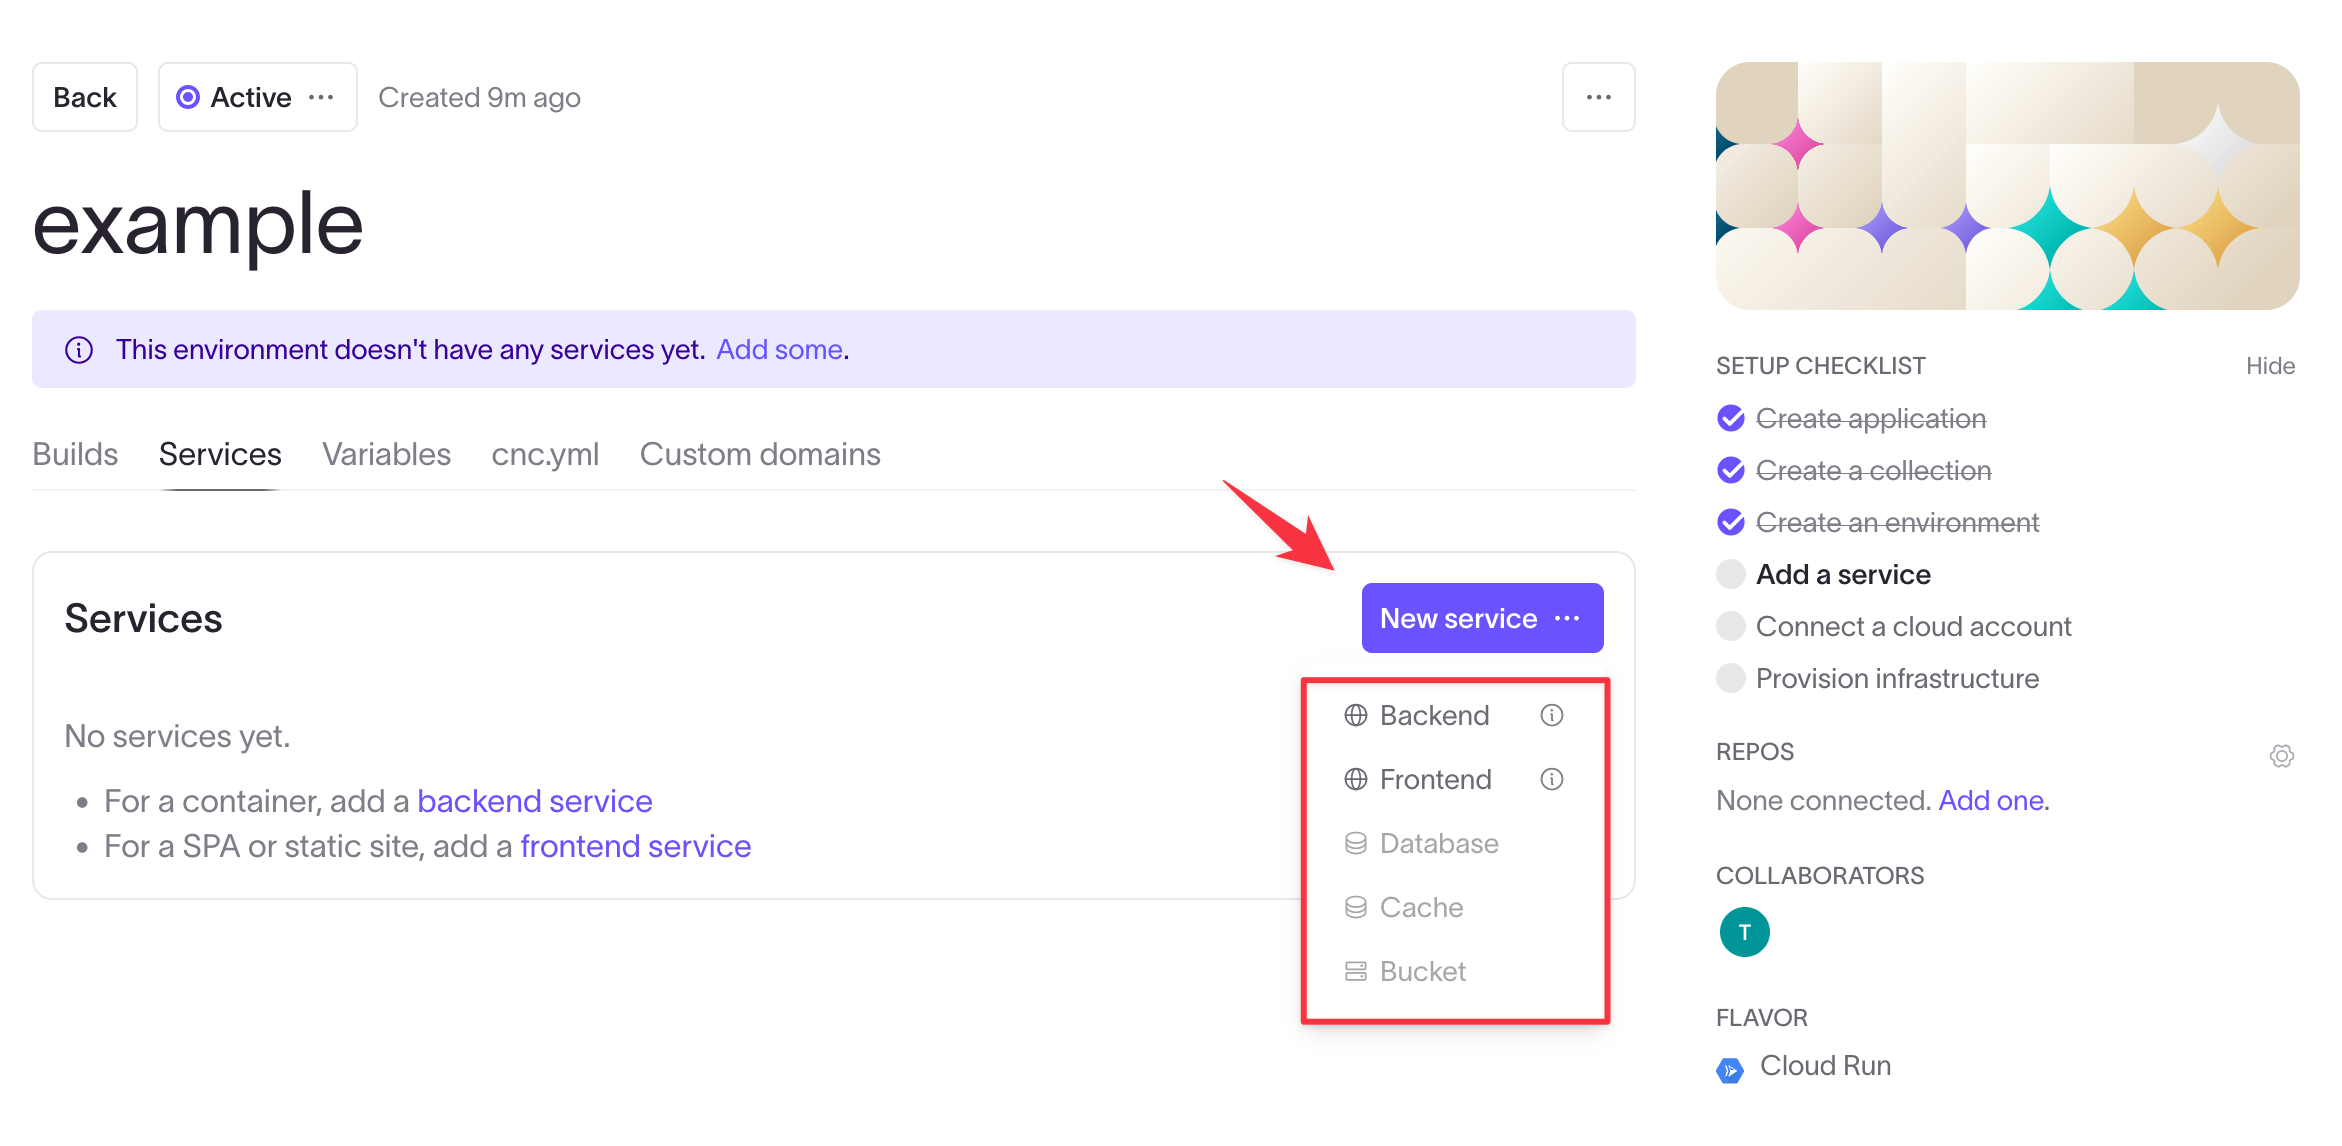
In the Services tab, you can view and create services for an application. Click the New service button to open a list of options.
- Select Backend to deploy a Docker container with your application.
- Select Frontend to deploy a single-page application or static site.
- Select Database to provision a database instance in your cloud account. Coherence saves the information you add here to be used by other services in the environment.
- Select Cache to deploy a Redis instance.
- Select Bucket to deploy an S3 bucket or equivalent.
Add a backend service
Select Backend from the new service dropdown to open the service creation form.
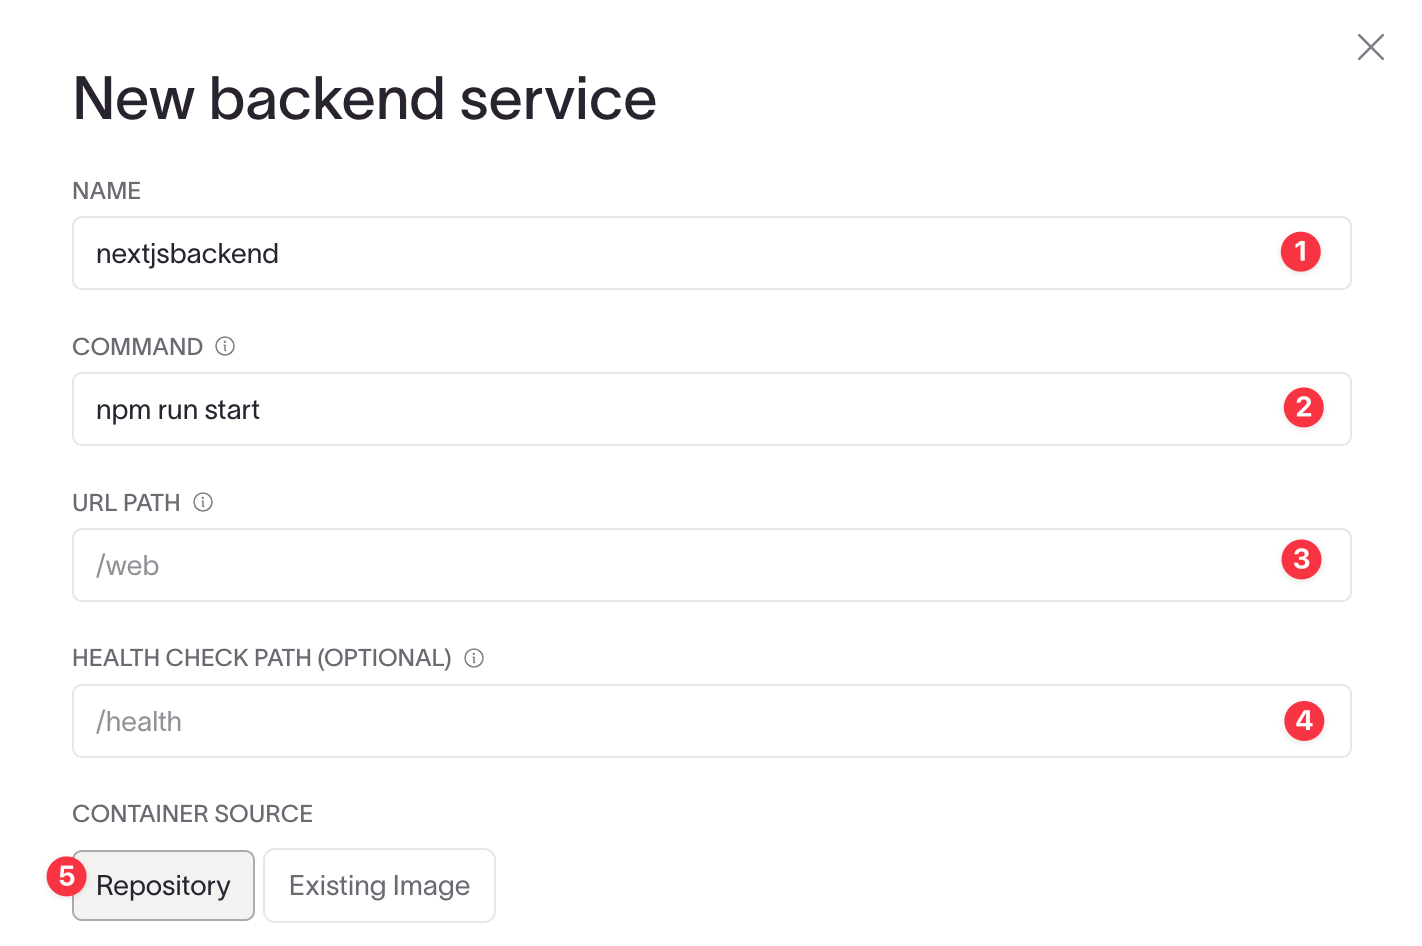
- Give your service a name, we use
nextjsbackend. - Define the command to use when your container starts in the Command field. In our case, this is
npm run start. - Add the path for the environment domain to route to for this service in the URL Path field. For this example, we'll leave this blank so the environment domain can be used as the root for our Next.js server.
- In the Health Check Path field, add the path Coherence should use to check if the service starts up and is correctly listening on a specified
$PORT. We can leave this blank for now. - In the Container Source field, you can choose to use a repository containing your services code or create a new service from an existing Docker image. We will choose
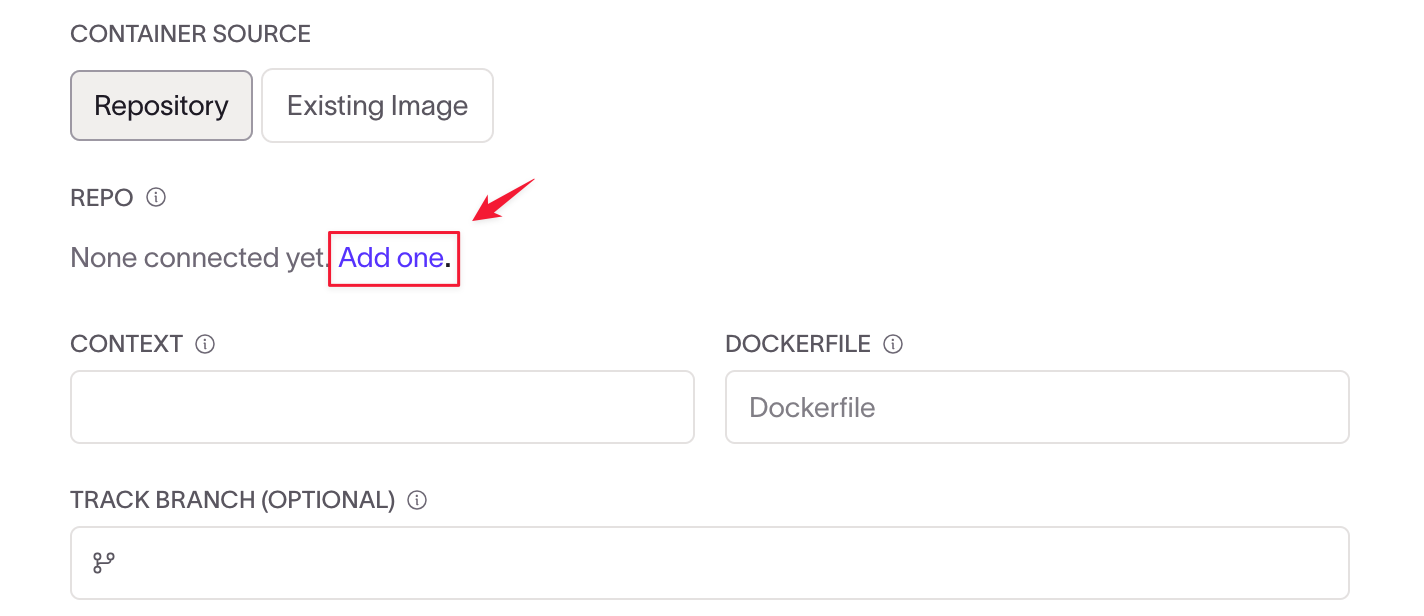
Repositoryfor our backend service.
In the Repo section, click Add one to connect your repository.
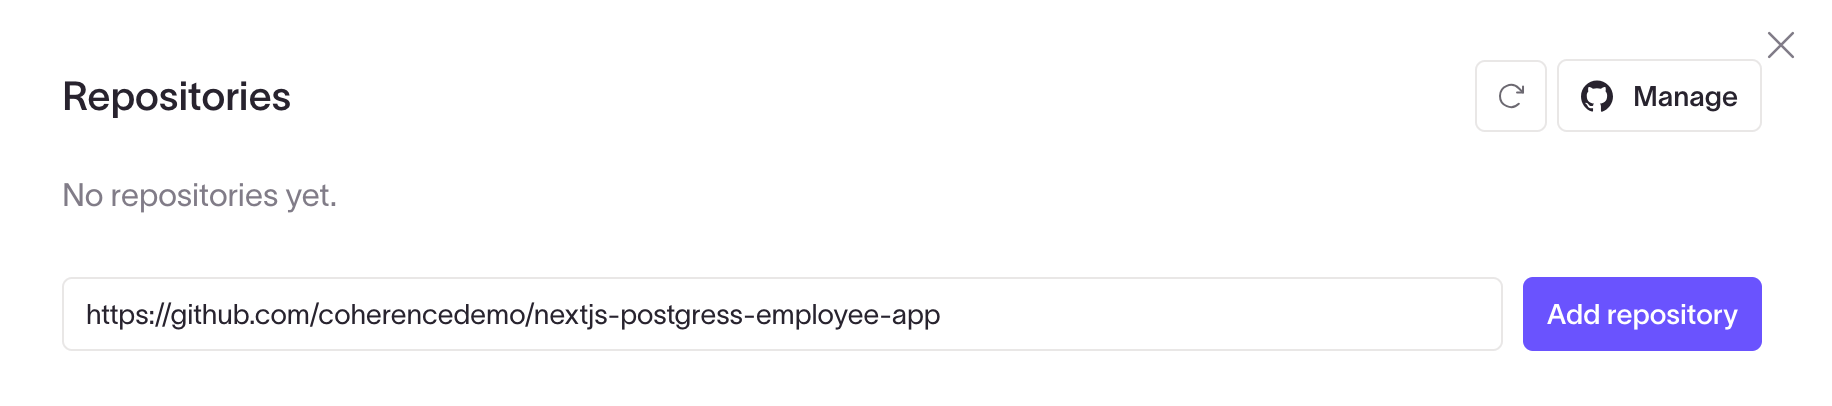
Copy the URL of the repository you previously forked on GitHub and paste it into the input field in the popup that opens. Click Add repository. Coherence will show the repository details with a Connected tag if it can access the repo. If the repository tag is Not connected, give Coherence access to the repo by clicking Connect and following the prompts on GitHub to install the Coherence GitHub application in the repository.
Once the repo is connected, complete the remaining fields in the service creation form.
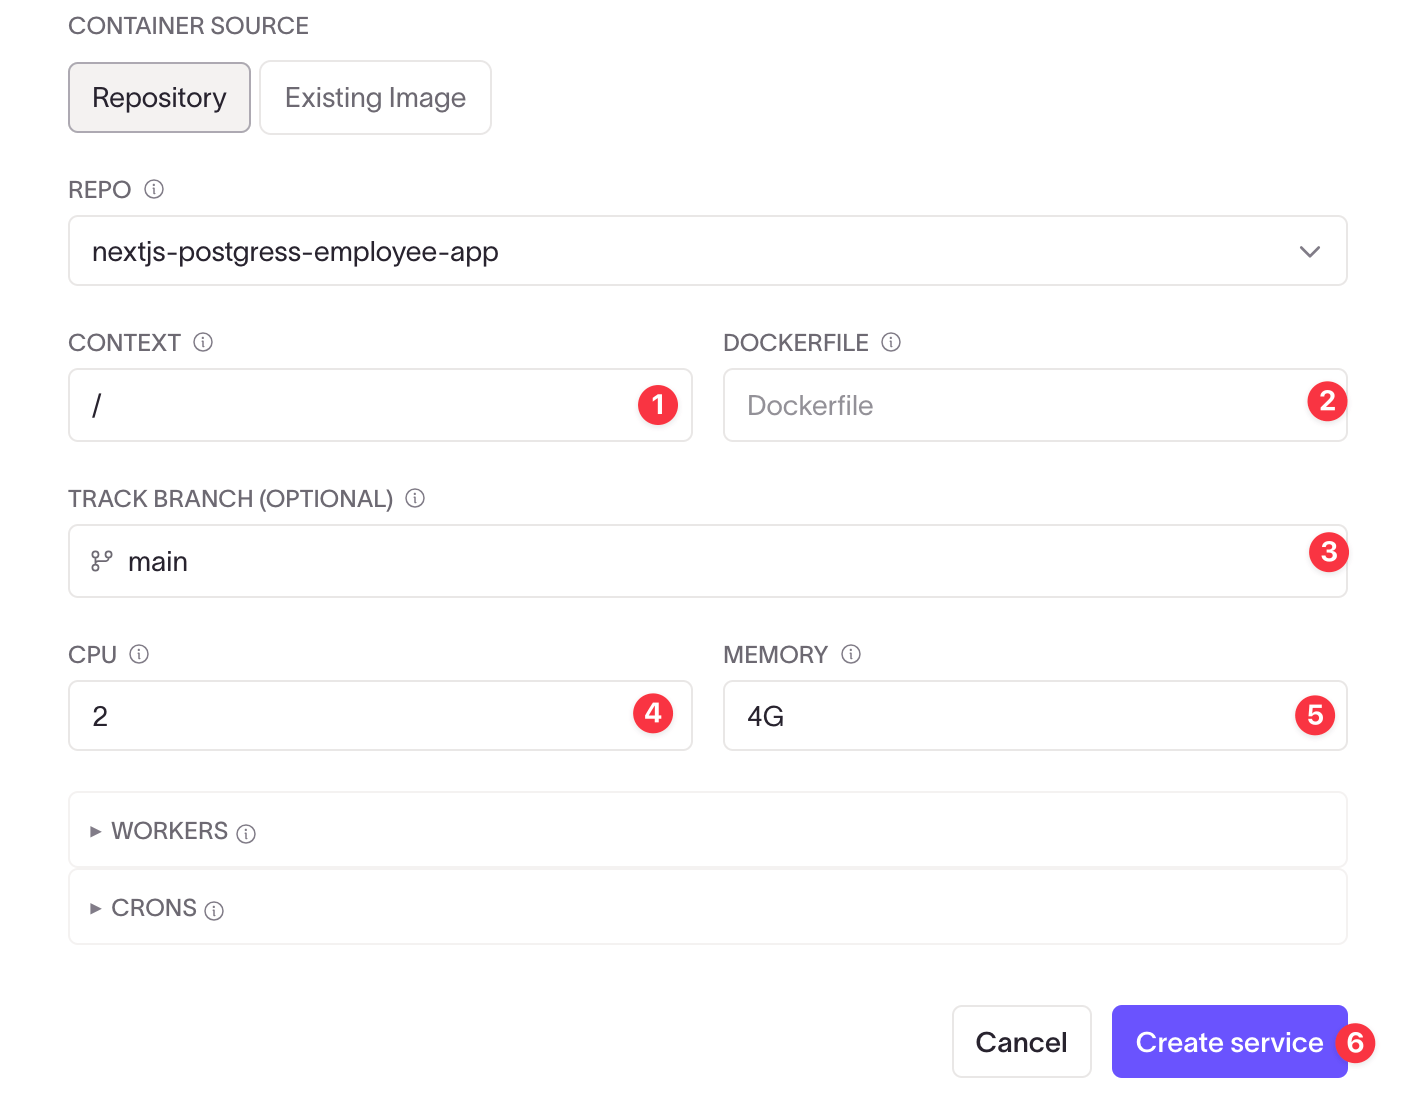
-
Context: Specify the directory Docker should use as the base directory for the build. The context directory contains the Dockerfile and any files the Docker build process uses. We use
/here, as the Dockerfile is in the repository root. -
Dockerfile: You can specify an alternate Dockerfile here if you are not using the default Dockerfile name or if the Dockerfile is located elsewhere within the context directory. We'll leave this blank as we're using the default name
Dockerfile. -
Track Branch: In this optional field, you can specify the branch to use to create the service. This is handy if you have multiple branches for staging and development and you want to have multiple environments in Coherence for each branch. We use
mainhere. -
CPU: Specify the CPU limit for resources dedicated to this service instance. We chose 2 here.
-
Memory: Specify the memory limit for resources dedicated to this service instance. We selected 4G.
Click Create service to create your backend service.
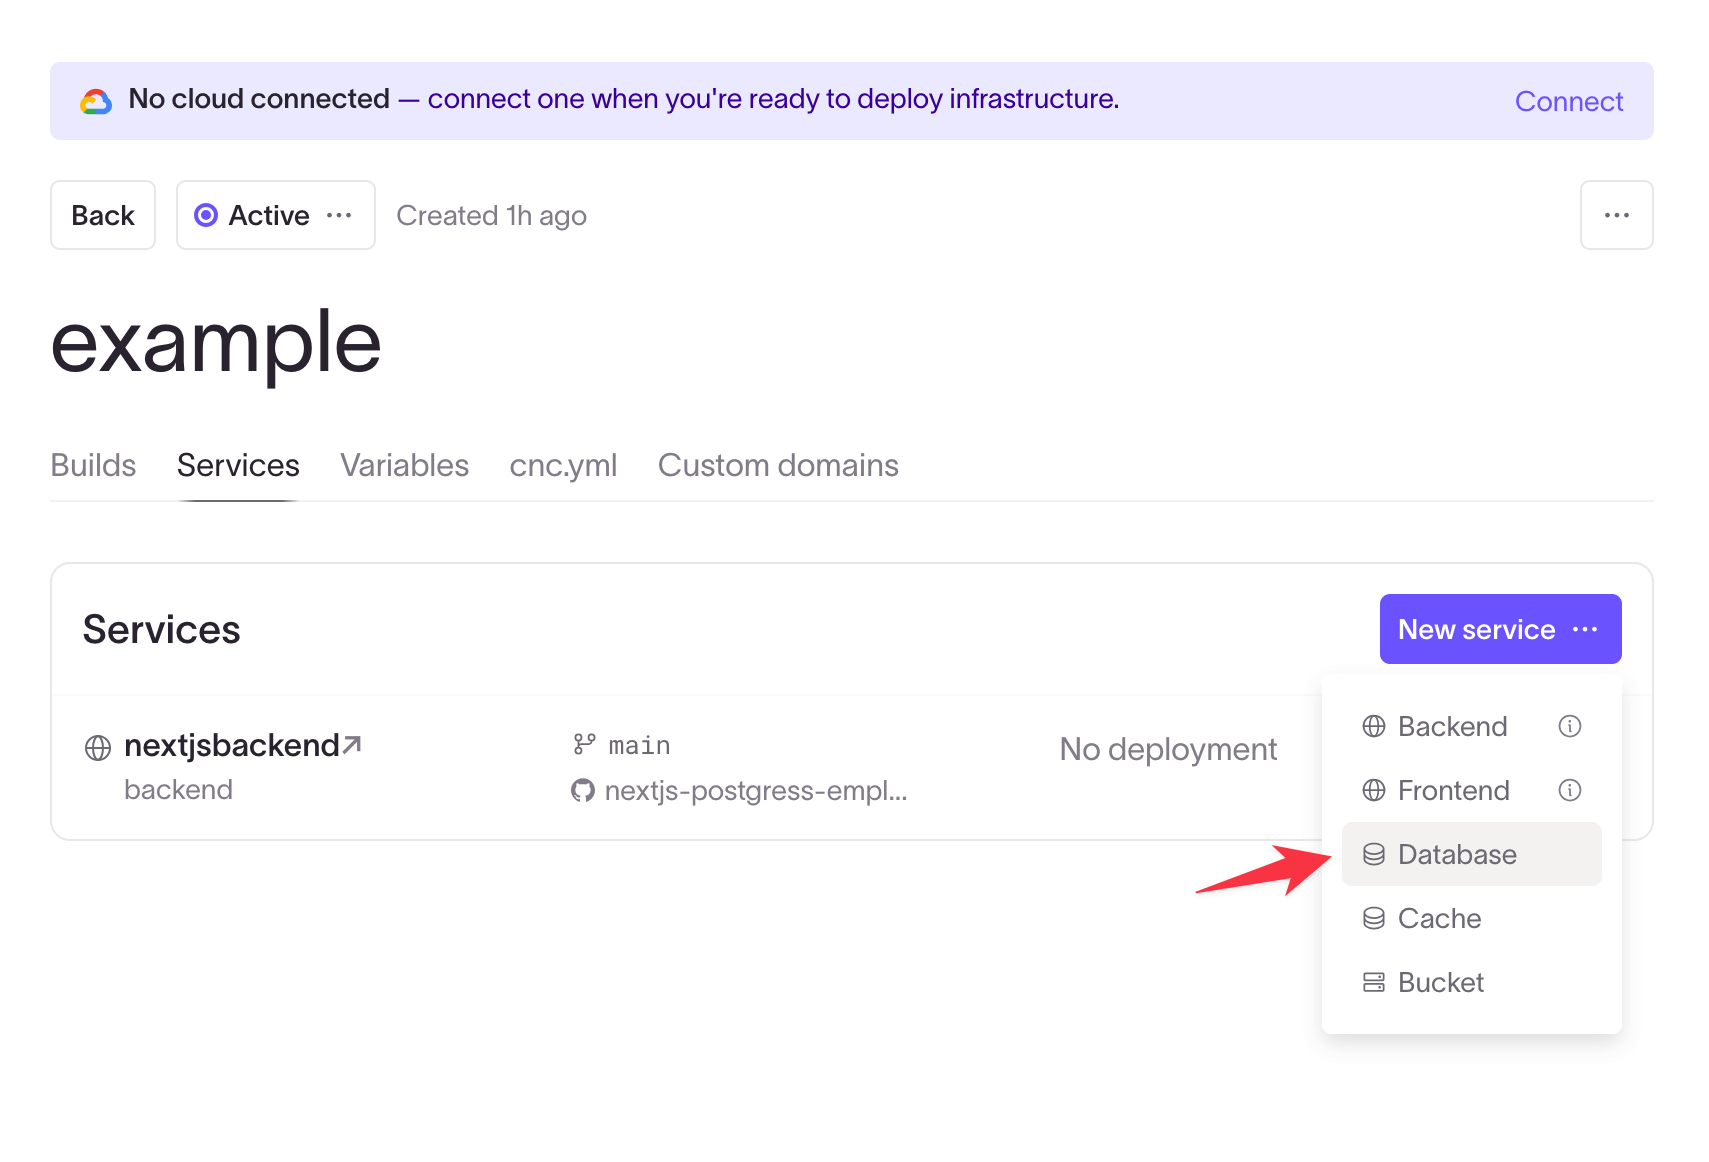
Add a database service
Next we'll create the database service for the project's PostgreSQL database.
In the New service menu, click Database.
Coherence uses the information you provide in the database creation modal to provision a database instance in your cloud account. This information is also saved so that it can be used by other services in the environment.
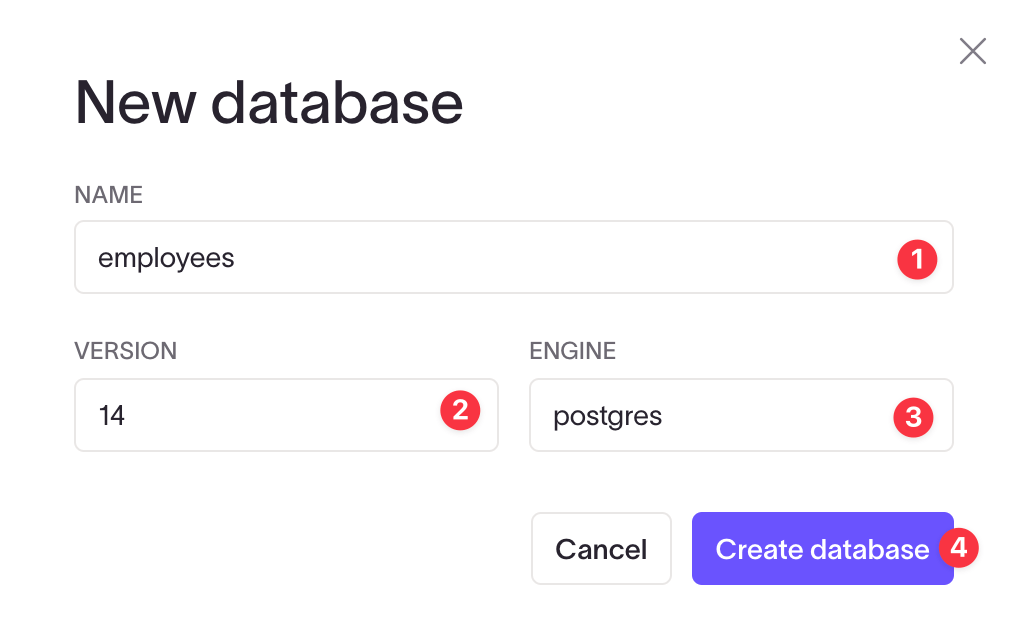
- Define the database's name. In our case, the name is
employees. Make sure the name matches the name you use in the project source code. - Specify the database engine version to use. This project uses PostgreSQL 14, so we configure the database to use version
14. - Specify the database engine the database should use. We're using
postgres.
Click Create database to add your database as a service.
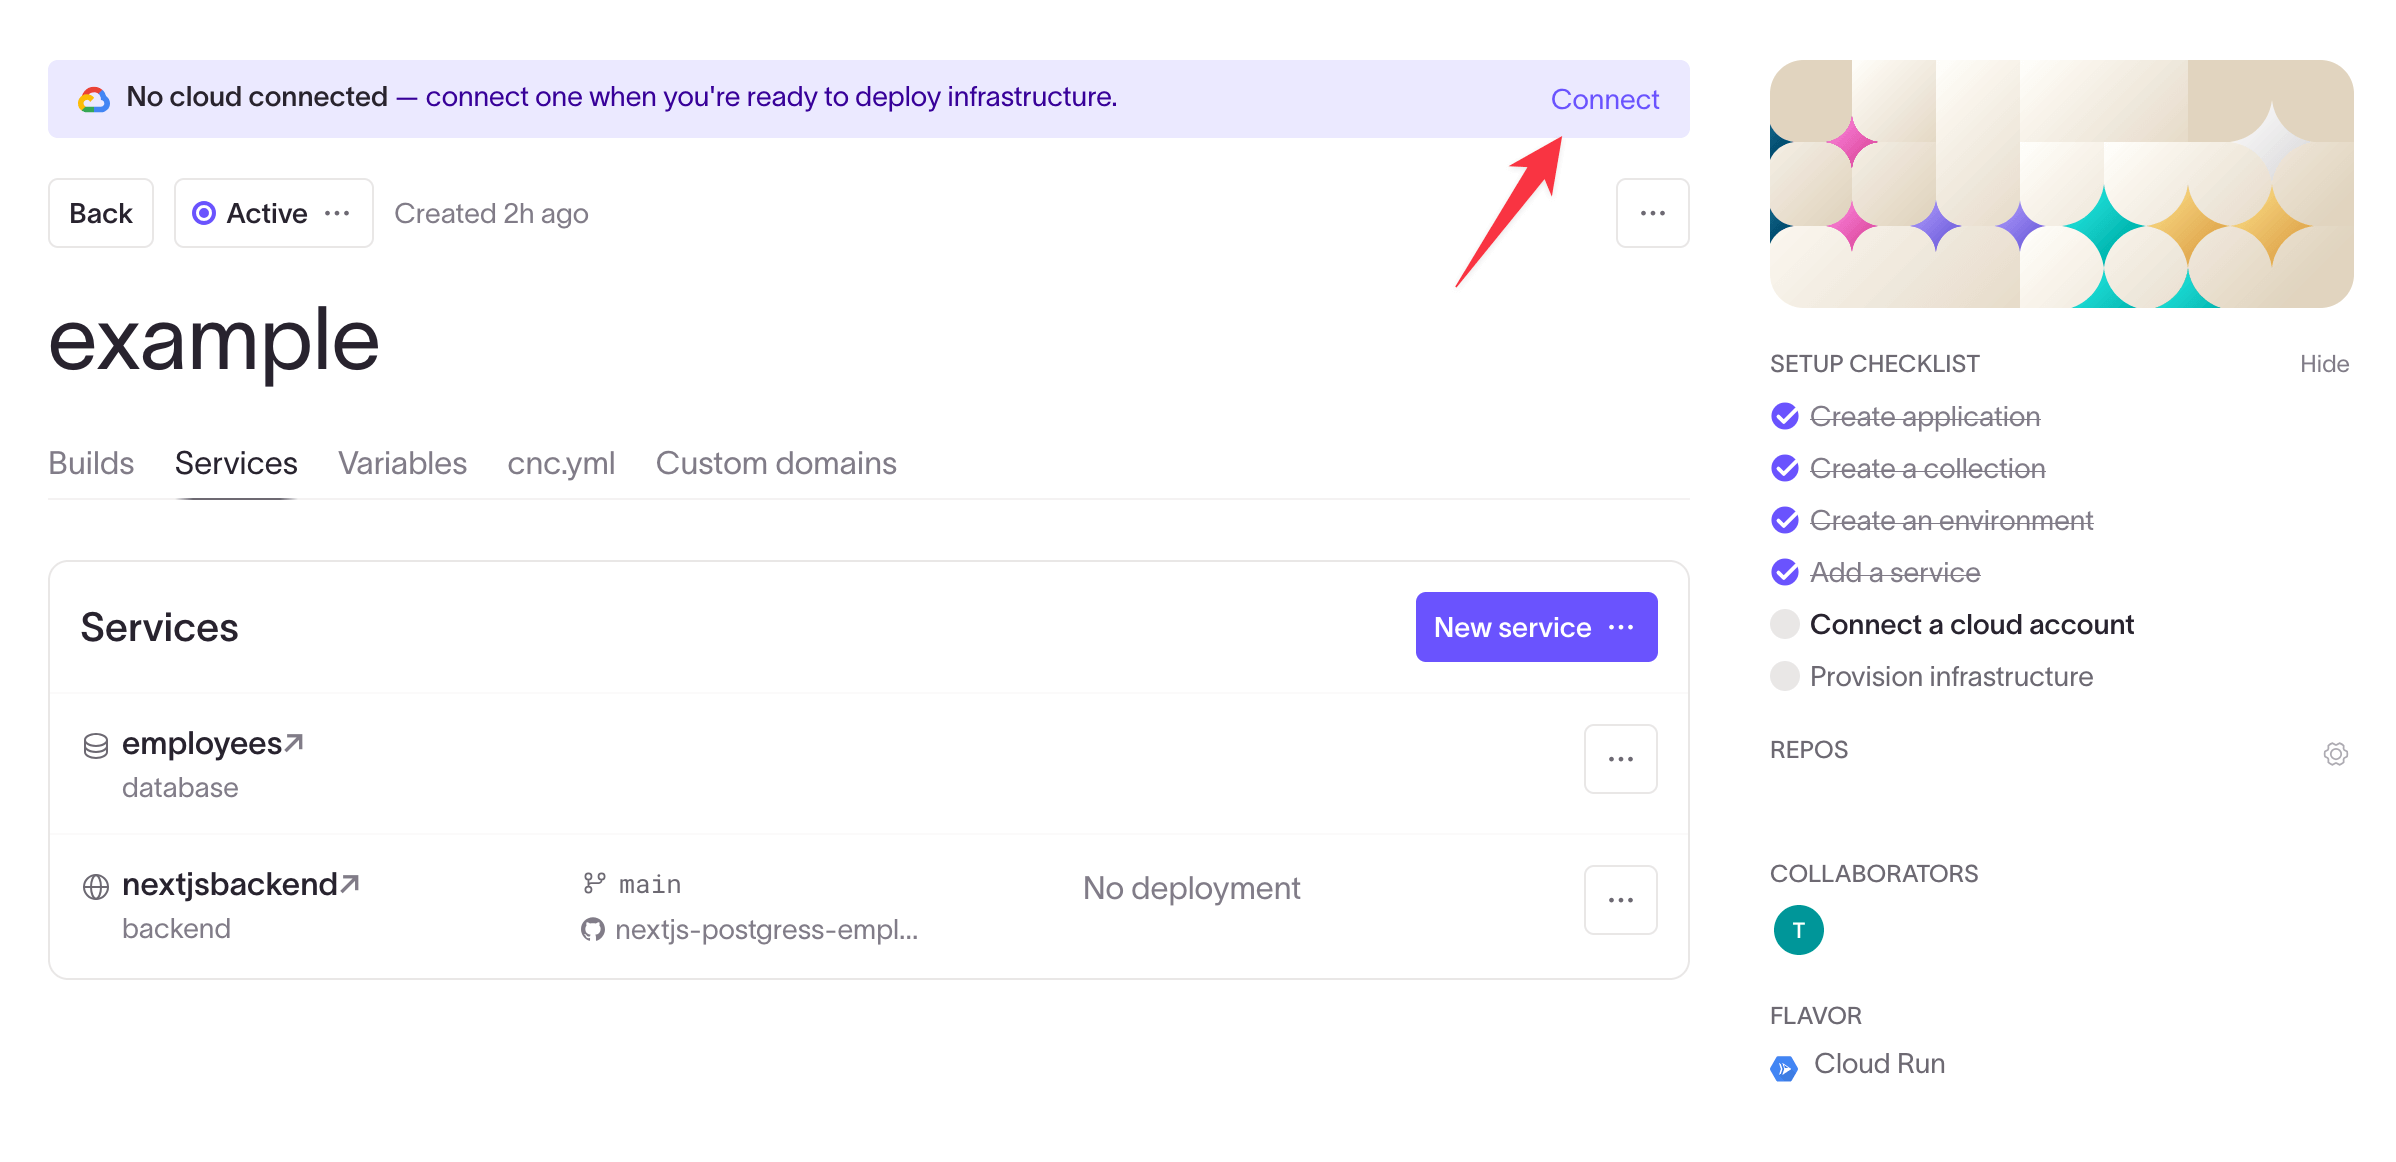
Connect your cloud account
Now you need to connect to your Google Cloud Platform account.
If you haven't created a project yet, create a Google Cloud project first.
In your Coherence project dashboard, click Connect at the top.
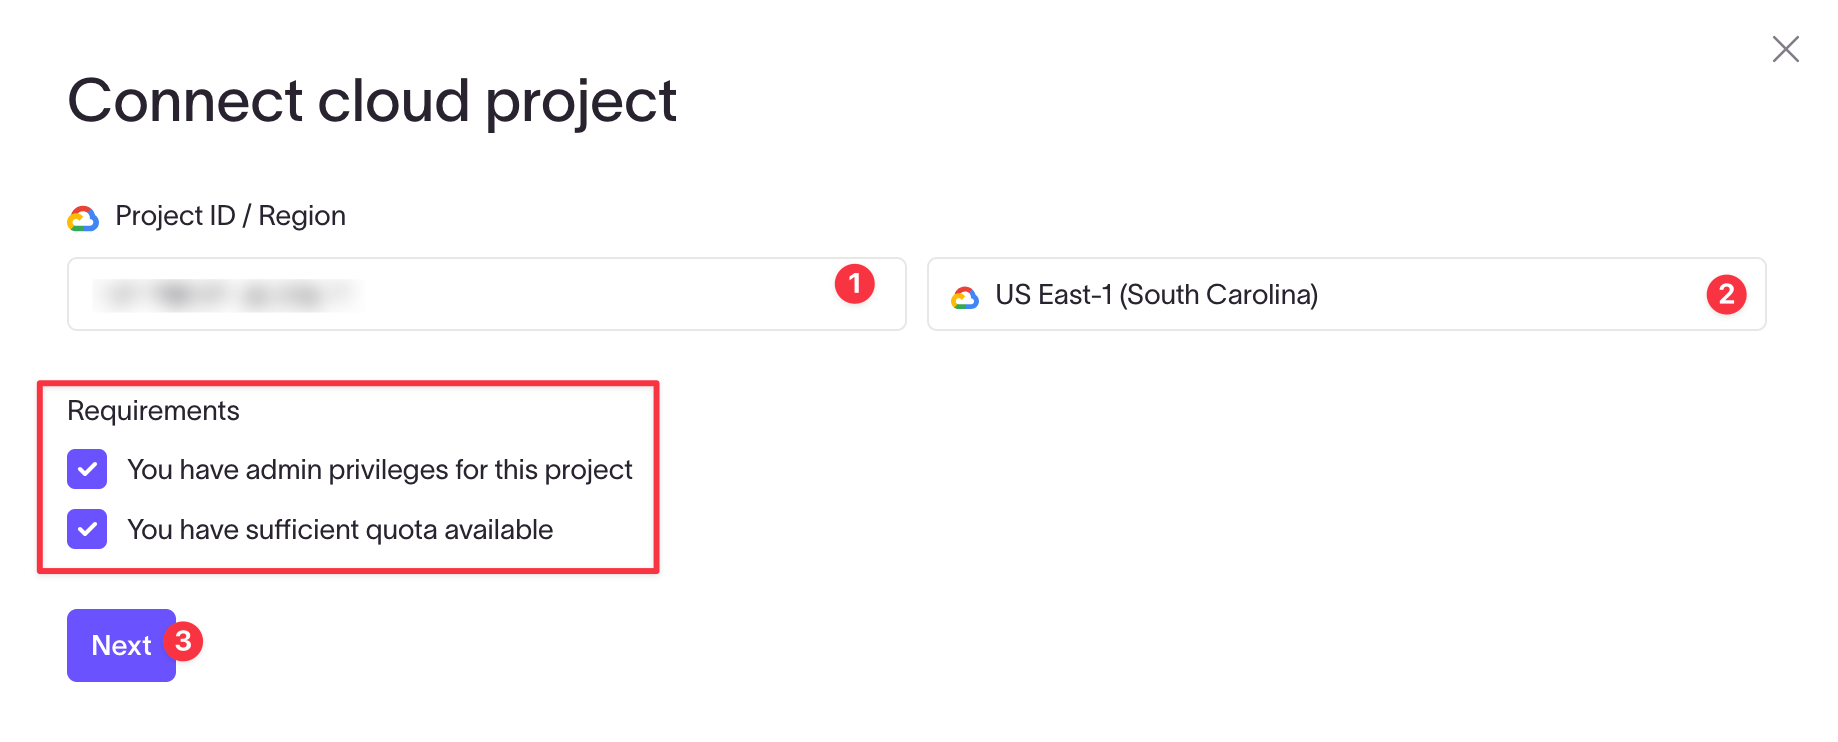
- Enter your Google Cloud project ID. Find your project ID on the project's main page in the Google Cloud console.
- Select the region to use for your cloud instance.
- Ensure your account meets the requirements and click Next.
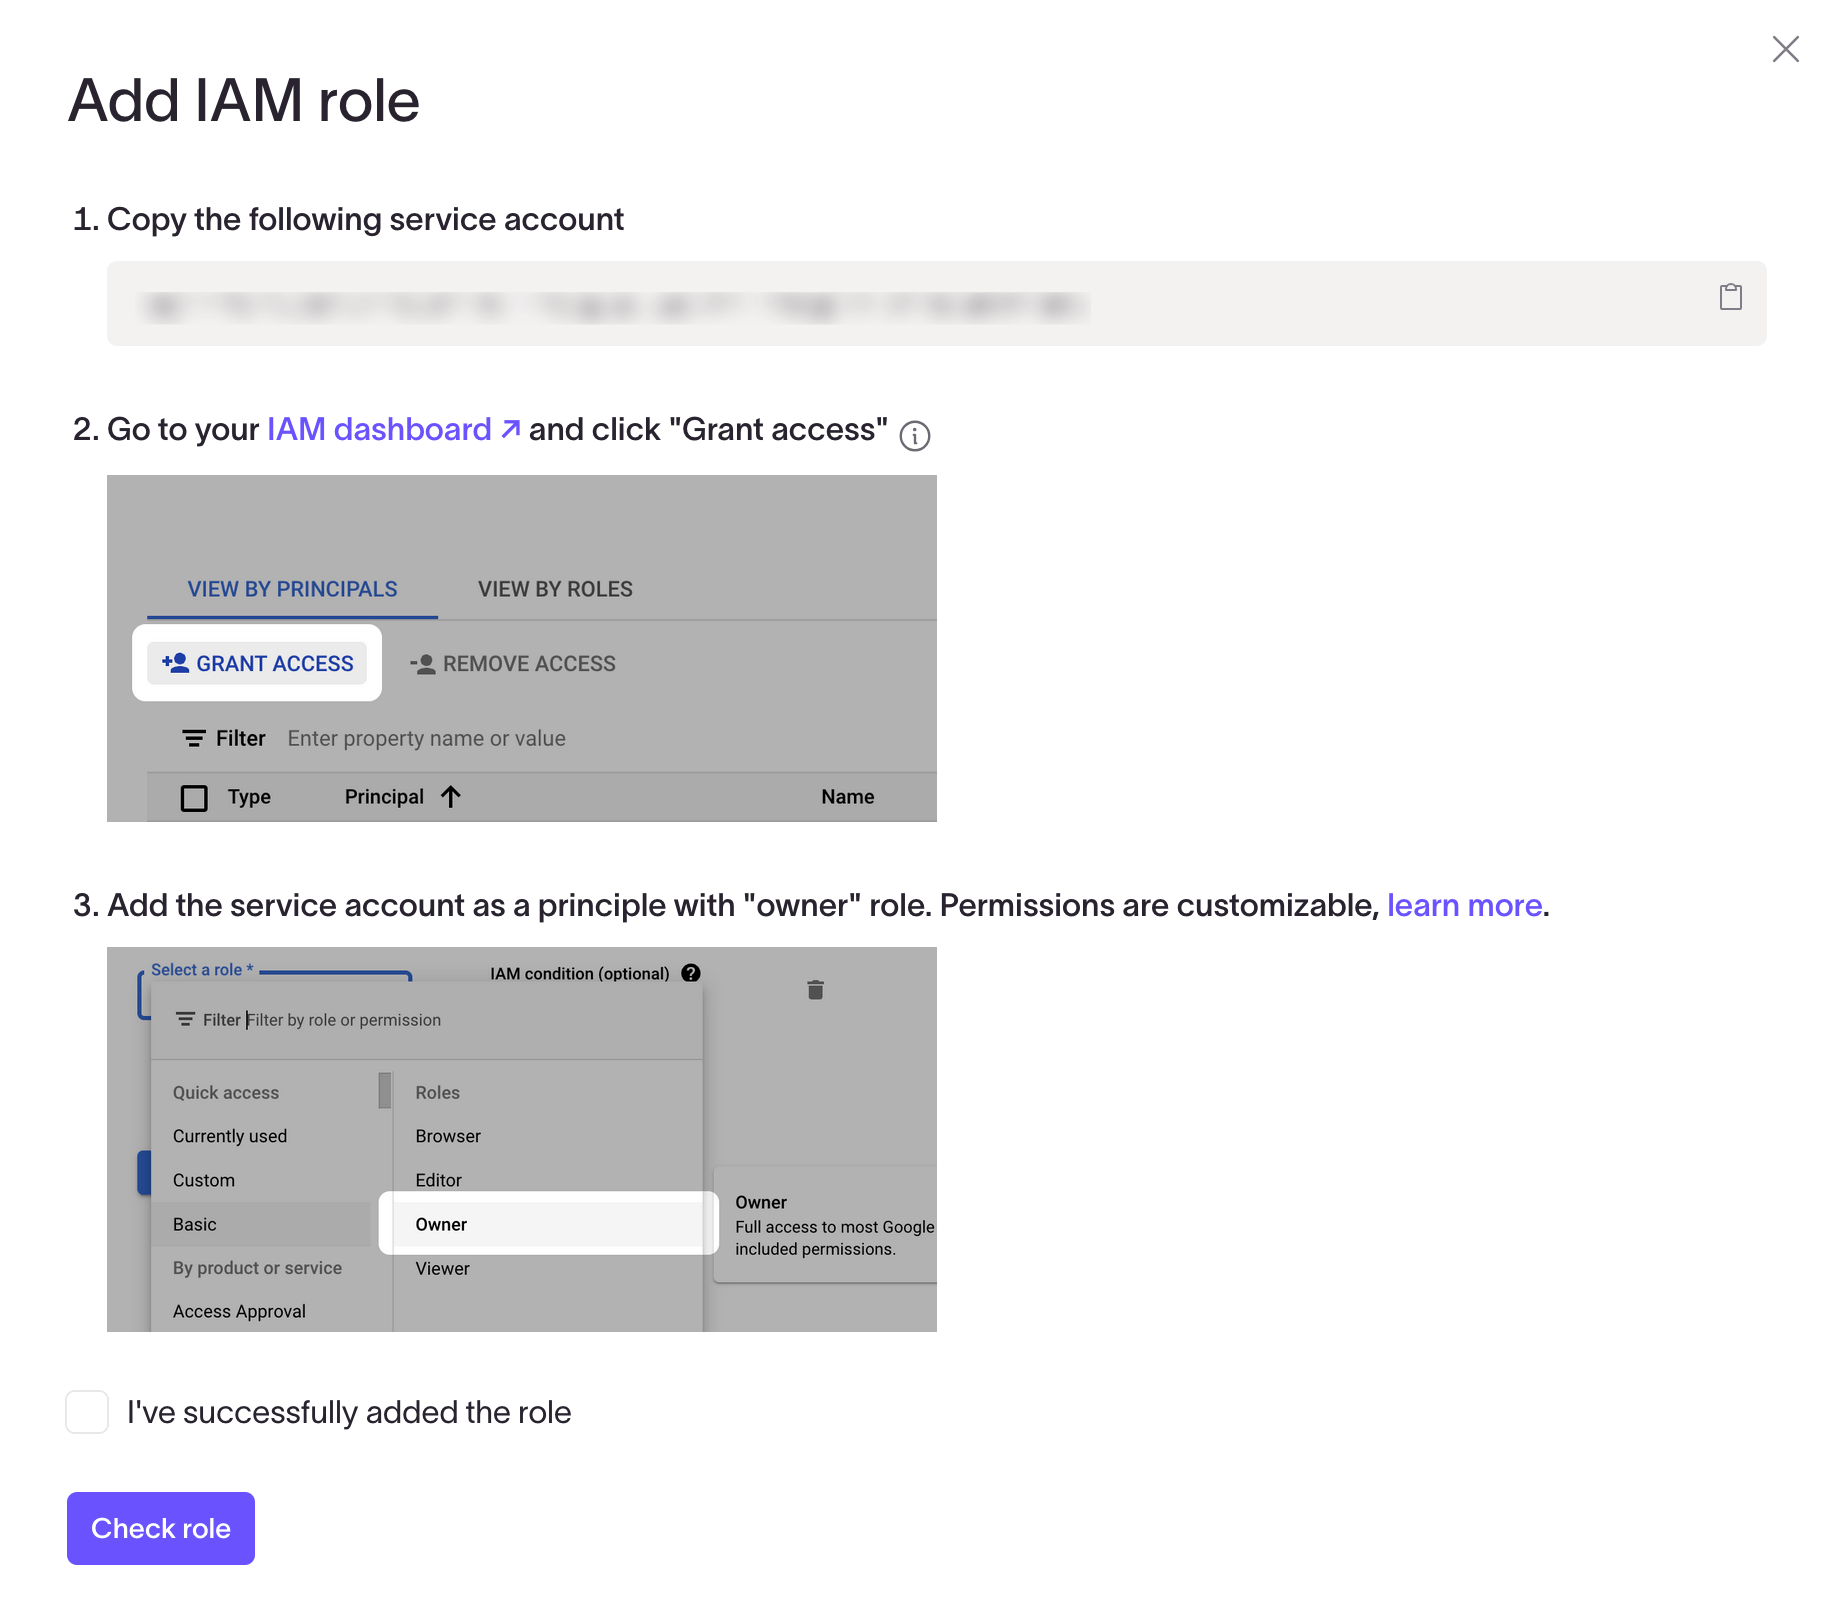
Now you need to give Coherence access to your Google Cloud project. Follow the on-screen steps to connect to the service account.
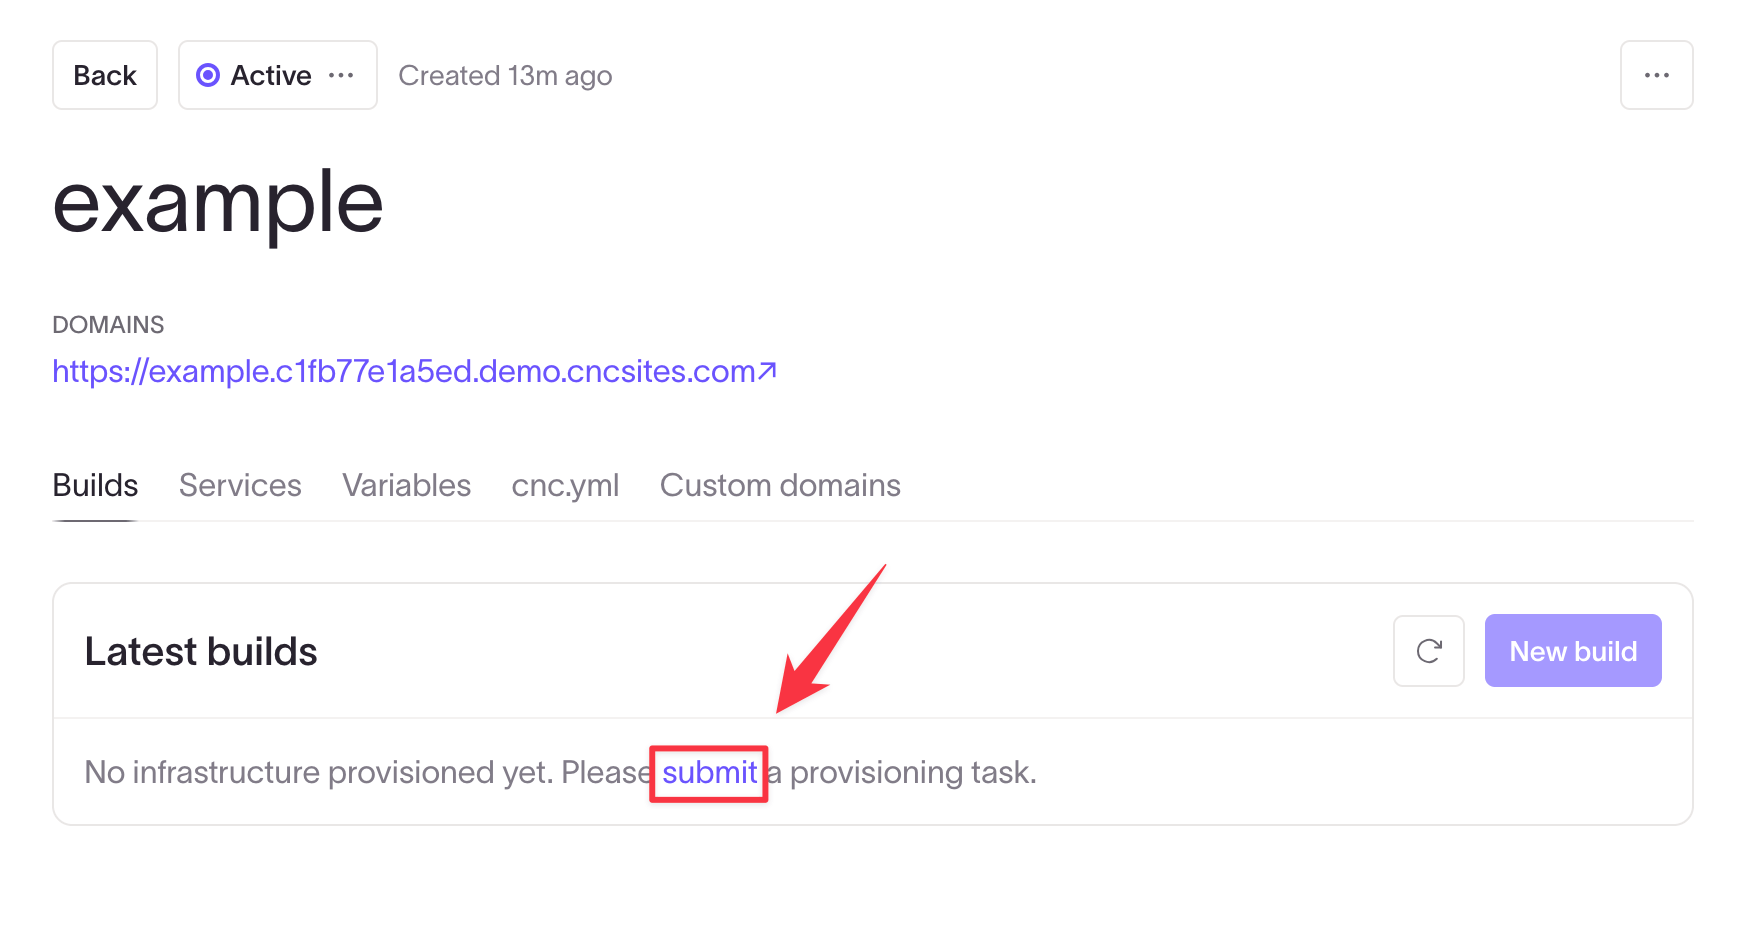
Once Coherence has been granted access to your project, you need to submit a provisioning task so that Coherence can automatically set up and manage the necessary cloud resources for your collection.
Click submit to go to the Provisioning tasks page.
Click Submit new task.
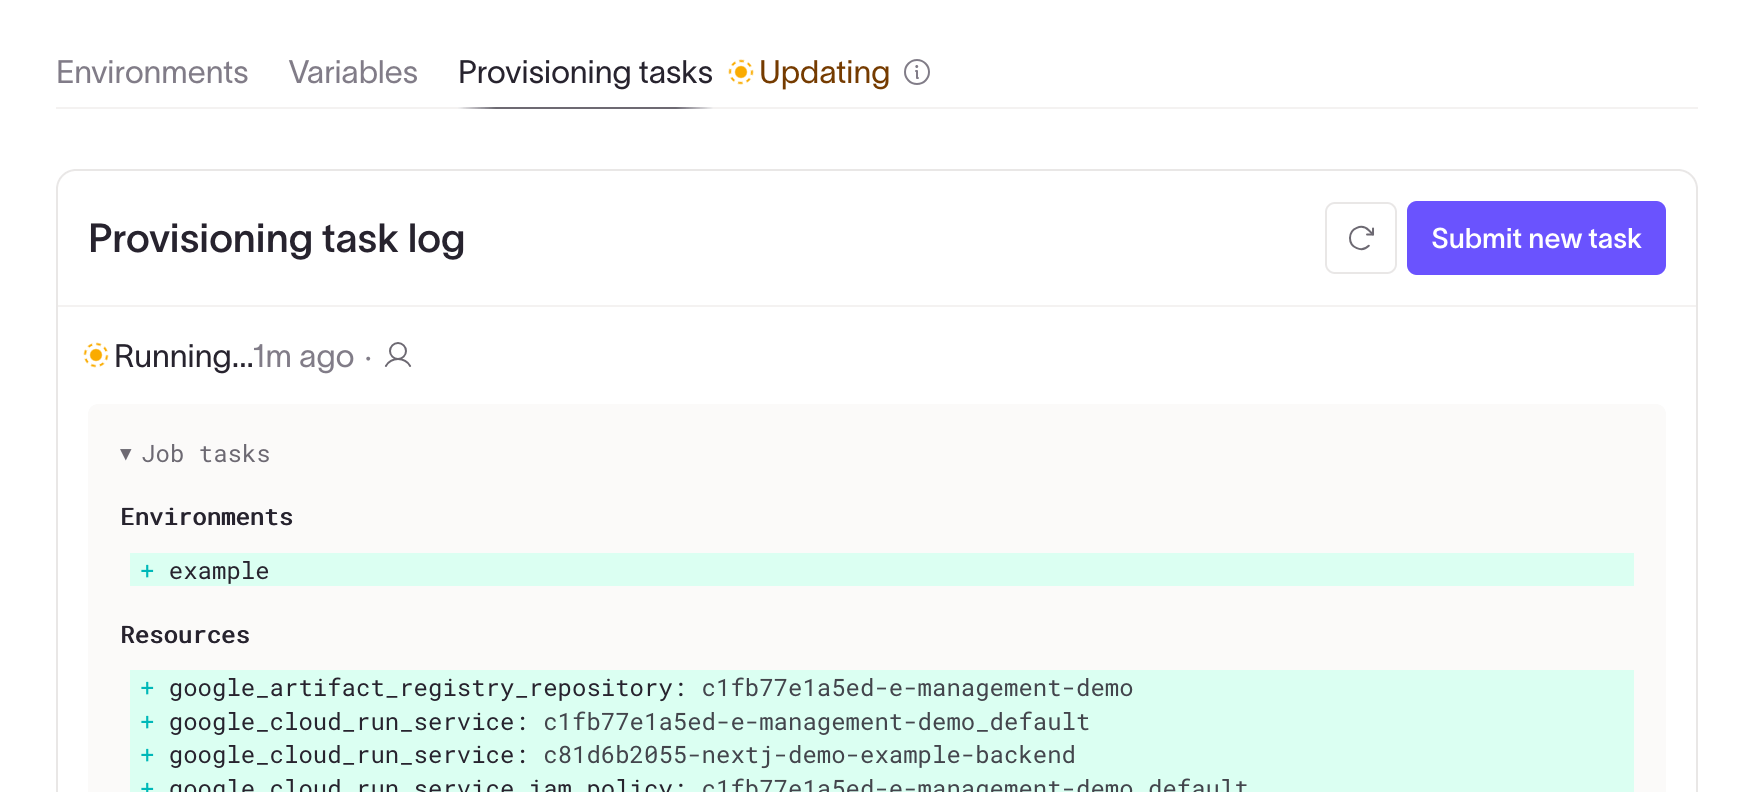
Coherence will now automatically provision infrastructure for your project based on your service requirements.
Edit the cnc.yml file
This application requires database migrations. You can do migrations locally using cnc, or you can add a migration command to the cnc.yml file on the cnc.yml tab of your environment.
migrate: npm run migrate up
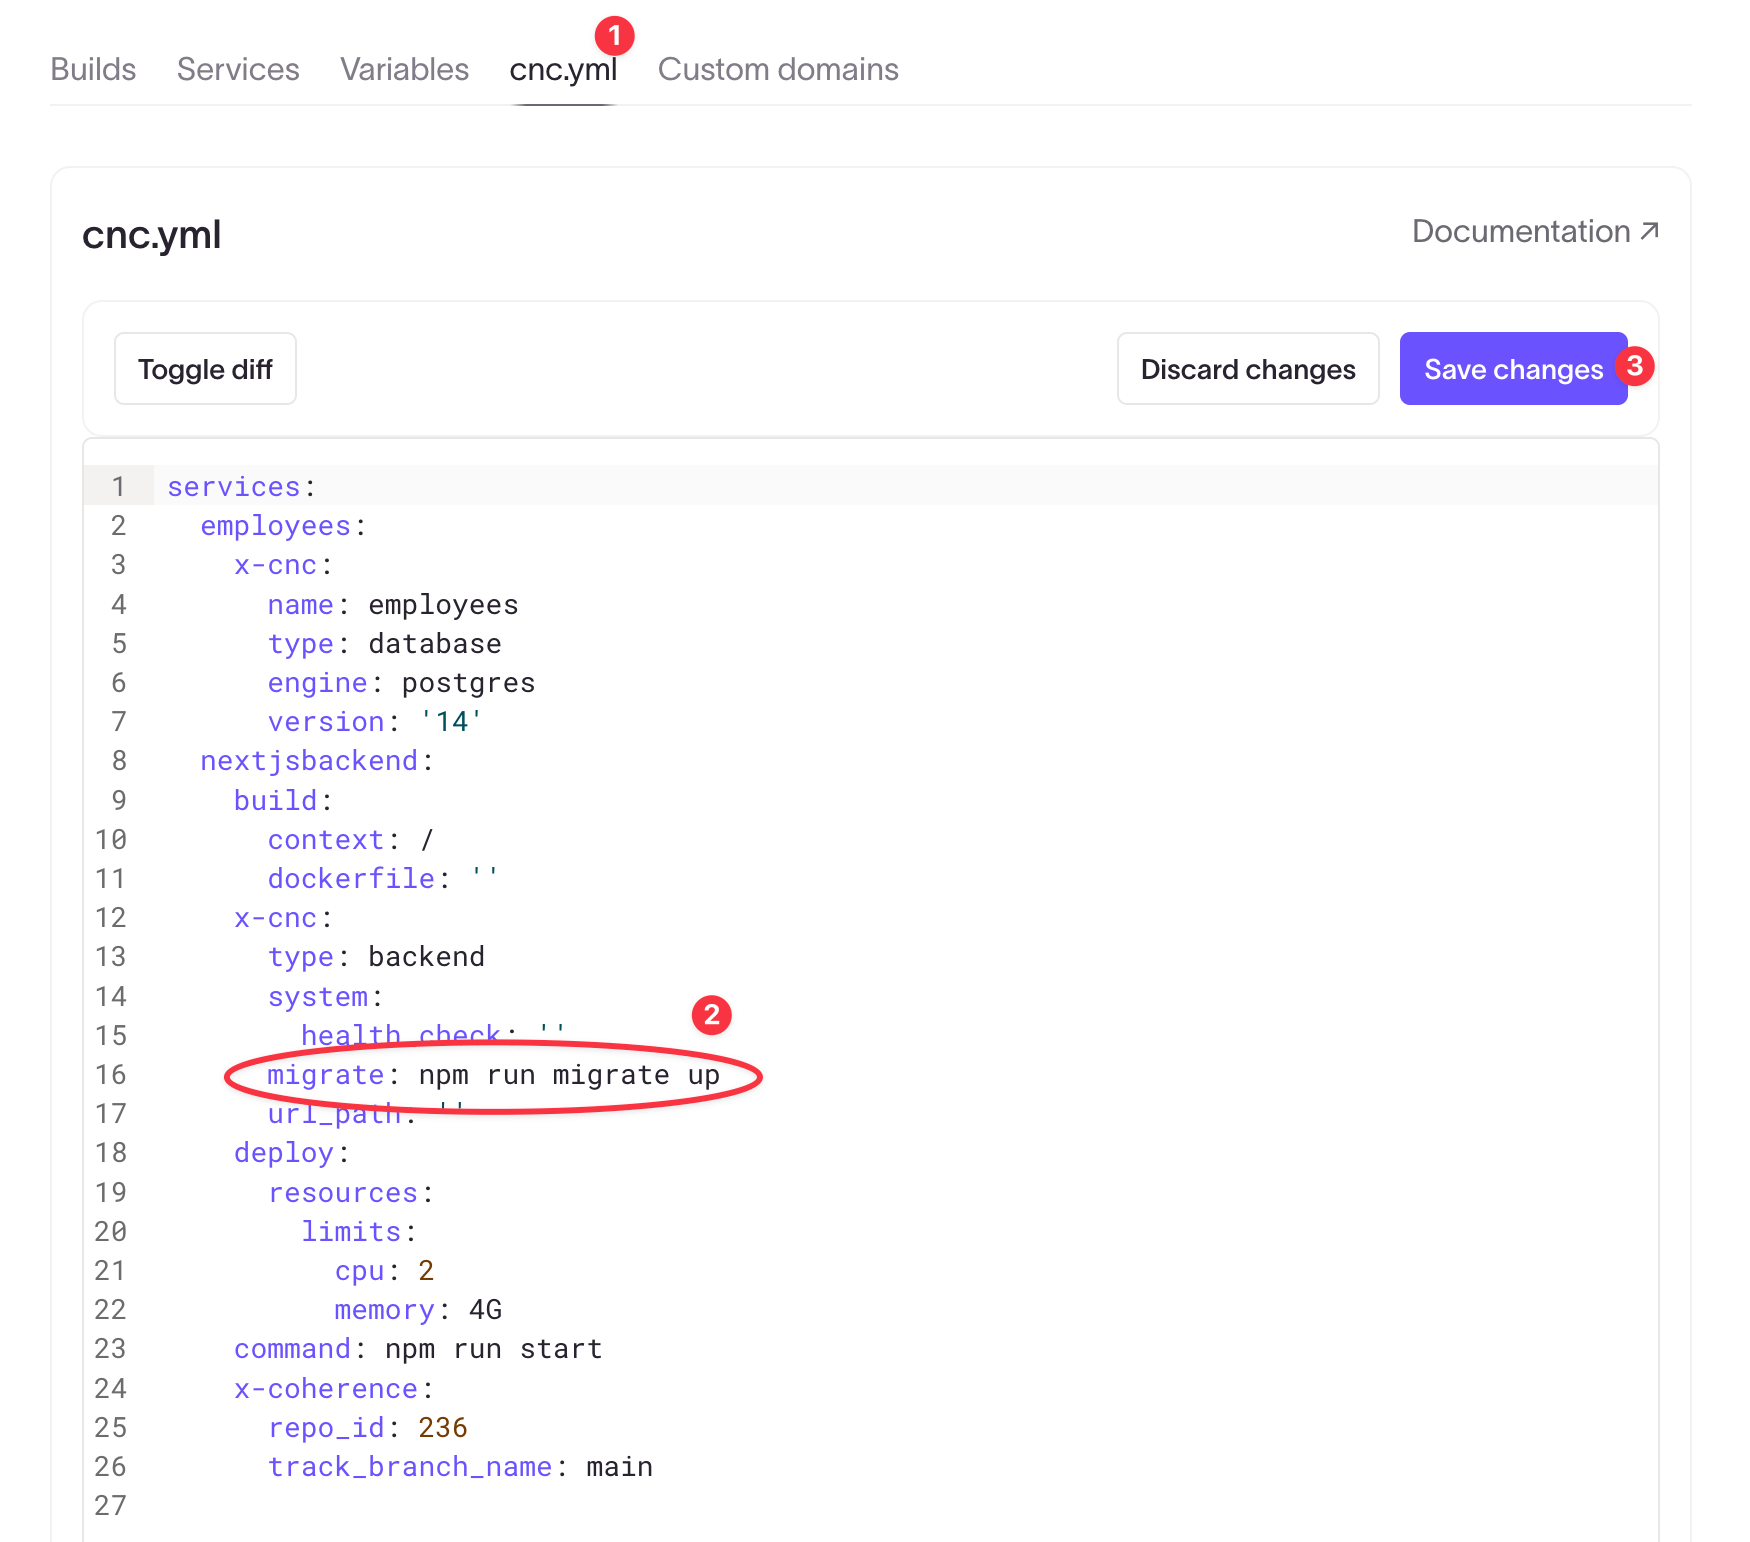
Your cnc.yml configuration should look similar to the following:
services:
  employees:
    x-cnc:
      name: employees
      type: database
      engine: postgres
      version: '14'
  nextjs:
    build:
      context: /
      dockerfile: ''
    x-cnc:
      type: backend
      system:
        health_check: ''
      migrate: npm run migrate up
      url_path: ''
    command: npm start
    x-coherence:
      repo_id: 207
      track_branch_name: main
Configure collection variables
Coherence automatically adds some environment variables to every environment. In our case, because we are using the DATABASE_URL environment variable to connect the backend application to the database, we don't need to do anything.
If your application uses a different variable name, or if you want to add any custom environment variables, you can do this either at the collections level (which apply to every environment in that collection) or to a specific environment.
See these options in the respective "Variables" tabs on the collection page and environment page.
Build and deploy the application
To deploy your application, go to the Builds tab of the environment and click New build.
Select the branch (we use main) and the commit to build from. Click Submit build to start the build process.
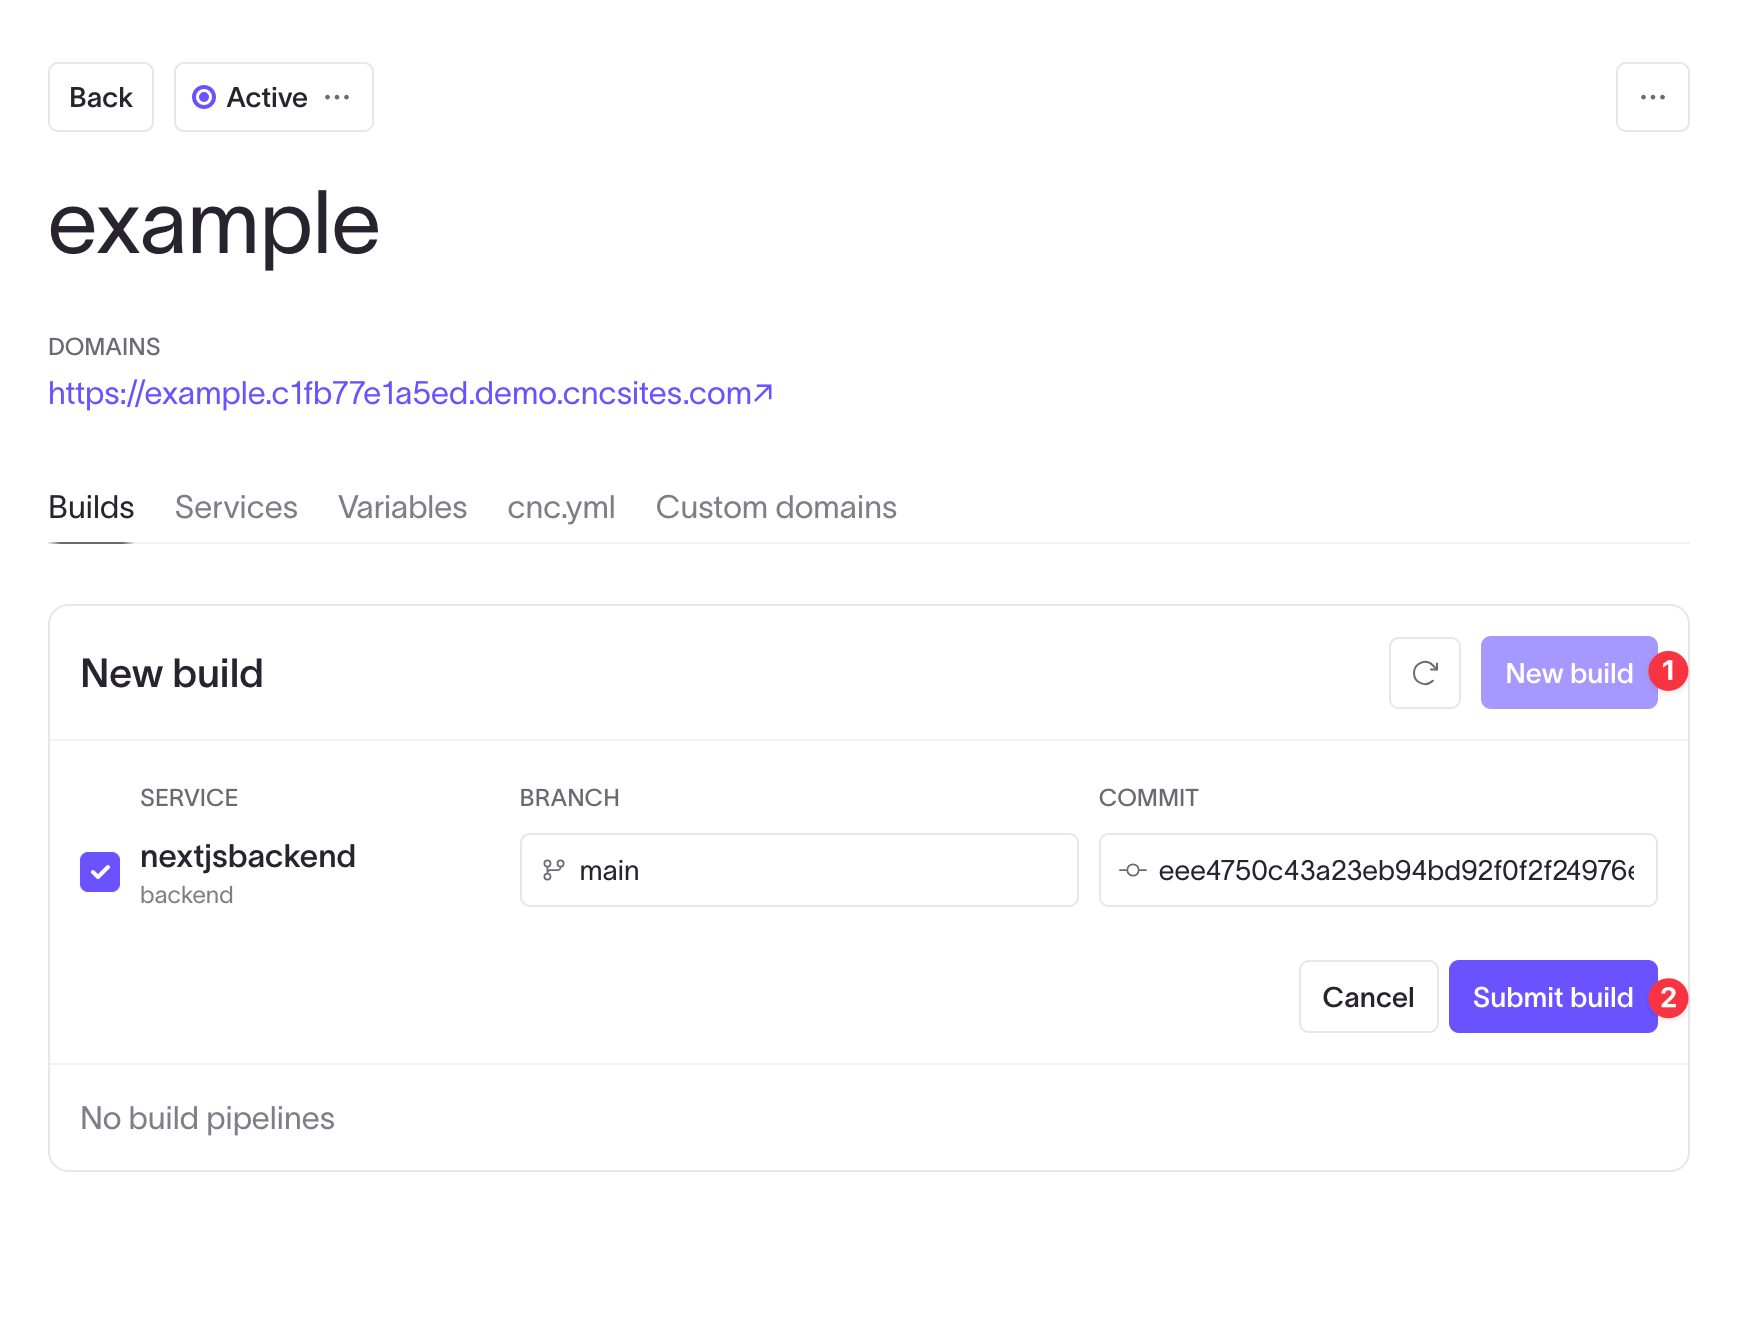
Once your environment has successfully built and deployed, you can click the link under Domains to see your deployed application.
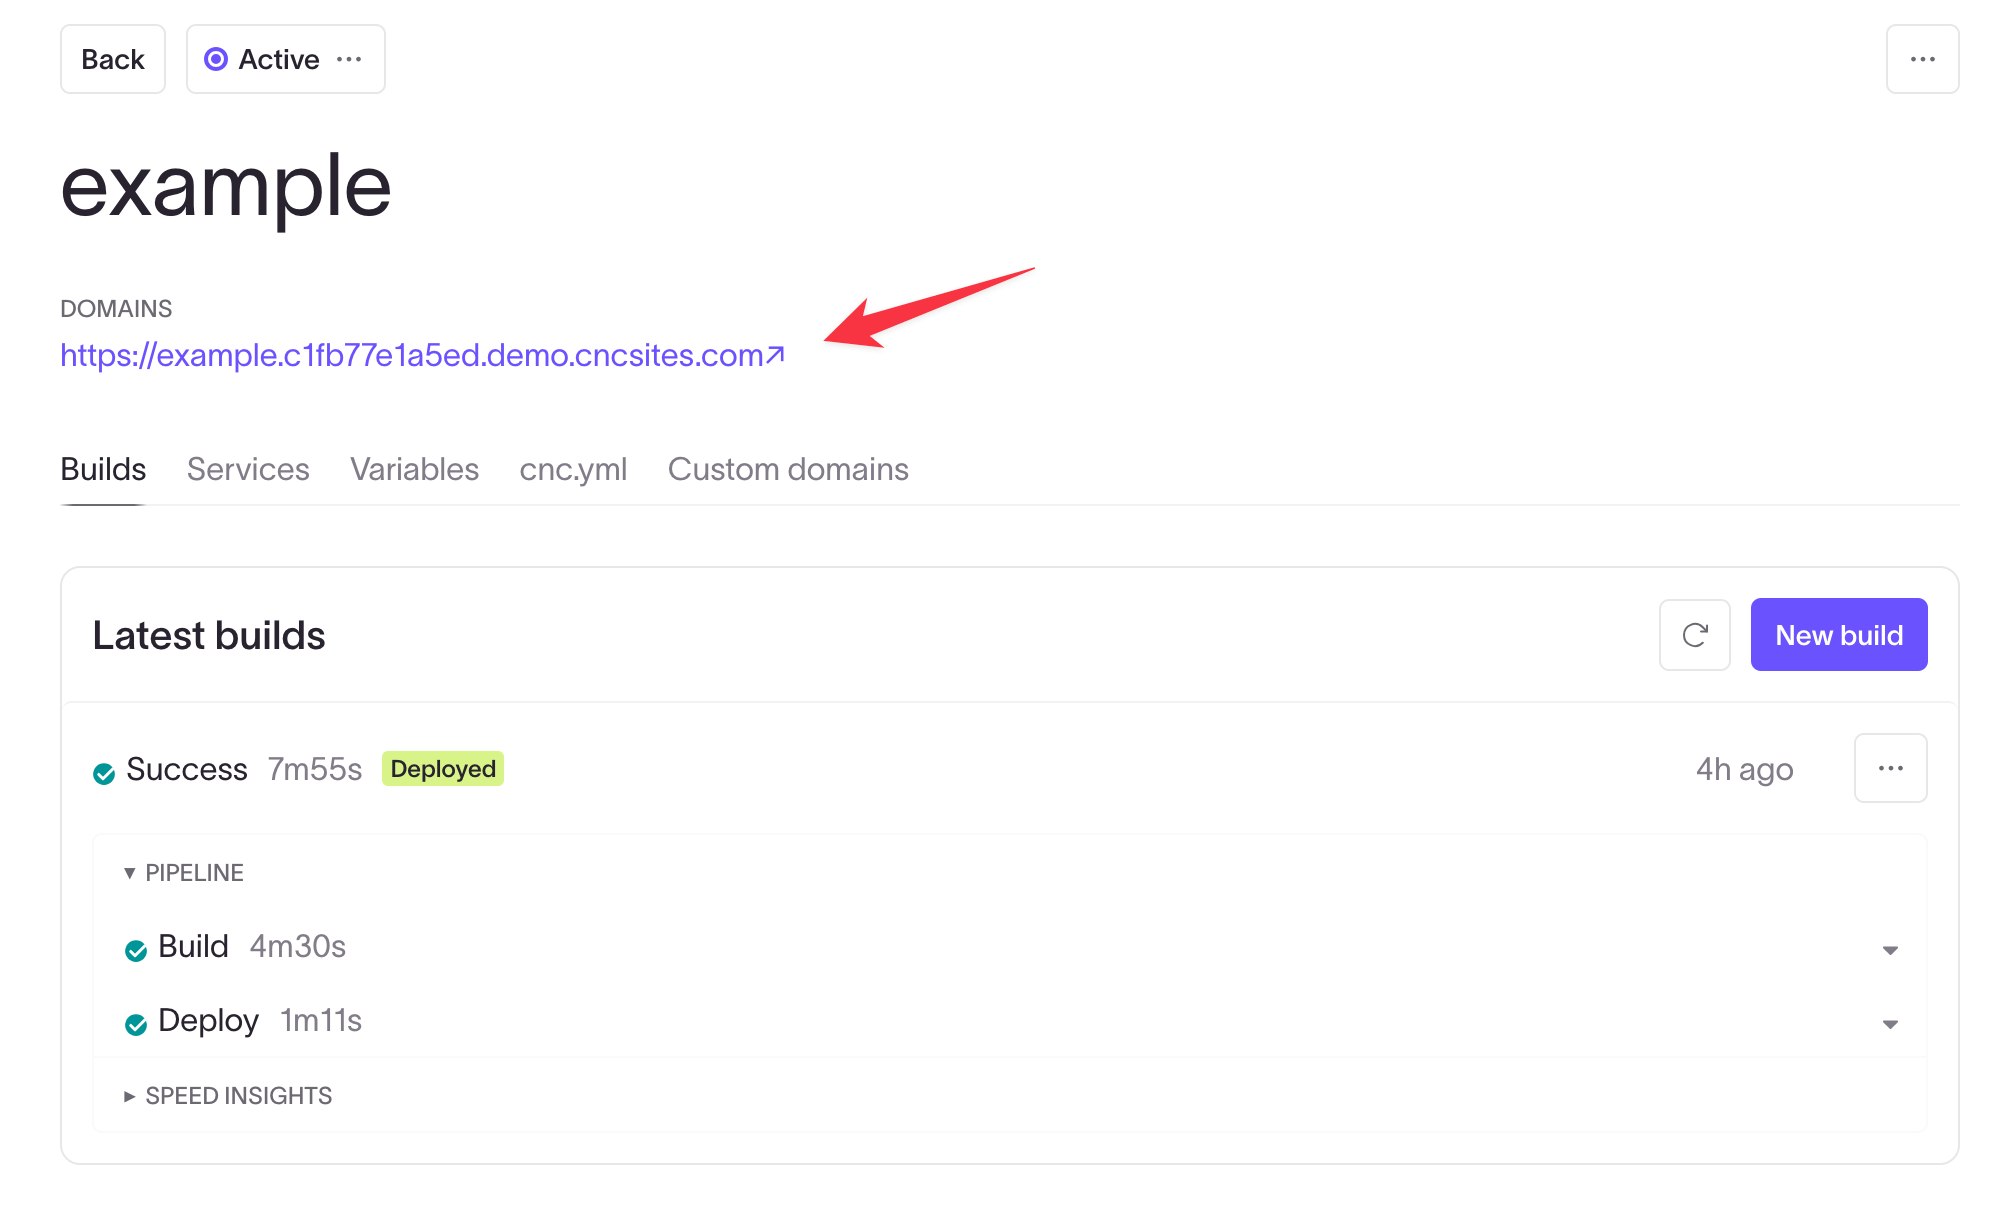
The deployed application is now accessible and can interact with the employees database.